Showing posts with label #not2shabby. Show all posts

Tuesday, July 23, 2024

Christmas in July 2024 {BYSHC} Linky Party ~ TOP Inky Inspiration Sketch 23 ~ Santa's Workshop ~ Jaded Blossom

 Hello there crafty friend!
It's day 5 of the Christmas in July 2024 {BYSHC} Linky Party!! I'm adding another sweet card to my Christmas stash! This time I played with the super cute Christmas Village: Santa's Workshop stamp set from Sponsor Jaded Blossom. I'm also sharing inspiration for the Tawny Owl Paperie Inky Inspiration Sketch Challenge 23 in the Tawny Owl Paperie Inky Inspiration Facebook group. In my continuing effort to finish off some paper scraps I did use a few scraps of pattern paper from one of my Christmas paper pads. Every little bit counts!


I paired up the cute Christmas Village: Santa's Workshop with the Brewing It Up 6x6 Paper Pad from our Sponsor Not 2 Shabby! Love these pretty papers! I adhered all of my background layers using the iCraft UltraBond Adhesive from Sponsor Therm O Web. I die cut a panel of white card stock using the Wonky Stitched Rectangle Die from Sponsor Gina Marie Designs and adhered the two smaller rectangles to the panel. I then added foam tape called iCraft 3D Foam Tape Jumbo Roll (white), also from Therm O Web, to the back of the whole combined panel and popped it up on the card.


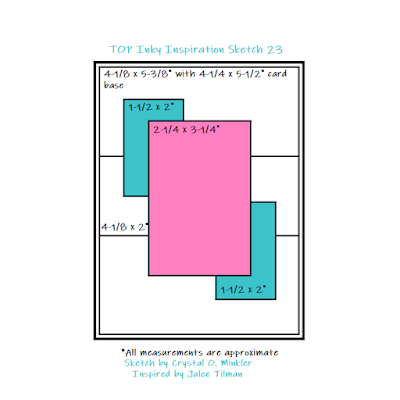
Here's a look at the fun sketch for Tawny Owl Paperie Inky Inspiration Sketch Challenge 23. The sketch, as always, is meant to inspire not require. So let the sketch lead in your design, but don't feel limited by it. A great example is how I turned the sketch for a landscape card. This fun sketch challenge ends July 29th!!


I wanted to add a bit of snow to my panel so I die cut a scrap of white card stock using the hill die from the Land Borders Die Set from Sponsor Newton's Nook Designs. I trimmed it and adhered it to the bottom of the panel. I then fussy cut Santa's Workshop. Boy was that a task! About halfway through my third or fourth Christmas light, I was wishing I had left a nice white border around the image. Hahaha... anywho, I colored the edge of the fussy cutting using a Memento Tuxedo Black marker making it all nice and neat and then I adhered it to the panel. Next I stamped a sentiment from the Big & Bold Santa's Sleigh Slimline stamp set from Sponsor Colorado Craft Company.


To finish off the card I added a bunch of cute little clay snowflakes from the Christmas Confetti Clay Embellishment Mix from Sponsor Twiddler's Nook. I love how this card turned out! And I think I used products from 7 of our amazing Sponsors. Woohoo! That may be a record!! 

Here's a quick list of the Copic markers I used: 
Workshop / Chimney: E53, E55, E57
Windows: Y11, Y15
Doorknob: Y11, Y15, Y28
Snow: C00, C1, C3
Wreath: YG11, G24, G46, R20, R14
Santa's Workshop Sign: R20, R14
Christmas Lights: R20, R14, B0000, B00, YG11, G14, Y11, Y15
Flags: R20, R14, YG11, G14
North Pole Sign: YG11, G24, G46
Pole: R20, R14, C00, C1, C3, E53, E55, E57


If you haven't already, stop by the Christmas in July 2024 {BYSHC} Linky Party to check out all the wonderful Holiday inspiration being shared!! So much amazing inspiration! You can't help but be inspired to make a card or two! Have an ink-tastic week!

Thanks so much for stopping by!
See ya next time.

Inky Hugs,
Crystal


{Please note that comment moderation is on. Your lovely comment will appear once approved.}

Wednesday, April 24, 2024

Spring into Christmas 2024 {BYSHC} Linky Party ~ Pick Me Up ~ Not 2 Shabby

 Hello there crafty friend!
I'm back with another fun holiday card for the Spring into Christmas 2024 {BYSHC} Linky Party! My card today features cute stamps from the Pick Me Up Clear Stamp set from our wonderful Sponsor Not 2 Shabby. If you follow my blog, you know I love truck stamps! This one was a must-have!!


I had a fun idea for a CAS-ish style card this time. Paired the stamps up with the Driven Snow stencil from our lovely Sponsor A Colorful Life Designs. Such a beautiful stencil! I masked the bottom portion of my card front using a piece of iCraft Removable Pixie Tape from our fabulous Sponsor Therm O Web. Without adding ink to my TE Blender Brush from our awesome Sponsor Taylored Expressions, I blended with my blue brush being sure to have a light touch around the outer edges.


I stamped the pretty trees using Twisted Citron Distress ink first. I used my mini misti so I could get it stamped with good coverage. I then used Pine Needles Distress ink only this time I pulled the ink pad down which gave the trees some texture and let the lighter green peek through in spots. I also stamped the cute truck in my mini misti and used the fabulous Pressure Pal from return Sponsor Twiddler's Nook


I colored up the truck using my Copic markers and then die cut the truck and the trees using the Pick Me Up Shabby Snips dies. I adhered the trees to the card base and added a few white glitter enamel dots from the Winter Sparkle Glitter Style Enamel Dots from our wonderful Sponsor Gina Marie Designs. I popped up the truck using 3D Foam Squares from Sponsor Therm O Web. I really love how this CAS-ish card turned out!

Here's a quick list of the Copic Markers I used:

Truck: R20, R14, R46, N0, N1, N3, N5, C1
Tree: YG11, G24, G46
Sentiment: E21, E23, E25


I hope you'll stop by the Spring into Christmas 2024 {BYSHC} Linky Party to check out all the wonderful Holiday inspiration being shared! I've been inspired by so many of the cards! I sure hope you'll stop by and check it out! Have an ink-tastic day!


Thanks so much for stopping by!
See ya next time.

Inky Hugs,
Crystal


{Please note that comment moderation is ON. Your comment will appear shortly.}

Monday, April 22, 2024

Spring into Christmas 2024 {BYSHC} Linky Party ~ Nutty or Nice? ~ Lawn Fawn

 Hello there crafty friend!
I'm back again today to share my holiday card for day 4 of the Spring into Christmas 2024 {BYSHC} Linky Party. I just adore the little scene card I created to share! The adorable squirrels and snowman come from the Nutty or Nice? Stamp Set that was a collaboration set from our wonderful sponsor Lawn Fawn and Simon Says Stamp for the 2018 STAMPtember celebration.


I paired them up with the beautiful A Shabby Christmas 6x6 paper pad from our awesome sponsor Not 2 Shabby. I die cut the red glittery paper using the largest die from the Large Cross-Stitched Rectangle Stackables die from Lawn Fawn. I also die cut a little snowy hill for my inner layer using a die from the Stitched Hillside Borders dies from Lawn Fawn, as well.


Here's a quick list of the Copic markers I used to color up these cuties:

Snowman: C00, C1, C3
Hat: N0, N1, N3, N5, R00, R20
Scarf: R00, R20
Squirrels: E21, E23, E25
Squirrel Hat: R20, R14
Squirrel Scarf: YG11, G24
Carrot Nose: YR21, YR15


I stamped the sentiment and fussy cut two fishtails for both end, mat it with a scrap of the glitter paper, and adhered it to the card. All of my layers are adhered using iCraft UltraBond Adhesive from our wonderful Sponsor Therm O Web. I did add a couple scraps of card stock underneath the snowman's head so that it would lay flat on the card.


Inspiration for my card came from this month's {BYSHC} Sketch #44. I love the simplicity of this sketch but really the possibilities are endless!


I can't believe that we're halfway through the linky party already! Stop by the Spring into Christmas 2024 {BYSHC} Linky Party to check out all the wonderful Holiday inspiration being shared!! 


Thanks so much for stopping by!
See ya next time.

Inky Hugs,
Crystal


{Please note that comment moderation is on. Your lovely comment will appear shortly.}

Saturday, April 20, 2024

Spring into Christmas 2024 {BYSHC} Linky Party ~ Cocoa Love ~ Not 2 Shabby

 Hello there crafty friend!
I'm back for Day 2 of the Spring into Christmas 2024 {BYSHC} Linky Party with another cute holiday card! It was so much fun checking out the inspiration shared yesterday for the start of the Linky Party. So many beautiful cards! Today I'm sharing a card using a sweet stamp from return Sponsor Not 2 Shabby called Cocoa Love Stamp Set.


If you follow my blog, you may be experiencing deja vu! LOL! I copied a card I made back in February for our sketch challenge. I just changed up the papers. If you're interested in seeing this cards twin, you can check it out here... {BYSHC} Sketch Challenge 42 ~ Cocoa Love ~ Not 2 Shabby.


Here's a quick list of the Copic markers I used to color up this cute stamp:

Brown: E21, E23, E25
Red: R20, R14, R37
White: C00, C1, C3
Warm Gray: W00, W1, W2
Cheeks: R00, R20


I adhered all my layers together using iCraft UltraBond Adhesive from our wonderful Sponsor Therm O Web. I heat embossed the sentiment using Sugar Cube Pigment ink from our lovely Sponsor Taylored Expressions. I die cut the heat embossed sentiment and the cup using the Cocoa Love Shabby Snips Die Set. I adhered the two pieces together with the sentiment overlapping the cup a bit and then I added a bunch of iCraft 3D Foam Squares from Therm O Web to the back of both and popped them up on the card.


My card design was inspired by {BYSHC} Sketch 42. I used the measurements directly from the sketch for my card. The only thing I changed up was adding the cup of cocoa with my sentiment for my focal piece. I really enjoyed this sketch!


Before you leave, be sure to stop by Not 2 Shabby! Jamie shared a 15% OFF code with us to shop... use code BYSHC! Woohoo!! And if you haven't already, stop by the Spring into Christmas 2024 {BYSHC} Linky Party to check out all the wonderful Holiday inspiration being shared!! Have a fantastic day!


Thanks so much for stopping by!
See ya next time.

Inky Hugs,
Crystal


{Please note that comment moderation is ON. Your comment will appear shortly.}

Friday, March 29, 2024

{BYSHC} Sketch Challenge 43 ~ Gingerbread Men Clay Embellishments ~ Twiddler's Nook

Hello there crafty friend!
Today I'm sharing one last card for the current sketch challenge over in the Build Your Stash Holiday Cardmakers Facebook group! A sweet gingerbread card! I used the adorable Gingerbread Men Clay Embellishments from our wonderful sponsor, Twiddler's Nook


I paired the sweet gingerbread men clay bits with the adorable Gingerbread Kisses 6x6 Paper Pad and ephemera from Not 2 Shabby. Sadly, it looks like these both are out of stock, but you can sign up to be put on the wait list for the papers when they come back.


All my papers are trimmed to the sketch measurements except the squares. I used the Scallops & Squares {nesting dies} from Unity Stamp Co. to die cut the pattern paper and a red mat from Real Red Card Stock from Stampin' Up. How cute are those little gingerbread men! They are having a party on the card! Hee hee!


To add a bit of dimension to the card, I added foam tape to the back of the ephemera and popped it up on the card. The cute sentiment is from the Gingerbread Hugs stamp set from Not 2 Shabby. Bummer... I am not seeing this cute set on the website anymore. Such a shame... it's just too cute! I prepped the card stock using the TE Anti-Static Powder Tool. Stamped the sentiment in my Mini Misti using the awesome Pressure Pal also from Twiddler's Nook. This handy tool isn't too heavy for my hand and it helps me to get even pressure on the stamp when I'm using my Mini Misti. I highly recommend it! Anywho, I heat embossed the sentiment with Sugar Cube Pigment ink from Taylored Expressions, Alabaster White Embossing Powder from Brutus Monroe on Real Red Card Stock from Stampin' Up and melted with a Wagner Precision Heat Tool. I like to use a Swiffer Dry Sweeping Cloth to wipe off the powder once I'm done embossing but definitely wait until it's cooled. It doesn't take long to cool... this step may save you from having to redo the heat embossing. Good advice from someone who has made the mistake of smudging up a heat embossed image! LOL!


Here's a look at {BYSHC} Sketch Challenge 43 for the month of March. Loving all the layers in this fun sketch! There's just a few more days to play along! I hope you'll join us. If you're interested in seeing a bit more inspiration for this sketch, check out the amazing inspiration from the design team over on the {BYSH} Cardmakers blog! Lots of beautiful inspiration this month from the design team.


Thanks so much for stopping by!
See ya next time.

Inky hugs,
Crystal


{Please note that comment moderation is ON. Your lovely comment will appear shortly.}

Friday, March 22, 2024

{BYSHC} Sketch Challenge 43 ~ Peppermint Candy Embellishment Mix ~ Twiddler's Nook

Hello there crafty friend!
I'm so happy to finally be playing again with the sketch challenge over in the Build Your Stash Holiday Cardmakers Facebook group! Today I'm sharing a sweet Christmas card featuring the Peppermint Candy Embellishment Mix from this month's fabulous sponsor, Twiddler's Nook! Unfortunately, it looks like these peppermints aren't available anymore but there's another fun mix called Christmas Confetti Clay Embellishment Mix that is available and includes some cute peppermints in the mix. 


Twiddler's Nook has an amazing assortment of clay embellishment mixes!! I have a whole bunch in my collection. Some people use them for shaker cards, but I really like to use some of the bits on my cards. I used just a handful of peppermints for this card. 


I paired up the cute peppermint clay bits with the beautiful Peppermint Latte 6x6 Paper Pad and the coordinating ephemera pack from Not 2 Shabby. I love using paper pads when I'm working with so many layers! The papers are already made to coordinate. I just need to decide which papers I want where! I mat each of my paper layers with Real Red card stock from Stampin' Up. The cute ephemera was the perfect peppermint touch!


I die cut the circle of Stampers Select White Card Stock from Papertrey Ink using the Scallops & Circles {nesting dies} from Unity. The sentiment is from the Warm & Cozy Stamp Set from Not 2 Shabby. I just love how this card turned out and it was so easy just following along with the measurements from the sketch.


Here's a look at {BYSHC} Sketch Challenge 43 for the month of March. Loving all the layers in this fun sketch! I can't wait to see what everyone does with it. I hope you'll join us and play along with the sketch! If you're interested in seeing a bit more inspiration for this sketch, check out the amazing inspiration from the design team over on the {BYSH} Cardmakers blog! Lots of beautiful inspiration this month from the design team.


Thanks so much for stopping by!
See ya next time.

Inky hugs,
Crystal


{Please note that comment moderation is ON. Your lovely comment will appear shortly.}

Friday, February 23, 2024

{BYSHC} Sketch Challenge 42 ~ Farmhouse Christmas ~ Not 2 Shabby

Hello there crafty friend!
I'm sharing one last card for the {BYSHC} Sketch Challenge 42 hosted in the Build Your Stash Holiday Cardmakers Facebook group! Today I'm sharing a sweet Christmas card featuring the pretty barn from the Farmhouse Christmas stamp set from our lovely sponsor Not 2 Shabby! We've changed things up this year and Not 2 Shabby is Sponsoring our {BYSHC} Sketch Challenge 42 this month!! Jamie, the owner of Not 2 Shabby, has generously offered up a fun-filled Christmas prize package for one lucky winner of the challenge! Thanks so much, Jamie!


I stamped the pretty barn from the Farmhouse Christmas stamp set using Memento Tuxedo Black ink. I colored it up with Copics and fussy cut it.


I paired up the barn with the gorgeous A Shabby Christmas 6x6 paper pad. Both of these lovely items I just got in my recent order. Have you taken advantage of the 15% OFF code that Jamie shared with us?! I stocked up on some Christmas papers and ephemera... and I got this pretty stamp set, too! Woohoo! Here's the code in case you want to do some shopping over at Not 2 Shabby... BYSH15.


I stamped the sentiment using Barn Door Distress Oxide ink and fussy cut it. I didn't want to cover up the barn so I ended up just putting the sentiment under the barn a bit. Both the barn and sentiment are popped up with foam tape.

Here's a quick list of the Copic markers I used:

Wreath / Banner: YG11, G24, G46, R20, R14, R46
Barn: E08, E19, E09
Snow: C00, C1, C3


Here's a look at {BYSHC} Sketch Challenge 42 for the month of February. This has been such a fun sketch! The entries this month have all been so awesome! I hope you'll join us and play along with the sketch. There's still some time! The challenge ends February 29th. If you're interested in seeing a bunch more inspiration for this sketch, check out the amazing inspiration from the design team over on the {BYSH} Cardmakers blog! Since it's a short month there's a WHOLE bunch of inspiration like two weeks worth on the {BYSHC} blog today.


Thanks so much for stopping by!
See ya next time.

Inky hugs,
Crystal


{Please note that comment moderation is ON. Your lovely comment will appear shortly.}

Friday, February 16, 2024

{BYSHC} Sketch Challenge 42 ~ Pattern Papers with Ephemera ~ Not 2 Shabby

Hello there crafty friend!
I'm back sharing inspiration for the sketch challenge over in the Build Your Stash Holiday Cardmakers Facebook group! Today I'm sharing three super quick cards using the coordinating paper pads and ephemera from Not 2 Shabby! I love the papers and ephemera from Not 2 Shabby! They coordinate so well and they're always so beautiful! Don't forget we're changing things up for 2024 and Not 2 Shabby is Sponsoring our {BYSHC} Sketch Challenge 42! Jamie has generously offered up a super fun-filled Christmas prize package for one lucky winner! Yay! Thank you so much, Jamie!


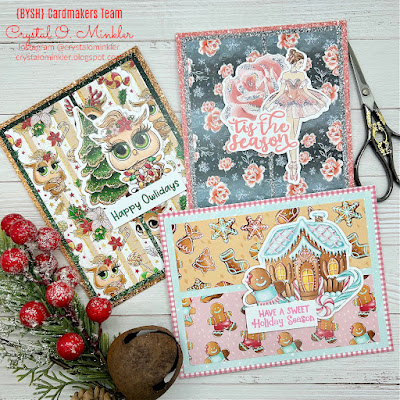
Here's a look at all three cards together! Aren't they just too cute!?


First up is the adorable owl papers and ephemera from the Deck the Owls 6x6 paper pad and the coordinating ephemera. Love the beautiful owls in these papers! I also love the glitter paper... it's so sparkly but doesn't have any of the gritty feel of actual glitter. Which also means no glittery mess! 


I used the measurements from the sketch for this card. I paired up two ephemera pieces for this one. I stamped a sentiment from the Holiday Owls stamp set using Rustic Wilderness Distress Oxide ink. I trimmed up the sentiment and adhered them all together and then added foam tape to the back.


For my second card I used the gorgeous Winter Magic 6x6 paper pad and coordinating ephemera. The papers in this paper pad are absolutely gorgeous!! I just had to use a couple of the glitter papers for this one too! 


I stamped the sentiment from the Nutcracker Dolls stamp set using Saltwater Taffy Distress Oxide ink. It looks so nice with the ephemera! I combined a couple ephemera for this card too. I adhered the ephemera with the sentiment and added foam tape to the back of all three pieces and popped them up on the card.


My third and last card featuring the adorable Gingerbread Kisses 6x6 paper pad and coordinating ephemera. Now the paper strips for this one are a bit smaller because I just used pieces that were already cut in the pack. 


No need to combine ephemera for this one. All the cute images were combined on one piece of ephemera! Love it! I stamped the sentiment from the Gingerbread Hugs stamp set using Kitsch Flamingo Distress Oxide ink. I adhered the sentiment to the ephemera and added foam tape to the back. I love the dimension that the popped up ephemera gives to the cards.


Here's a look at {BYSHC} Sketch Challenge 42 for the month of February. Loving this fun sketch! I hope you'll join us and play along with the sketch! If you're interested in seeing a bit more inspiration for this sketch, check out the amazing inspiration from the design team over on the {BYSH} Cardmakers blog! The design team made some really beautiful cards! Have an ink-tastic day!


Thanks so much for stopping by!
See ya next time.

Inky hugs,
Crystal


{Please note that comment moderation is ON. Your lovely comment will appear shortly.}

Thursday, February 1, 2024

{BYSHC} Sketch Challenge 42 ~ Cocoa Love ~ Not 2 Shabby

Hello there crafty friend!
It's time for a new sketch challenge over in the Build Your Stash Holiday Cardmakers Facebook group! Today I'm sharing a sweet Christmas card featuring the cute cup of cocoa from the Cocoa Love Stamp Set from Not 2 Shabby! We're changing things up for 2024 and Not 2 Shabby is Sponsoring our {BYSHC} Sketch Challenge 42! Jamie has generously offered up a super fun-filled Christmas prize package for one lucky winner! Yay! Thank you so much, Jamie!


I paired up the adorable cup of cocoa with the Hot Cocoa Warm Hearts Paper Pad. It just made sense! I used papers from the paper pad for all of my layers on this card. And as always, I adhered it to a white A2 top fold card base using Stampers Select White card stock from Papertrey Ink.


I stamped the sweet cup using Memento Tuxedo Black ink and colored it up with my copic markers. Confession... I actually was looking at the stamp set on the website and saw this color combination shared in a sample. I thought it was so cute so I kinda replicated it. Here's a quick list of the copic markers I used:

Brown: E21, E23, E25
Red: R20, R14, R37
White: C00, C1, C3
Warm Gray: W00, W1, W2
Cheeks: R00, R20


I used the measurements directly from the sketch for my card. The only thing I changed up was adding the cup of cocoa with my sentiment for my focal piece. I die cut the heat embossed sentiment and the cup using the Cocoa Love Shabby Snips Die Set. I adhered the two pieces together with the sentiment overlapping the cup a bit and then I added a bunch of foam tape to the back of both and popped them up on the card.


Here's a look at {BYSHC} Sketch Challenge 42 for the month of February. Loving this fun sketch! I can't wait to see what everyone does with it. I hope you'll join us and play along with the sketch! If you're interested in seeing a bit more inspiration for this sketch, check out the amazing inspiration from the design team over on the {BYSH} Cardmakers blog! You won't regret it! The design team made some really beautiful cards!


Thanks so much for stopping by!
See ya next time.

Inky hugs,
Crystal


{Please note that comment moderation is ON. Your lovely comment will appear shortly.}

Wednesday, November 1, 2023

{BYSHC} Sketch Challenge 39 ~ Gingerbread Kisses ~ Not 2 Shabby

Hello there crafty friend!
It's time for a new sketch challenge over in the Build Your Stash Holiday Cardmakers Facebook group! Today I'm sharing three Christmas cards using adorable papers and ephemera from Not 2 Shabby called Gingerbread Kisses!


You may remember these pretty papers and ephemera from the card I shared last month for Sketch 38. I started these cards back then when I had the papers out on my desk. I couldn't wait to play and give this sketch a try.


I cut three pieces of the pattern papers to 4-1/4 x 5-1/2". I then used a ruler and a pencil to mark off the measurements noted in the sketch. Each of the papers is then adhered to a piece of white card stock measuring 4-1/4 x 5-1/2". I did this just in case the papers didn't line up quite right but they worked out wonderfully. I then Adhered the card fronts to white A2 top fold card bases that I turned on the side for a landscape card.


Next I die cut three circles from Vellum card stock using the stitched circle die from the Circle Frames Die Set from Newton's Nook Designs. I adhered three adorable ephemera pieces from the Gingerbread Kissed ephemera {unfortunately, I'm not seeing these on the Not 2 Shabby website anymore} to the vellum circles and then adhered the circles to the card just adding glue behind the ephemera pieces.


To finish these off I stamped the Winter Wishes sentiment from the Pick Me Up Stamp Set from Not 2 Shabby. A super cute truck stamp set that I hope to play with again very soon! I stamped the sentiment three times on a long scrap of white card stock and then trimmed them. I cut a quick fishtail end on both side, added some foam tape to the back of each of them and popped them up on the cards. So easy peasy and they turned out so cute!


Here's a look at {BYSHC} Sketch Challenge 39 for the month of November. I am loving this sketch! The possibilities are endless with this one depending on what papers you use. I'm excited to see what everyone does with it. I hope you'll join us and play along with the sketch! If you're interested in seeing a bit more inspiration for this sketch, check out the amazing inspiration from the design team over on the {BYSH} Cardmakers blog! You won't regret it! The design team had a blast with this one!


Thanks so much for stopping by!
See ya next time.

Inky hugs,
Crystal


{Please note that comment moderation is ON. Your lovely comment will appear shortly.}