Showing posts with label coffee card. Show all posts

Monday, August 18, 2025

Inky Paws Challenge #243 ~ Sketch Challenge {Week 3}

Hello there crafty friend!
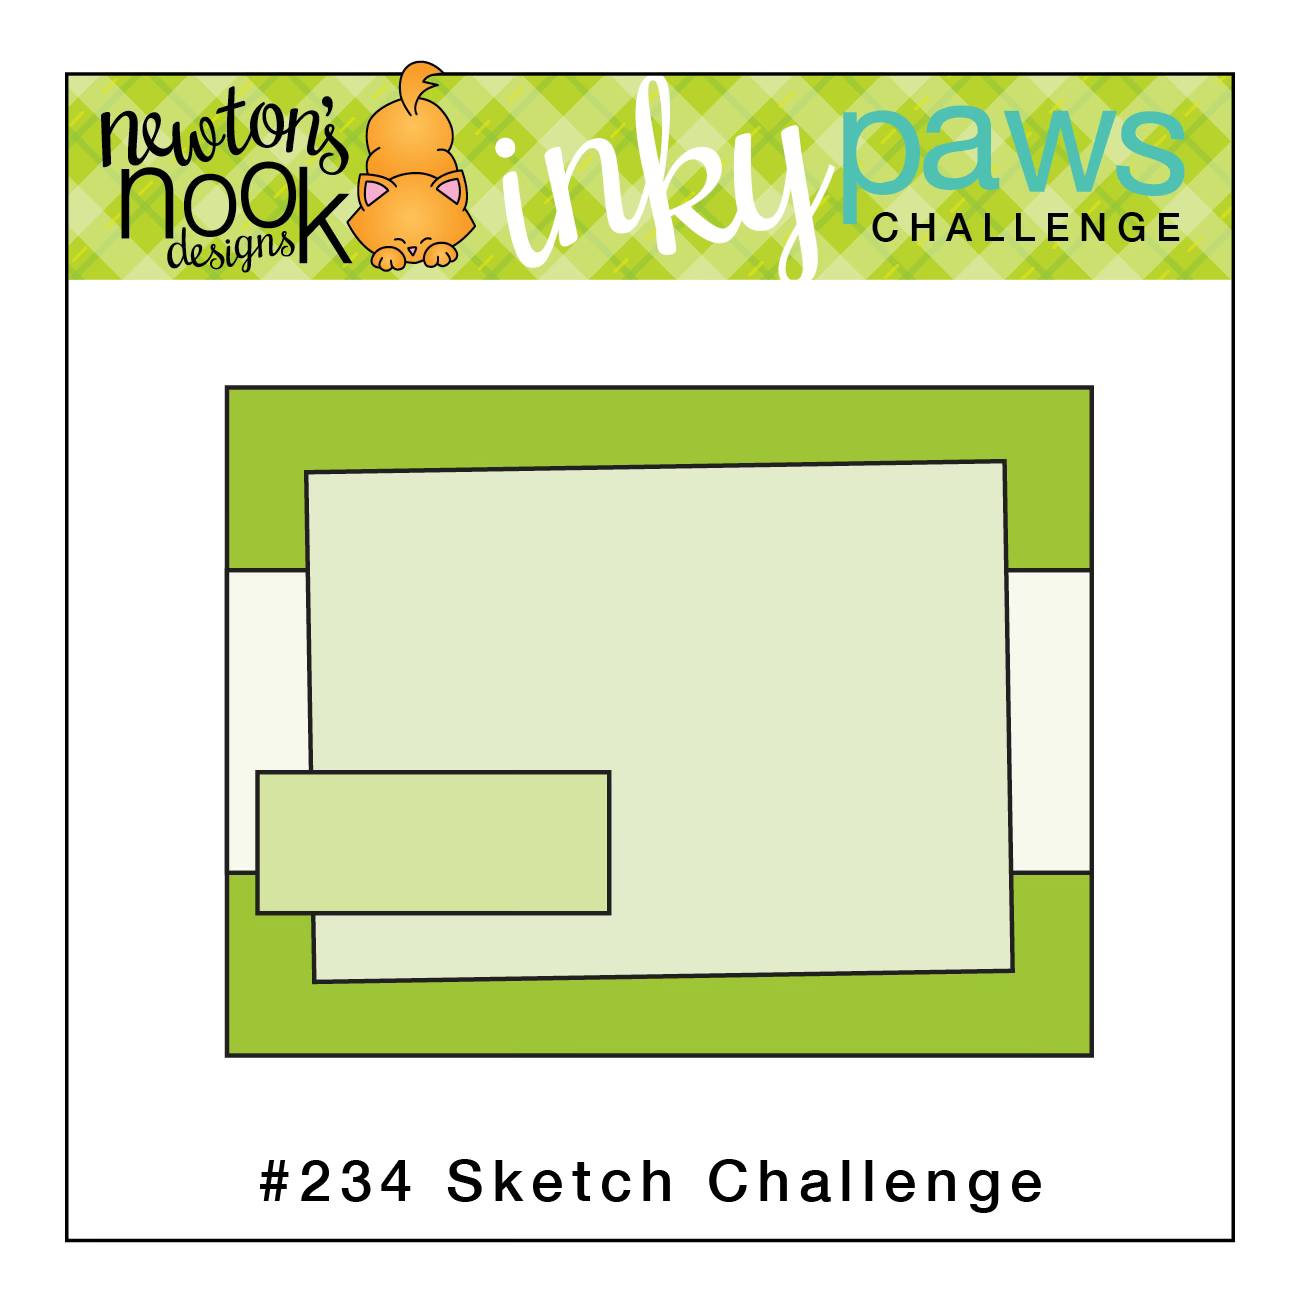
 Sharing some more inspiration for week 3 of the Inky Paws Challenge #243 - Sketch Challenge! You have until Friday, August 29th to get your entries in for the challenge and a chance to win a $20 store credit to Newton's Nook Designs!


Have you played along with us yet? I sure hope you do. This is a super fun sketch. So fun that I turned it upside down. I wanted the brown to ground my images.


 I made a fun Fall card using the sweet Autumn Read Stamp Set. I die cut the cute stacks of books using the coordinating dies from the Autumn Read Die Set.


I adhered the stack of books together and then popped them up on the card with foam tape. I also popped up the sentiment that I had heat embossed with white pigment ink and white embossing powder.
Here's a quick list of the Copic markers I used:
Pumpkins / Mug: Y11, YR20, YR15, E000, E11, E25
Yellows: Y000, Y11, YR23
Orange: YR20, YR15
Browns: E000, E11, E25
Blues: BG000, BG72
White: C0, C2


I used the fantastic Card Layout 4 Die to die cut my papers this time. If you don't have this die in your stash and you're not quite sure how to cut the pieces, you can check out my blog post from last week to see the measurement guide I shared for this sketch. I used three fun pieces of pattern paper from the Autumn Meows 6x6 Paper Pad. I traced around the shapes using the die as a guide and then cut out the papers. And then I was able to die cut the three pieces of pattern paper. I die cut a piece of Kraft card stock to cut out the frame. I adhered all of the pieces for my background to a Kraft A2 top fold card base. I finished off the card with a few glittery enamel dots from my stash.


Now it's your turn to get your paws inky with your Newton's Nook Designs products and create a card using this month's sketch. Be sure to link up to the Inky Paws Challenge! Can't wait to see your projects!


Thanks so much for stopping by!

Inky Hugs,
Crystal

Monday, July 7, 2025

Inky Paws Challenge #242 ~ Color Challenge {Week 1}

Hello there crafty friend!
It's time for a new Inky Paws Challenge! We're playing with a fun mix of colors this month for a Color Challenge! I sure hope that you'll join us and play along with your Newton's Nook Designs products! Don't forget... our challenges are a whole month long so there's lots of time to play along! Yay! You have until Friday, August 1st to get your entries in for the #242 Color Challenge and a chance to win a $20 store credit to Newton's Nook Designs!


Our beautiful colors are... Cotton Candy Pink, Orange Sherbet, Turquoise, and Royal Blue!! Love this pretty combination of colors!


I stamped the beautiful coffee themed heart from the Heartfelt Coffee Stamp Set with Memento Tuxedo Black ink and colored up all the coffee cups with Copic markers. 

Here's a quick list of the Copic markers I used for the kitty and heart:
White: C0, C2
Cotton Candy Pink: RV10, RV52
Orange Sherbet: YR20, YR15
Turquoise: BG000, BG01, BG05
Royal Blue: B02, B24, B28
Coffee: E21, E25
'BREW': RV10, RV52


I die cut the heart using a die from the Heart Frames Die Set, but the scrap of white card stock wasn't big enough. Poor planning on my part! LOL! So I trimmed around the stitching on the heart and adhered it to another heart that I die cut from another piece of white card stock. 


I made a fun background using three of the colors and the Plaid Stencil Set. I blended
Kitsch Flamingo and Spiced Marmalade Distress Inks over the first stencil in the set. And then I blended Broken China Distress Ink over the second stencil to finish off the pattern. I really like how it turned out. I popped up the heart and the sentiment using foam tape.


Now it's your turn to get your paws inky with your Newton's Nook Designs products and create a project using the color combo of Cotton Candy Pink, Orange Sherbet, Turquoise, and Royal Blue. Be sure to link up to the Inky Paws Challenge! Can't wait to see your projects!

Thanks so much for stopping by!

Inky Hugs,
Crystal

Tuesday, April 15, 2025

Tawny Owl Paperie Inky Inspiration Sketch 31 ~ Caffeinated Girls ~ Angie Blom Digital Designs

 Hello there crafty friend!
Today I'm also sharing another card for the Tawny Owl Paperie Inky Inspiration Sketch 31 in the Tawny Owl Paperie Inky Inspiration Facebook group. I felt like playing with some digi stamps so I looked through my files and found the gorgeous Caffeinated Girls from Angie Blom Digital Designs. Love the images in this fab set!


I combined and resized a few different images and a sentiment from the Caffeinated Girls digital stamp set in a Word Document. I printed it off and started coloring. Sadly, I started coloring before I picked my papers so the greens in my coloring were a little off. Otherwise, it works really well with the papers I found in my stash.

Here's a list of the Copic Markers I used:
Skin: E000, E00, E11
Hair: YR20, E34
Sweater: R00, R32, YG11, YG03, G99
Cup: C00, C2, BG10, BG72
Coffee Cup Background: C00, C2, E000, E21, E25, R00, R11, R12, R14, R21, R27, BG10, BG72, YG03, YG67


Here's a look at the fun sketch for Tawny Owl Paperie Inky Inspiration Sketch 31. The sketch, as always, is meant to inspire not require. So let the sketch lead in your design, but don't feel limited by it. I'd love for you to join in the fun and play with us in the Tawny Owl Paperie Inky Inspiration Facebook group.


I paired up this girl with the Coffee paper pad from Echo Park Paper Co. I've had these papers forever! Mostly just scraps leftover now so it was perfect for this card and I love how the colors worked so well with my coloring. 


I finished off this cute card with a few enamel dots from the coordinating Coffee enamel dots from Echo Park Paper Co. I just love how this turned out! I hope you can find time to play along with the sketch challenge. I can't wait to see what you create. Have an ink-tastic week!

Thanks so much for stopping by!
See ya next time.

Inky Hugs,
Crystal


{Please note that comment moderation is on. Your lovely comment will appear once approved.}

Monday, January 13, 2025

Inky Paws Challenge #236 ~ Color Challenge {Week 2}

Hello there crafty friend!
It's week two of the Inky Paws Challenge! We're playing with a fun mix of colors this month for a Color Challenge! I sure hope that you'll join us and play along with your Newton's Nook Designs products! Our challenges are now a whole month long so there's lots of time to play along with us! Yay! You have until Friday, January 31st to get your entries in for the #236 Color Challenge and a chance to win a $20 store credit to Newton's Nook Designs!


We have a gorgeous mix of colors that are perfect for so many different occasions. Our lovely colors are... Cherry Red, Dreamy Turquoise, Buttery Brown, and White!! 


I had so much fun making this card! I started by die cutting the background and the brown papers from the Coffee Shop 6x6 Paper Pad. I die cut the background and the ticket shape using dies from the Framework Die Set.


Inspiration for my card comes from the Tawny Owl Paperie Inky Inspiration Sketch Challenge 28. The sketch, as always, is meant to inspire not require. So let the sketch lead in your design, but don't feel limited by it. I'd love for you to join in the fun over at the Tawny Owl Paperie Inky Inspiration Facebook group.


I die cut the coffee cups and hearts using dies from the Coffee Silhouettes Die Set. I love these dies and I'm super happy I finally played with them. I die cut the cups from Kraft, Stampers Select White, and Pure Poppy card stock from Papertrey Ink. And the bottom cup is die cut from Bermuda Bay card stock from Stampin' Up.


I finished off the card with a fun {and true!} sentiment from the Newton Loves Coffee Stamp Set. It's stamped with Memento Tuxedo Black ink. I trimmed it up and adhered it directly on the card. No foam tape for this one.


Now it's your turn to get your paws inky with your Newton's Nook Designs products and create a project using the color combo of Cherry Red, Dreamy Turquoise, Buttery Brown, and White. Be sure to link up to the Inky Paws Challenge! Can't wait to see your projects!


Thanks so much for stopping by!
See ya next time.

Inky Hugs,
Crystal


{Please note that comment moderation is on. Your lovely comment will appear once approved.}

Tuesday, December 17, 2024

Unity Advent Calendar 2024 Day 17 ~ Unity Stamp Co.

Hello there crafty friend!
It's Day 17 of the 2024 Advent Calendar from Unity!! I am loving the creations being shared with these fun and adorable Advent Calendar stamps. Keep them coming! Today I'm also sharing inspiration for the Tawny Owl Paperie Inky Inspiration ALL the Sketches Challenge!


Today's Advent Calendar stamp is a beautiful stack of books with a pretty coffee cup! I stamped the image with Black Amalgam ink from Gina K. Designs and colored it up with some Copic markers.

Here's a quick list of the Copic markers I used:
Cup: BG10, BG70, BG72, E70, E71, E74
Books: E70, E71, E81, E84, E87, YR21, YR24, YG91, YG93, R81, R83,
Pages: C00, C1 
Flower: R81, R83, R85, YR21, YR24, YG93 

You can check out my video revealing the Advent Calendar Day 17 stamp and my process in making this card here... Unity Advent Calendar 2024 Day 17 | Unity Stamp Co.


There are 27 different sketches to inspire us to create this month! Here's a look at six of them. I was inspired by the one on the top far right... Sketch 3.


A closer look at Tawny Owl Paperie Inky Inspiration Sketch 3! I love this sketch! It's so fun to use with scraps. Stop by the Tawny Owl Paperie Inky Inspiration Facebook group to check out the challenge and see all the inspiration for each of the sketches. Maybe you'll be inspired to play along with us!


I die cut the stack of books with the smallest die from the Scallops & Circles {nesting dies}. Popped up the circle with foam tape.


I paired up the books and coffee cup with the Perk Me Up {paper pack}The pretty sentiment is from the Coffee is Not Enough stamps. I heat embossed it with my usual combo of  products: TE Anti-Static Powder Tool, Sugar Cube Pigment Ink from Taylored Expressions, Alabaster White Embossing Powder from Brutus Monroe, and a Wagner Precision Heat Tool.

I'll be back tomorrow for Day 18 of the 2024 Advent Calendar from Unity!
Have an inkredible day!


Thanks so much for stopping by!
See ya next time.
 
Inky Hugs,
Crystal


{Please note that comment moderation is on. Your lovely comment will appear once approved.}

Monday, November 18, 2024

Inky Paws Challenge #234 ~ Sketch Challenge {Week 3}

Hello there crafty friend!
 Sharing some more inspiration for week 3 of the Inky Paws Challenge #234 - Sketch Challenge! You have until next Friday, November 29th to get your entries in for the challenge and a chance to win a $20 store credit to Newton's Nook Designs!


I am having so much fun with the sketch this month! I hope that you've been able to play along with us and if you haven't there's still 11 days to join in the fun!


I turned the sketch again for my card this time. And I inked up one of the larger stamps in my stash... Caffeinated Cats Stamp Set. I LOVE this stamp! It does take a bit to color though. I colored it over a couple of days. I tried to color up some Siamese kitties this time... whatcha think? I think I need more practice! LOL

Here's a quick list of the Copic markers I used:
Siamese Kitties: W00, W1, W4, W6, W7, W9
Coffee: E21, E23, E25
Mugs: C00, C2, Y11, Y15, Y35, YR21, YR15, YR68, R00, R20, R14, R27, YG11, YG23, BG000, BG01, BG45


I paired up this adorable stamp set with the A Cat's Life 6x6 Paper Pad. I was tempted to use the Coffee House Stories 6x6 Paper Pad again, but thought I'd change it up with some kitty papers.


The sentiment is also from the Caffeinated Cats Stamp Set. It's stamped with Memento Tuxedo Black ink. I trimmed it and adhered it to the kitty layer and then I added foam tape to the back of both and popped them up on the card. I finished off the card with a coffee brown heart from the Caffeinated Crafting Embellishment Mix from Twiddler's Nook.


Now it's your turn to get your paws inky with your Newton's Nook Designs products and create a card using this month's sketch. Be sure to link up to the Inky Paws Challenge! Can't wait to see your projects!


Thanks so much for stopping by!
See ya next time.

Inky Hugs,
Crystal


{Please note that comment moderation is on. Your lovely comment will appear once approved.}

Monday, November 11, 2024

Inky Paws Challenge #234 ~ Sketch Challenge {Week 2}

 Hello there crafty friend!
 Have you played along with the Inky Paws Challenge 234 - Sketch Challenge yet?! You have until this coming Friday, November 29th to get your entries in for this fun challenge and a chance to win a $20 store credit to Newton's Nook Designs!


I turned the sketch for my card today. Sometimes the design just calls for it!


The cooler weather has me really loving my coffee! I thought it would be fun to ink up the Heartfelt Coffee Stamp Set again! I love the mix of coffee cups! I stamped it with Memento Tuxedo Black Ink and colored it up with Copic Markers.

Here's a quick list of the Copic markers I used:
Coffee Beans: E21, E25
Whipped Cream: C00, C2
Cups: Y11, Y15, Y38, V000, V12, V15, G0000, G12, G24, C00, C2, E30, E31, E33


I die cut the coffee heart using a die from the Heart Frames Die Set. I paired it up with pretty papers from the Coffee House Stories 6x6 Paper Pad.


The coffee cup banner was die cut using the banner die from the Basic Frames Die Set. The sentiment was heat embossed with Sugar Cube Pigment White Ink from Taylored Expressions, Alabaster White Embossing Powder from Brutus Monroe, and melted with a Wagner Precision Heat Tool on Kraft card stock from Papertrey Ink. I adhered the sentiment to the heart and then popped them both up with foam tape. Otherwise, all of the other layers are adhered directly to a Kraft A2 top fold card base. 


Now it's your turn to get your paws inky with your Newton's Nook Designs products and create a project using the sketch. Be sure to link up to the Inky Paws Challenge! Can't wait to see your projects!


Thanks so much for stopping by!
See ya next time.

Inky Hugs,
Crystal


{Please note that comment moderation is on. Your lovely comment will appear once approved.}

Friday, November 1, 2024

{BYSHC} Sketch Challenge 51 ~ Christmas Village Coffee Shoppe ~ Jaded Blossom

Hello there crafty friend!
It's time for a new sketch challenge over in the Build Your Stash Holiday Cardmakers Facebook group! Today I'm sharing a fun Christmas card featuring a beautiful stamp from our amazing sponsor, Jaded Blossom! Jaded Blossom has generously offered up a $25 gift card as a prize for the {BYSHC} Sketch Challenge 51 this month! So wonderful!!


I just love the fabulous stamps over at Jaded Blossom. They also have amazing dies... including a fabulous selection of gnome dies. I don't actually have any of the Christmas ones, but I'm hoping to get some for Christmas this year!! Woohoo! Anywho, I do have the beautiful Christmas Village: Coffee Shoppe stamps in my stash and I was super excited to finally ink it up and color. It's SO pretty!

Here's a quick list of the Copic markers I used:
Roof: N0, N2, N4
Windows / Frames: Y11, Y15, E31, E35, E37
Building / Cup: E30, E31, E35, E37
Door / Awning: R20, R43, R27
Whip Cream: C00, C2
Lid: C0, C1, R20, R43, R27
Straw: C00, C2, YG11, G24, G46
Sign: E30, E31, E35, E37, R20, R43, R27, YG11, G24, G46
Green Scallops: YG11, G24, G46


I paired it up with the Miss Mary Christmas paper pad from Hobby Lobby. I absolutely love the simplicity of this card design so just adding a strip of pattern paper to the bottom of my panel was the perfect touch! And these papers have some fun glitter in them! Love that added shine!


For my background panel I blended Sugar Cube Pigment ink from Taylored Expressions over the Snowed in Stencil from Carta Bella Paper. I heat embossed the sentiment, trimmed it up and adhered it directly to the card. To finish off the card, I added a few snowflake bits from the Christmas Confetti Clay Embellishment mix from Twiddler's Nook.


Here's a look at {BYSHC} Sketch Challenge 51 for the month of November. Loving this fab sketch! I can't wait to see what everyone does with it. I hope you'll join us and play along with the sketch. If you're interested in seeing a bit more inspiration for this sketch, check out the amazing inspiration from the design team over on the {BYSH} Cardmakers blog! The design team, as always, rocked this sketch!


Thanks so much for stopping by!
See ya next time.

Inky hugs,
Crystal


{Please note that comment moderation is ON. Your lovely comment will appear shortly.}

Monday, October 21, 2024

Inky Paws Challenge #233 ~ Color Challenge {Week 3}

Hello there crafty friend!
 Sharing some more inspiration for the Inky Paws Challenge #233 - Color Challenge! You have until next Friday, November 1st to get your entries in for the challenge and a chance to win a $20 store credit to Newton's Nook Designs!


Such a gorgeous color combo for Fall... Burnt Orange, Olive Green, Slate Gray, and Ivory!! 


This time I'm sharing an Autumn inspired card featuring the Autumn Reads Stamp Set. The bottom leaf was cut off when I die cut the image using a die from the Circle Frames Die Set. So I stamped the bottom portion of the image focusing mostly on the leaf and then die cut it using the leaf die from the coordinating Autumn Reads Die Set. I love that it's the same size as the extra leaf in the stamp set!

Here's a quick list of the Copic markers I used:
Mug: YG61, YG63, E40, E81
Coffee: E51, E55
Orange Book: E40, E81, YR21, YR15, YR16, C00, C2
Gray Book: N0, N2, N4, YG61, YG63
Leaves: YR21, YR15, YR16, YR27, E40, E81, E51, E55, E57, YG61, YG63


My pretty plaid paper layer is a pattern paper from the beautiful Autumn Meows 6x6 Paper Pad. I die cut it using a die from the Basic Frames Die Set. I also die cut a piece of Really Rust card stock from Stampin' Up using the largest stitched and scalloped die from the Frames & Flags Die Set. Since I was covering up the center of that card stock, I went ahead and die cut my stitched and scalloped circle mat using a die from the Circle Frames Die Set


My gray heat embossed leaf layer actually started the whole card. I used the beautiful Falling Leaves Stencil and blended Clear Embossing ink over the stencil on Smokey Shadow card stock from Papertrey Ink. And then I sprinkled Golden Gourd Embossing Powder from Brutus Monroe and melted it with a heat tool. I die cut the panel using the stitched banner die from the Basic Frames Die Set. I die cut a piece of Really Rust card stock using the large banner die from the Frames & Flags Die Set. The wonderful sentiment from the Never Enough Books Stamp Set was also heat embossed using
 my favorite combination of products for white heat embossing... I prepped the card stock with the TE Anti Static Powder Tool and stamped the sentiments with Sugar Cube White Pigment ink, both from Taylored Expressions. I dusted the ink with Alabaster White Embossing Powder and then melted the powder with a Wagner Precision Heat Tool. I adhered the sentiment banner to the back of the circle and then I popped up both pieces using foam tape. All the other layers are adhered together using a liquid glue and then adhered to a Smokey Shadow A2 card base.


Now it's your turn to get your paws inky with your Newton's Nook Designs products and create a project using the color combo of Burnt Orange, Olive Green, Slate Gray, and Ivory. Be sure to link up to the Inky Paws Challenge! Can't wait to see your projects!


Thanks so much for stopping by!
See ya next time.

Inky Hugs,
Crystal


{Please note that comment moderation is on. Your lovely comment will appear once approved.}

Monday, September 2, 2024

Inky Paws Challenge #231 ~ Sketch Challenge

 Hello there crafty friend!
Who's up for a new challenge?! It's time to get our paws inky with a fun sketch challenge! I am always up for good sketch and this one is so fun! You have until Friday, September 13th to get your entries in for the #231 Sketch Challenge and a chance to win a $20 store credit to Newton's Nook Designs!


Another super fun sketch! I can't wait to see what you create with it!


I couldn't help but make three cards for this sketch! First of all, it gave me an excuse to ink up both of the girls in the Pumpkin Latte Stamp Set. And secondly, I cut up three sheets of pattern paper for the sketch anyways... so why not make them all into cards! 


Here's the measurements I used for the sketch. The card stock was trimmed down to 4 x 5-1/4". I found it easiest to measure and cut the bottom portion first so I measured up from the bottom left 1/2" and 3-5/8" on the right side. I then drew a light line with pencil across the pattern paper. And I cut each of the three pattern papers. And then to cut that top pattern paper I measured from the left top corner of the pattern papers to 11/16". From the bottom corner I measured up that angled edge to 2-5/8". I drew another light line with pencil across the pattern paper and then I cut all three pieces of pattern paper. I then trimmed three light weight pieces of white pattern paper. I think mine is 60lb. I trimmed them down to 3-7/8 x 5-1/8". And then I adhered the pattern papers to these three white card fronts. Just like puzzle pieces... they fit together just perfectly and gave me three fun and Fall-filled backgrounds.


All of the pretty Fall backgrounds I created using the beautiful Autumn 6x6 Paper Pad. I adhered each of them to an A2 top fold card base of Kraft card stock from Papertrey Ink. I stamped the beautiful girls from the Pumpkin Latte Stamp Set on Stampers Select White card stock from Papertrey Ink using Memento Tuxedo Black ink. I colored each of them using a bunch of Copic markers. And then I die cut them using the coordinating Pumpkin Latte Die Set. I wanted a bit of a layer between the girls and the Fall background but I didn't want to cover up the pretty papers so I die cut three circles of vellum card stock using a die from the Circle Frames Die Set


Here's a list of the Copic Markers I used:

Skin: E000, E00, E11
Hair: Y02, Y21, Y26, E23
Boots: E51, E55, E57
Yellow Jacket: Y21, Y26, E55
Blue  Dress: BG10, BG70, BG72, Y21, Y26
Blue Jacket {Pumpkin Girl above}: BG10, BG70, BG72
Redwood Dress: E51, E13, E19, Y21, Y26
Blue Jacket {last card}: BG10, BG70, BG72, Y21, Y26
Scarf: BG70, BG72, BG10, E13, E19
Pumpkins: YR21, YR15, YR68, YR27, E51, E55, E57
Cups: C00, C3, E55, E57, Y21, Y26


These were such fun cards to make. I can't wait to see the awesome entries using this fun sketch!


I then heat embossed the sentiments on Kraft card stock using my favorite combo of products. I prepped the card stock with the TE Anti-Static Powder Tool. I stamped the sentiments using Sugar Cube White Pigment ink from Taylored Expressions. I then dusted the ink with Alabaster White Embossing Powder and melted the powder with a Wagner Precision Heat Tool. Once it was cooled, I wiped off the remaining anti static powder using a microfiber cloth. 


I trimmed all of the sentiments and cut a fishtail on the left side. And then I adhered all of my layers directly to the card. The girls were adhered to the vellum circles and then I glued the circles to the card by applying glue just to the back of the girls.


Now it's your turn to get your paws inky with your Newton's Nook Designs products and create a project using this awesome sketch. Be sure to link up to the Inky Paws Challenge! Can't wait to see your projects!


Thanks so much for stopping by!
See ya next time.

Inky Hugs,
Crystal


{Please note that comment moderation is on. Your lovely comment will appear once approved.}