Showing posts with label Simple Stories. Show all posts

Monday, August 11, 2025

Emoji Couple ~ Preview Day 1 ~ The Greeting Farm

 Hello there crafty friend!
It's the first day of previews at The Greeting Farm for the awesome August release! Three super sweet and adorable stamp sets releasing this month!! So fun! Be sure to check out The Greeting Farm blog each day this week! The previews start today with EMOJI COUPLE! An adorable set with Anya, Ian and a bunch of fun emojis!


I stamped Anya and all the fun emojis with Memento Tuxedo black ink and colored the images up with Copic Markers. I fussy cut them all on the line and colored the edges of the fussy cutting with a Memento Tuxedo Black marker making the fussy cutting all nice and neat. 

Here's a quick list of the Copic markers I used:
Skin: E000, E00, E11, E04, R00, R20
Hair: E33, E35, E37
Headphones: RV10, RV02, RV14, C2, C3, C5
Shirt: Y11, Y15
Jacket: B000, B91, B93, B95, R20, R14, R27
Bag: BG000, BG01, BG34
Shorts: C0, C2
Shoes: B000, B93, B95, C0, C2
Phone: C0, C2, C3, C5
Emojis: Y11, Y15, R20, R14, R27, C2, C3, C5, B000, B02


I paired up these adorable stamps with some pretty papers from my stash called Let's Get Crafty 6x8 Paper Pad from Simple Stories. I used scraps from the paper pad and trimmed them down to 3-3/4 x 1". I adhered them directly to a white A2 top fold card base. 


Inspiration for my card comes from the Tawny Owl Paperie Inky Inspiration Sketch Challenge 34. This has been a fun sketch to play with. I invite you to join us over at the Tawny Owl Paperie Inky Inspiration Facebook group and play along with the sketch. There's just under two weeks to get entries in for this fun sketch challenge.


I adhered cute Anya and all the emojis to the card and then stamped a sentiment from the Perk Up stamp set that I think works really nicely with this set of stamps. I'm not seeing the Perk Up set on the website, but if you'd like to add it to your collection, you can check out thFarmers Market and submit a request via email... maybe it'll be available for the next Farmers Market. Fingers crossed! I trimmed up the sentiment and popped it up on the card with foam tape.


This darling new Anya with the cute emojis {and sweet Ian, of course} release in the store on the 15th at 12am EST. Come back tomorrow for preview day 2.

Thanks so much for stopping by!

Inky Hugs,
Crystal


Wednesday, April 23, 2025

Take It Easy ~ Happy Place ~ The Greeting Farm

 Hello there crafty friend!
Today I'm sharing a sweet and bright card just perfect for a relaxing Spring day.


I inked up the super cute girl from the Happy Place stamp set along with a few other stamps from the set to create a little mini scene for my card. I stamped them all with Memento Tuxedo Black ink and colored them up with Copic markers.


I fussy cut all the images and colored the edges with a Memento Tuxedo Black marker. 
Here's a quick list of the Copic markers I used:
Skin: E000, E00, E11, R00, R20
Hair: YR20, E34
Headband / Shirt: BG11, BG01
Capris: Y11, Y15
Slippers: C00, C2
Gray Book: C00, C2, C5
Book Stack: C00, C2, Y11, Y15, E21, E23, E25
Bowl: BG11, BG01, BG13
Flowers: YG11, YG17, V15, E51, E53
Chair / Table: E21, E23, E25


I host a fun sketch challenge each month in the Tawny Owl Paperie Inky Inspiration Facebook group. The TOP Inky Inspiration Sketch 31 challenge ends on Monday April 28th at 11:59pm PST. The sketch, as always, is meant to inspire not require. So let the sketch lead in your design, but don't feel limited by it. 


I paired up this sweet girl with some pretty papers from Simple Stories called Simple Vintage Lemon Twist. I just love these colors! I die cut the pretty papers using a circle die from the Scallops & Circles {nesting dies} from Unity. I popped up the girl and the sentiment using foam tape.


Take it easy, crafty friends!

Thanks for stopping by!
See ya next time.

Inky Hugs,
Crystal


{Please note that comment moderation is on. Your lovely comment will appear once approved.}

Monday, April 14, 2025

Release Day Blog Hop ~ Bee Happy ~ The Greeting Farm


The April 2025 New Release is now available for purchase in The Greeting Farm Store! This month we introduced 3 new stamp sets. Our first set called BOBA PANDAS features 4 adorable Pandas enjoying the outdoors with their favorite Boba tea. Next, our favorite girl has resumed her travels and this month we have ANYA IN INDIA. Lastly, we showcased the cutest, chubbiest bees in a set called BEE HAPPY. 


I couldn't BEE more happy than to share another card featuring the absolutely adorable bees and flowers from Bee Happy! I just adore these cuties! I stamped the flowers and bees on white card stock and colored them up with Copic markers. I fussy cut them leaving a white border around the edge - just like a die cut would. I adhered the flowers to the hexagon layer and popped up the bees with a little foam tape. And then I stamped the little bees swirly line directly on the pattern paper.


The yellow gingham pattern paper is die cut with a hexagon scalloped die. I covered an A2 card base with the black and white pattern paper from the same pack. The sentiment was stamped, trimmed and adhered to the hexagon. And then I popped up the hexagon focal piece and the sentiment onto the card with lots of foam tape.


Here's a quick list of the Copic markers I used:
Bees: C00, C2, C4, C9, Y11, Y15
Flowers: BG10, BG01, BG15, Y15
Leaves: YG11, G02


To celebrate this release we are having a short BLOG HOP! One lucky fan will win a $50.00 Gift Certificate to The Greeting Farm Store!! You have until April 18th, 12pm CST/1pm EST to leave your comments on each Designer's Blog. Then head back to The Greeting Farm Blog to let us know you completed the hop. **Remember to qualify for the prize you MUST leave a comment on each Designer's Blog AND The Greeting Farm Blog letting us know you completed the hop.

NOTE: Comments on The Greeting Farm Blog are admin approved so it may take a day for your comment to be visible. Please only comment once, and use the same name on all the blogs when leaving a comment. Do not pick the Anonymous option (otherwise we won't be able to verify that it's you). We will announce the random winner later in the week on the Blog and in our Facebook Group: The Greeting Farm Fan Page.

TGF Design Team:

This is a short hop, and definitely worth playing along! If you want to grab your favorites now, you can purchase the new stamps HERE. We will have more cards featuring the New Release from our Design Team Leaders starting on the 16th so be sure to stop by The Greeting Farm Blog to see more inspiration.

Happy Hopping!


Thanks so much for stopping by!
See ya next time.

Inky Hugs,
Crystal


{Please note that comment moderation is on. Your lovely comment will appear once approved.}

Sunday, April 13, 2025

Bee Happy ~ Preview Day 3 ~ The Greeting Farm

 Hello there crafty friend!
It's the final day of previews at The Greeting Farm for the April release! Introducing Bee Happy... oh. my. cuteness! These bees and all the pretty flowers are just too darn cute.


I stamped the bees and flowers with Memento Tuxedo Black ink and colored them up with Copic markers. I fussy cut each of the images leaving a white border - almost like they were die cut.

Here's a quick list of the Copic markers I used:
Bees: Y11, Y15, YR23, N0, N2, N4, BG10, BG01, BG15
Pink Flowers: RV10, RV02, RV04
Blue Flowers: BG10, BG01, BG15, Y11, Y15
Stems / Leaves: YG11, G94, G99


I paired up these sweet bees and flowers with the Simple Vintage Lemon Twist 6x8 paper pad from Simple Stories. This is a 6-1/2 x 7" mini slimline card base, scored at 3-1/2". My paper layers are: black with polka dots - 6-1/2 x 3-1/2"; Yellow distressed - 6-5/16 x 3-5/16" ; and the die cut is 6-3/16 x 3-3/16" approximately.


The white panel is die cut with the largest die from the X Stitched Mini Slimline Die from Gina Marie Designs. I popped up the white panel with foam tape avoiding the negative hexagon space. The hexagons are all cut using the Hexagon Frames Die Set from Newton's Nook Designs. The two on the right side are die cut from the white panel giving me the negative space to build around. The larger hexagon on the left is die cut from the pretty papers and it's popped up with foam tape.


I stamped the sentiment directly on the white panel. All of the adorable bees are popped up on the card with foam tape. Too fun! The release goes live in the store on the 15th at 12am EST! Woohoo! Bee sure to come back tomorrow for the release Blog Hop!! One lucky winner will receive a $50 gift card to The Greeting Farm. All you have to do is comment on the hop! Yay!

Thanks so much for stopping by!
See ya next time.

Inky Hugs,
Crystal


{Please note that comment moderation is on. Your lovely comment will appear once approved.}

Tuesday, February 11, 2025

Snapshot Anya ~ Preview Day 1 ~ The Greeting Farm

 Hello there crafty friend!
I'm so excited! It's the first day of previews at The Greeting Farm! Yay!


I dived into my paper stash to find the perfect papers for the beautiful Snapshot Anya! I found the Travel Notes 6x8 Paper Pad from Simple Stories and thought it was perfect to pair up with Anya.


I stamped sweet Anya with Memento Tuxedo black ink and colored her up with Copic Markers. I fussy cut her and colored the edge of the fussy cutting with a Memento Tuxedo Black marker. I adhered her to a paper strip of black card stock and then I popped her and the paper strip up on the card with foam tape. Here's a quick list of the Copic markers I used:

Skin: E000, E00, E11, E04, R00, R20
Hair: E30, E31, E34
Hair Clip: YG11, YG03, YG63, B000, B00, B91
Sweater: R20, R14, R37
Jeans: B91, B95
Boots: N0, N2, N4, N6
Camera: YR21, YR15, YR16, Y11, Y15, C00, C2, N0, N2, N4, R20, R14, B000, B00, YG11, YG03


I stamped the cute polaroid photos and 'picture perfect' sentiment also using Memento Tuxedo Black ink. I stamped the cute and happy sentiments, along with the little heart, using Tumbled Glass and Barn Door Distress Inks. I fussy cut them all and adhered them together and then I popped them up on the card with foam tape.

Here's a quick list of the Copic markers I used for the polaroid photos:
Polaroids: N0, N2, N4, N6
Dog Photo: E21, E23, E25, N0, N2, N4, N6, R20, R14
Boy Photo: E000, E00, E21, Y21, YR24, B000, B00
Legs Photo: E000, E00, E21, R20, R14, YG11, YG03, YR21, YR15, Y11, Y15


Lots of fun layers for this card! Release goes live in the store on the 15th at 12am EST.

Thanks so much for stopping by!
See ya next time.

Inky Hugs,
Crystal


{Please note that comment moderation is on. Your lovely comment will appear once approved.}


Friday, April 1, 2022

{BYSHC} Sketch Challenge 21 ~ Cocoa Love ~ Not 2 Shabby

 Hello there crafty friend!
It's time for a new Sketch Challenge over at Build Your Stash Holiday Cardmakers and I have a cute cocoa card to share for the new sketch using an adorable stamp from Not 2 Shabby called Cocoa Love.


I paired up this adorable cocoa stamp with the beautiful Hot Cocoa Warm Hearts paper pack also from Not 2 Shabby. I'm partial to the amazing plaid in this paper pack so I just had to use it again for my background paper. I used the brown pattern paper in the pack for my mats for each layer.


I stamped the adorable cocoa mug with Gina K. Black Amalgam ink and colored it up with the following Copic Markers:

Mug ~ E33, E35, E37
Marshmallows ~ C00, C2
Heart / Cheeks ~ R20, R14, R27
Candy Cane ~ R20, R14, R27, C00, C2
Steam ~ N0, N1, N3


I die cut the cocoa mug with the coordinating Cocoa Love Shabby Snips Coordinating die. The cute little red bow is from the Cocoa Love ephemera pack that coordinates with the papers and stamps. However, the ephemera pack didn't have any Christmas sentiments so I looked through some of my other ephemera packs and found the Let it Snow Chit Chat ephemera from Doodlebug Designs that had the perfect sentiment for my card. I think this one turned out pretty cute!


Here's a look at the fun {BYSHC} Sketch 21 for the month of April!
I hope you'll join us and play along with the sketch! If you're interested in seeing a bit more inspiration for this sketch, check out the amazing inspiration from the design team over on the  {BYSH} Cardmakers blog! I'll be back next Friday with my regular weekly Christmas card using this new sketch!


Thanks so much for stopping by!
See ya next time.

Inky hugs,
Crystal


{Please note that comment moderation is ON. Your lovely comment will appear shortly.}

Friday, February 25, 2022

{BYSHC} Sketch Challenge 19 ~ Hot Cocoa Love ~ Not 2 Shabby

 Hello there crafty friend!
It's been a busy week at the Minkler house and I've been getting worried that I wouldn't have time to make my weekly Christmas card. So when I had a bit of time I thought I'd use some fun ephemera that I got awhile ago but haven't played with yet. And I got the coordinating papers too!


So... here's my card!! Cute, right! I love how quick it came together using ephemera and the pattern papers! And since it was so quick I actually made two cards!!


I picked two cute pattern papers from the Hot Cocoa Warm Hearts paper pack from Not 2 Shabby and cut them to 4 x 5-1/4". I stacked the papers together and cut them at an angle. Cutting the papers together makes it very easy to line them up for this particular card design.


I adhered the pattern papers to a black card front and die cut some black card stock with the Stitched Ric Rac die from My Favorite Things. I adhered the Ric Rac die cut to the card. And popped up the ephemera piece with foam tape.


Now for card #2!! Aren't those marshmallows just THE cutest! I love them! 


I used the leftover pieces from the first card which made this card SO easy!


The Cocoa Love ephemera pack didn't have any Christmas sentiments so I looked through some of my other ephemera packs and found the Say Cheese Christmas ephemera from Simple Stories that had a couple sentiments that worked perfectly for my cards.


Here's another look at the fun {BYSHC} Sketch 19 for the month of February! There's still a few days to play along with the sketch! If you'd like to see more inspiration for the sketch head on over to the {BYSH} Cardmakers blog! I'll be back on Tuesday with inspiration for the new {BYSHC} Sketch Challenge 20!!


Thanks so much for stopping by!
See ya next time.

Inky hugs,
Crystal

{Please note that comment moderation is ON. Your lovely comment will appear shortly.}

Friday, March 5, 2021

{BYSHC} Sketch Challenge #8 ~ Say Cheese Christmas ~ Simple Stories

 Hello there crafty friend!
Oh my goodness... I almost didn't make it this week with my weekly Christmas card to share! Thank goodness I have the adorable Say Cheese Christmas ephemera pieces in my collection! They made for such a quick card!


Isn't that just THE cutest card?! I adore these sweet ephemera pieces from Simple Stories. I especially love the touch of Disney in the Say Cheese Christmas collection. I just adore all things Disney!! I started with a card front of Wild Wasabi from Stampin' Up! The patterned paper is also from the Say Cheese Christmas collection. I trimmed that down to 4-1/8 x 5-3/8". I adhered it to the card front and then adhered the entire panel to a white A2 top-fold card base.


I die cut a 3-1/4" Real Red circle and a 2-3/8" True Black circle. Since I had already adhered my patterned paper I laid the circles down on my card and marked the two sides of the circle to trim off. I cut those in my Tim Holtz Tonic Guillotine Paper Trimmer and adhered them to the card. To finish off the card I adhered the sweet little girl from the Say Cheese Christmas Happy Kids Bits & Pieces and the Happy Holidays sentiment from the Say Cheese Christmas Bits & Pieces. Done! So quick!


Here's another look at the fun {BYSHC} Sketch 8. I'll be back next week with another Christmas card using this fun sketch! I hope you'll come check it out.

Speaking of checking things out, drop by the {BYSH} Cardmakers blog... we're featuring a mix of creations shared by the {BYSH} Cardmakers team and a fun card randomly chosen from the challenge entries in the {BYSH} Cardmakers Facebook group.


Thanks so much for stopping by!
See ya next time.

Inky Hugs,
Crystal

Friday, November 15, 2019

Scrapping for Less ~ Kaisercraft Silver Bells Tags ~ Gift Card Holder Using Tags

Hello there crafty friends!
 Today I'm sharing a fun idea for prepackaged tags... a Gift Card Holder Tag Card...? Well, I'll need to work on the name... lol...but basically I made a couple of super cute and fun interactive cards using the beautiful Kaisercraft Silver Bells Tags and they are holding a gift card!! Let's have a look... 


Aren't these just beautiful?! I love how they turned out! I found that the Simple Stories Country Christmas papers paired up well with the Silver Bells Tags... similar colors and styles, even though one is vintage and the other is country... lol. We're mixing it up!


First, I cut my layers of patterned paper and adhered them to a red card front measuring 4-1/4 x 5-1/2". I then adhered the card front to a white card base. I trimmed the red mat piece for the tag to 2-1/4 x 3-1/2" and punched a hole using my ancient Crop-a-Dile allowing me to use the included string... so the recipient could pull the tag using the string. I was just going to adhere the gift card directly to that piece but then I got to thinking that it would be fun to have a piece of card stock across the card and then have the tag tuck in behind it. So, I cut another piece of the red card stock the same size and adhered it to the back of the tag being careful to only adhere the top portion so I had an opening on the bottom to tuck. I cut the red card stock to go across the card and die cut it with a scalloped stitched border die. I adhered it to the card using a strong scor-tape being careful to only add the tape to either side of the card stock so I'd have an opening to tuck the gift card behind.


And then I stamped and heat embossed a surprise sentiment behind the tag!! So fun! I used the My Favorite Things Bitty Holiday Wishes for the sentiment. I stamped it with VersaMark watermark ink and heat embossed a fine white embossing powder.


Here you can see the other side of the tag where I've adhered the gift card using glue dots.


Here's the second card that I made using all the same steps as the first card only with the other style of tag and different patterned papers from the same Simple Stories Country Christmas paper pad. I also changed up the card stock to coordinate with the aqua colors in this tag.


I forgot to mention above that I tied some white baker's twine around the string of the tags. I thought it was a fun way to add a bit of white to the tag.


I tried to coordinate my gift cards to the colors of the cards... lol. I couldn't believe I still have my Amazon gift card from last Christmas! Guess who's going shopping!?!


This picture shows the opening between the card stock layers that makes it possible to tuck the tag on the card. I know sometimes that a visual can help so I wanted to share this too.


I sure hope that you've enjoyed the cards I shared today and that they've inspired you to get creative with your designs!!


Thanks so much for stopping by!
See ya next time.

Inky Hugs,
Crystal

Thursday, October 10, 2019

Scrapping for Less ~ September 2019 FOTM Card Kit Fall is Coming ~ More Inspiration!!

Hello there crafty friends!
I'm back with more fabulous inspiration using the September 2019 Flavor of the Month Card Kit called Fall is Coming!! I'm so excited to share the cards that I created! I had so much fun with this card kit! Once I started creating, I just couldn't stop!! Lol! 

I have 8 cards to share with you all today! I'm going to warn you now, this post is a tad bit long, but I hope you'll stick around and check out all my cards! Let's get to it!


If you've followed my card making journey you'll know that I adore making Halloween cards, so it's no surprise I made a couple extras with the fabulous Frightful Cuties Collection!!! Love it!! I almost used up all the gorgeous papers in the kit... too cute!


My first card is from Collection Two: Cozy Fall
This collection is so beautiful! The papers are absolutely stunning! If I get a chance, I do have plans to make another card or two with this collection... but for today's card, I kept the design kind of simple. I instantly fell in love with the gorgeous rose papers... the colors are amazing so I HAD to use it for my card and I also wanted to use the mug... well, because I love my coffee!! I used the following Copic markers to color the mug and flowers:

Mug ~ R000, R20, R39, R85
Flowers/leaves ~ YG0000, YG01, YG03, YR15, YR21

I fussy cut the mug and went around the edges with my Memento tuxedo black marker to clean it up a bit. I then set it aside and started die cutting the Autumn Blessings die from the Banana Split subscription. I die cut it three times and then adhered the die cuts together. A little tip for this intricate die... it's not one piece, it cuts into four separate sections. I used Press n' Seal wrap to hold my die cut pieces in place. I then added the liquid glue and placed the die cut layers on each other. It was a little time consuming but so worth it!! I love this fabulous font of this sentiment! It's perfect paired up with these gorgeous papers! To finish off the card, I adhered the fussy cut mug just above the sentiment and added a few enamel dots included in the Banana Split subscription.


My second card is from Collection Three: Fall Foliage.
Another fabulous set of papers in this collection and they honestly made this card super quick!!
I cut the gorgeous flourish paper at 4-1/4 x 4-1/2" and popped it up on a 4-1/4 x 5-1/2" piece of the yellow paper. I adhered those to a white card base and set them aside. I stamped the beautiful sunflower from the Thankful Floral stamp set by Trinity Stamps... such a gorgeous flower! I colored it in with the following Copic markers:

Flower ~ Y11, YR14, YR15, YR21, YR24, E25, E27
Leaves ~ YG01, YG03, YG63

I stamped the Thankful sentiment on a scrap of white card stock and trimmed it into a strip. I adhered it to the card and then adhered the sunflower using liquid glue on the top portion and some foam tape on the bottom since that flourish paper was popped up. To finish off the card, I added a few of the rich yellow enamel dots to the card and one sweet ladybug! Love it!!


My third card is from Collection Four: Woodland Critters.
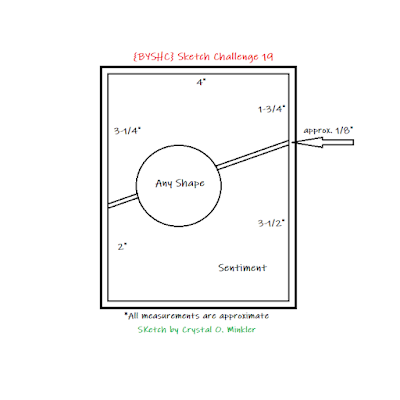
For this card, I used one of the fun sketches from the September 2019 FOTM Sketch Sheet. I cut all my pretty papers and adhered them to the Chocolate Brown card base. I die cut a medium sized circle of white card stock and blended a little Tumbled Glass and Mowed Lawn Distress Oxide inks for my background. I popped up the circle die cut on the card using foam tape. I then set that aside and stamped the moose and snail images on a piece of white card stock. I colored those in with the following Copic markers:

Moose ~ E21, E23, E25, E27, W00, W2, W4, W5, N4
Snail ~ YG0000, YG01, YG03, YR15, YR21, YR24

I fussy cut these adorable Woodland Critters and adhered them to the little scene I created. I originally planned to make two cards with these critters but when I saw them together I just knew they would be the best of friends so I kept them together and stamped the Friends Forever sentiment on a scrap of white card stock. I trimmed it down to a banner and adhered it to the card using liquid glue and foam tape. To finish off this card, I wrapped the twine around the card and tied a bow.


My next five cards are from Collection One: Frightful Cuties.
Now, this collection is absolutely my favorite of the whole kit... that's kind of why I left it for last and also didn't share the collections in order. The papers in this collection are too cute and the colors are awesome for Halloween! Love them! My first card features the adorable Scaredy Cat stamp by Sunny Studio Stamps that's included in Collection One. I stamped the little kitty in the pumpkin along with the moon and stars using my Tim Holtz Stamp Platform. I knew I was going to die cut the panel with a stitched rectangle die so I laid that on the white card stock to help guide me in positioning the stamps. I then colored in the images, as well as the background, with the following Copic markers:

Kitty ~ N0, N1, N2, N3, N5, R000, R20
Pumpkin ~ YR15, YR21, YR68, N0, N3, N5
Moon/Stars ~ Y06, Y11, Y35
Sky ~ BV000, BV00, BV20, BV23, BV25
Grass ~ YG03, YG17, YG23, YG67

Once I was done coloring, I die cut the panel and stamped the sentiment with VersaMark watermark ink and heat embossed it with a fine white embossing powder. I adhered all of my layers to a Black Licorice card front measuring 5-1/2 x 4-1/4" and then adhered that to a white card base from my stash. I punched out a piece of the spider web paper using a 1-1/2" circle punch. I die cut the banner from the purple spider web paper. I adhered those two pieces together and then popped them up on the card using foam tape. To finish off this card, I added the fun stickers to the circle and one near the moon. So cute!


The next four cards were so quick and easy to make!! I used the adorable Kiddie Ephemera by Simple Stories that are included in Collection One... these little kids are just TOO cute!!
I blended some Twisted Citron Distress Oxide ink on a Stitched Arch STAX die cut piece cut from white card stock and adhered this adorable kid directly on it. I popped up the die cut on the card using foam tape. I added a few of the fun green enamel dots to finish up this card.


I used more of the fabulous papers from the kit with this little vampire!! I added foam tape to the little vampire, as well as the sentiment, and popped those up on the card.


I used more of those fabulous stickers on this card... it was absolutely perfect with this little witch. I blended a bit of Wilted Violet Distress Oxide ink on the white die cut circle to make it look like she's conjuring up some Halloween magic fun!! I then popped her up on the card to give her some dimension. Such a great way to add interest to a card!


My last card just might be my favorite! I had fun creating a little background with some purple skies and grey/black road... just like Halloween night! Or close to it anyway! I used a cloud stencil along with Wilted Violet, Hickory Smoke, and Black Soot Distress Oxide inks to create my background. I set that aside and adhered some more pretty papers to a Black Licorice card front measuring 4-1/4 x 5-1/2" that I adhered to a white card base from my stash. I then die cut my background piece with a small stitched rectangle die and mat it with some Black Licorice card stock. By the way, I was actually out of Black Licorice card stock so that mat piece is actually from the card front piece that's adhered to the card base... a neat little trick I sometimes use when my card stock becomes limited in supply. The 'stolen' piece of card stock is hidden by a layer of patterned papers so no one knows... well, unless you tell them! Lol! Back to the card... I adhered the background  panel to the card and then popped up the little Trick or Treater with some foam squares. I then stamped the sentiment from the Scaredy Cat stamp set, trimmed it and mat it on literally my last little scrap of Black Licorice card stock... I definitely like the black card stock for Halloween cards this year!


Here's a little look at all the Halloween cards together! So much fun!! I love this kit so much... I believe there are still a few kits remaining!! 
Don't miss out on this one! Get it here ---> September 2019 Fall is Coming Card Kit


Thanks so much for stopping by! 
See ya next time.

Inky Hugs,
Crystal