Showing posts with label monochromatic. Show all posts

Saturday, May 17, 2025

Monochromatic Sympathy ~ Peony Reverie ~ Unity Stamp Co.

Hello there crafty friend! 
It's hard to make sympathy cards. Especially when you need one. I think a monochromatic floral card is nice for a sympathy card. When I saw the gorgeous Peony Reverie I wanted to see what it would look like with a sepia style of coloring. 


I've done sepia colorings before but I think I've colored them on white card stock. This time I wanted to see what it would look like on Kraft card stock. I colored the peonies with just E21 and E25. 


I die cut the panel using the largest die from the Deckle & Stitches Nesting Dies. I adhered the panel to a Kraft A2 top fold card base. I added a touch of white to the center of the peonies using a white gel pen.


The sentiment from the Say It Loud & Clear stamps was heat embossed with a clear embossing ink and black embossing powder. My black embossing powder is very old from Stampin' Up. I had to heat emboss the sentiment twice because of the old ep. It's also contaminated with paper bits and other stuff. Probably time to replace it. Any suggestions for a good black embossing powder? I fussy cut the sentiment and popped it up on the card with foam tape. I really like how this turned out.

Thanks so much for stopping by!
See ya next time.

Inky hugs,
Crystal

{Please note that comment moderation is on. Your lovely comment will appear shortly.}

Monday, February 24, 2025

Inky Paws Challenge #237 ~ Sketch Challenge {Week 4}

Hello there crafty friend!
 There's just a few more days to play along with the Inky Paws Challenge #237 - Sketch Challenge! You have until this coming Friday, February 28th to get your entries in for the challenge and a chance to win a $20 store credit to Newton's Nook Designs!


This has been such a fun sketch! I hope you have a chance to play along with us if you haven't already! There's just a few days left to play!


I decided to make another St. Paddy's Day card. This time using the Newton's Pot of Gold Stamp Set. I stamped the adorable kitty with his pot of gold using Memento Tuxedo Black ink and colored up the sweet image with my Copic markers. I fussy cut it leaving a skinny white border around the edges.

Here's a quick list of the Copic markers I used:
Kitty: R00, R20, C00, C2
Hat: N0, N1, N3, N5, YG11, YG23, Y11, Y15, Y28
Pot: N0, N1, N3, N5
Gold: Y11, Y15, Y28
Shamrock: YG11, YG23


I used the fun Pastel Basics 6x6 Paper Pad. I don't normally use pastels for St. Paddy's Day cards so I thought it would be a fun change. What do you think?


I die cut a scalloped circle of vellum card stock using a die from the Circles Frames Die Set to go behind the kitty leprechaun. It separates those layers but doesn't cover the fun green pattern papers. I finished off the card with a few green enamel dots from my stash.


Now it's your turn to get your paws inky with your Newton's Nook Designs products and create a project using the fun sketch. Be sure to link up to the Inky Paws Challenge! Can't wait to see your projects!


Thanks so much for stopping by!
See ya next time.

Inky Hugs,
Crystal


{Please note that comment moderation is on. Your lovely comment will appear once approved.}

Monday, February 3, 2025

Inky Paws Challenge #237 ~ Sketch Challenge {Week 1}

Hello there crafty friend!
Who's up for a new challenge?! It's time to get our paws inky with a fun SKETCH challenge! I'm always up for a good sketch and this one is so fun with all the layers! You have until Friday, February 28th to get your entries in for the #237 Sketch Challenge and a chance to win a $20 store credit to Newton's Nook Designs!


Aren't those layers fun?! So many possibilities!


I wanted to make a St. Paddy's Day card so I went looking through my stamps and found the adorable Lucky Dog Stamp Set. I stamped him with Memento Tuxedo Black ink and colored him up with my Copic markers. I die cut the pup using the coordinating Lucky Dog Die Set.

Here's a quick list of the Copic markers I used for the kitty and heart:
Dog: N0, N1, N2, N3, N6, C00, C1, C3
Hat: N0, N1, N2,N3, N6, YG11, G14, G07, Y11, Y15, Y28
Shamrock: YG11, G14, G07


I went looking through my paper pads for green papers and found the Bright Basics 6x6 Paper Pad that has four different green patterns. Score! Check out my video link below for the measurements. The banner with heart polka dots paper was die cut using a die from the Frames & Flags Die Set. I also used a flag die from the set for the sentiment on white card stock.


I wanted the pup to pop a bit more on the card so I die cut an oval using a die from the Oval Frames Die Set and die cut a vellum oval. It helps to bring the pup forward in the card so he doesn't get lost in all the green patterns.


Now it's your turn to get your paws inky with your Newton's Nook Designs products and create a project using this awesome sketch. Be sure to link up to the Inky Paws Challenge! Can't wait to see your projects!


Thanks so much for stopping by!
See ya next time.

Inky Hugs,
Crystal


{Please note that comment moderation is on. Your lovely comment will appear once approved.}

Saturday, February 1, 2025

~ Friends of Unity February 2025 Blog Hop ~

Hello there crafty friend!
It's time for our Friends of Unity Blog Hop!! This month's cue is super fun!


It's Monochromatic. I love this cue! 
We've done it once or twice now and I love seeing the variation in creations.


First up, I'm sharing the ATCs that I made for last month's Unity Lovers ATC swap. I ink smooshed 14 ATC panels of Stampers Select White card stock from Papertrey Ink measuring 2-1/2 x 3-1/2" using Black Soot Distress Ink leaving some white space. I then spattered the panel with Apple Barrel Black Acrylic Paint thinned with just a spritz or two of water. Once the panels were all dry, I die cut them using a fun ATC Layers die from Waffle Flower.


I stamped the adorable owl from the Cozy Vibes Owl stamps multiple times in my Stamp Platform with Black Amalgam ink. I didn't color them at all, just left them black and white. These stamps have so much detail you really don't need to color them. I fussy cut them leaving a tiny border around the edges. I adhered all of my layers to a 2-1/2 x 3-1/2" ATC panel of True Black card stock from Papertrey Ink. These took some time because of how many there were to make, but I really love how they turned out. 


You may have seen the cards I shared last Wednesday for Membership Wednesday using the Damask Grunge Background of the Month stamp from January 2025 along with the December 2024 Faded Roses BOM. I was on a roll and couldn't stop so I also stamped the background using Lost Shadow Distress Ink with the Damask Grunge BOM and Black Soot Distress Ink with the Faded Roses BOM. The sentiment is from the Extended Celebration {Front & Center Stamps}. I heat embossed it with white pigment ink, white embossing powder, and melted it with a heat tool. The background panels were die cut using the largest die from the Scallops & Rectangles {nesting dies}.


 For my last card I ink smooshed the right side of a Stampers Select White card front panel measuring 4-1/4 x 5-1/2" with Peacock Feathers Distress Ink. The left side of the card is white {though in the photo it has a blue tinge - no clue}.


I dried the panel completely with my heat tool. And then I stamped the gorgeous butterfly from the February 2024 Kit of the Month called Grace and More Grace using Mermaid Lagoon and Peacock Feathers Distress Inks. I stamped it twice with Mermaid Lagoon for nice coverage and then one time with Peacock Feathers to give it a bit of that teal look more than a dark blue.


I did the same thing with the fun sentiment from the January 2025 Kit of the Month called Kinda Made for Each Other. I trimmed the panel cutting 1/16" off each side so the butterfly would stay center so now it measures 4-1/8 x 5-3/8". I adhered it to a white A2 top fold card base. I finished off the card with a few raindrop embellishments from my stash. I love how this one turned out! I'm determined to send out more cards this year. I always have good intentions but time seems to slip by and I forget about it. No more! I'm going to send out those paper hugs! And this will be one of them. It was such a super quick card too!

Now before we get to the hopping, I chose a lucky winner from the comments on last month's hop to win a fun prize and the lucky winner is...


... Linda Abel!! Congratulations, Linda!!
Please email me at crystalominkler@gmail.com to claim your prize. 
Please claim the prize before February 26th, 2025. 

Well, that's it for me this time! Please hop along and enjoy some more inspiration from the Friends of Unity! I can't wait to see how our friends were inspired by this month's cue. I wonder how many went with black & white or if we'll see more colors! I will be doing another fun giveaway this month!! Be sure to hop along and comment for a chance to win. {When you comment please leave your name just in case it posts as anonymous.} I'll announce the winner next month! 


Let's get to the hopping...

Crystal <--- you're here

up next ---> Kari


Dawn


Thanks so very much for supporting our little hop!
We appreciate you so much!!

See ya next time.

Inky Hugs,
Crystal


{Please note that comment moderation is ON. Your comment will appear shortly.}


Tuesday, January 21, 2025

January Scraps Cards ~ Penguin Hugs & Cozy Vibes Owl ~ Unity Stamp Co.

 Hello there crafty friend!
Today I'm sharing the last two cards I created using the leftover scraps I opened up way back in October 2024. Goodness! My plan to use up scraps each month has been going way too slow! I need to up my game a bit. BUT I am so happy to finally be finishing off these papers!


I've shared this fun technique before here and here. For these two cards I cut 1/2" strips of the pattern papers and adhered them to a thin white card stock panel {I recommend using copy paper if you plan on die cutting the panels} leaving a little bit of room. I didn't measure it or anything... just eyeballed it. I then cut these into 1/2" strips. These papers are from a company that's no longer in business, unfortunately. I love them! Now that these papers are finished up, I'll pick out another pack and share them next week for the new TOPII Sketch 29 that starts on January 28th.


For my first card, I adhered all of the pattern paper horizontally across the white card stock and then I cut 1/2" strips. I adhered those strips to another piece of white card stock with a bit of space in between them making a fun pattern. I trimmed the panel down to 4 x 5-1/4" and adhered it to a white A2 card base measuring 4-1/4 x 11"; scored at 5-1/2".


I stamped the adorable Penguin Hugs with Black Amalgam ink and colored it just a little bit with C00, C1, C3, BV0000, BV11. I die cut the sweet penguin using a die from the Scallops & Circles {nesting dies}.


I stamped the sentiment, trimmed it up and then adhered it to the scalloped circle. I added foam tape to the back of both and popped them up on the card.


For my second card I used the same 1/2" strips of the pattern paper, but I adhered them diagonally to a panel of white card stock. And then I cut the strips vertically. I then adhered the strips horizontally on another piece of white card stock leaving a little bit of space in between the strips. This panel was trimmed down to 3-3/4 x 5".


I stamped the adorable owl from the Cozy Vibes Owl stamps with Black Amalgam ink and die cut it with another circle die from the Scallops & Circles {nesting dies}. I colored the owl a little bit with C00, C1, and C3.


I stamped the sentiment and trimmed it. Added foam tape to the back of both and popped them up on the panel. I then trimmed off the excess hanging over the edges and adhered the panel to a white A2 top fold card base. Two cute cards for my wintry/holiday stash and another paper pack done!! Woohoo!

Thanks so much for stopping by!
See ya next time.

Inky Hugs,
Crystal


{Please note that comment moderation is on. Your lovely comment will appear once approved.}

Thursday, October 3, 2024

Tawny Owl Paperie Inky Inspiration Sketch 26 ~ Bitty Forest ~ Unity Stamp Co.

 Hello there crafty friend!
Today I'm sharing a bit more inspiration for the Tawny Owl Paperie Inky Inspiration Sketch Challenge 26 in the Tawny Owl Paperie Inky Inspiration Facebook group. Another fun sketch for scraps! I wanted to created a holiday card using the beautiful Bitty Forest stamps from Unity that just released. I love these stamps! So I went looking through my paper scraps and came across these beautiful grey and white papers.


I wouldn't normally open up another package of scrap papers until I had finished off the last one, BUT I just had to for this card! The paper scraps that I've been using are from my days with Scrapping for Less which closed a few years ago so the papers aren't available anymore but if you like the papers stop by Not 2 Shabby and check out the papers they have. My sweet friend, Teresa, is the designer for their papers and she designed the beautiful papers I used for my card today.


Here's a look at the fun sketch for Tawny Owl Paperie Inky Inspiration Sketch Challenge 26. The sketch, as always, is meant to inspire not require. So let the sketch lead in your design, but don't feel limited by it. My rectangle scraps today measure 2 x 2-1/2".


 I stamped the trio of trees twice and both of the deer from Bitty Forest with Smokey Shadow ink from Papertrey Ink. The panel is die cut using a die from the Postage Stamp {nesting dies}. The sentiment and sentiment mat are die cut using dies from the Scalloped & Stitched Sentiment Nesting Dies. The grey mat is also paper from the scraps.


I adhered all my layers directly to a white A2 top fold card base. The postage focal piece is popped up on the card with foam tape. I finished off the card with a few shiny pieces of confetti from the Crystal Metallic Quicksilver Card Bling set from A Colorful Life Designs.

 I hope you all have fun with this sketch! I can't wait to see what you create with it. 
Have an ink-tastic week!

Thanks so much for stopping by!
See ya next time.

Inky Hugs,
Crystal


{Please note that comment moderation is on. Your lovely comment will appear once approved.}

Monday, December 12, 2022

Membership Monday ~ December 2022 Kit of the Month ~ Advent Calendar Day 12 ~ Unity Stamp Co.

Hello there crafty friend!
Today I'm sharing a quick card for the December 2022 Kit of the Month. It's a busy time of year for everyone. If you find yourself in need of a card that can also be a gift... this one is quick and easy.
   

Today's Advent Calendar Day 12 stamp just happens to be coffee themed so I thought I'd pair it up with the cute coffee stamps in this month's KOM. Some simple copic coloring really makes this a quick card. I used T0, T1, T2, T3, T4, T5, T7, R20, R14, R27. This may look like a long list but I used different ones on different cups. I also added just a touch of red to the Advent Calendar stamp.
 

The monochromatic design really started with that pretty black and white paper from the Coffee Lovers {paper pack}. And I couldn't help but use the Scallops & Circles {nesting dies} again. They work so perfectly with the Advent Calendar stamps.
 

Next, the sentiment was stamped directly on the card. I had originally stamped it on a scrap and was going to cut it but this simple card just needed a simple sentiment. Easy peasy.
 

The inside of the card is what makes this a gift. Just add a scrap of pattern paper! Some tear tape on just the bottom and sides to adhere it to the card leaves that top open to insert your gift card. 


Here's a look at the whole KOM... another fabulous kit!
Can you believe you get a full sheet of rubber for only $42. That includes shipping! You also get a $6.95 discount on every order from Unity over $40. And you can purchase any past kit for only $26 plus shipping. Such a great value! But be sure to sign up before the end of the year because prices will be increasing in January 2023!!
 
Click here to learn more about this membership!
 

I hope that you've been inspired to get inky with your Kit of the Month! That's it for me this week. Be sure to come back next Monday. Echo will be sharing another fab card featuring the beautiful December 2022 KOM. I can't wait to see what she's created to share with us all!


Thanks so much for stopping by!
See ya next time.
 
Inky Hugs,
Crystal


{Please note that comment moderations is on. Your lovely comment will appear once approved.}

Tuesday, April 26, 2022

Monochromatic Birthday Card ~ April 2022 Uniquely Unity ~ Unity Stamp Co.

 Hello there crafty friend!
I had so much fun yesterday making the ink smooshed dandelion card with the April 2022 Uniquely Unity membership stamp that I was inspired to make another one. This time I inked up the You Can Dream It stamps for a monochromatic birthday card and actually went out of the box a bit and went with brown. Not my usual color choice for a monochromatic card but I love it!


I was searching through my Unity paper packs and saw the pretty Plant a Garden {paper pack} and the light brown paper with the white wild flowers caught my eye. It also inspired my color choices for the entire card.


I love how the white embossing pops on the brown card stock. The white mat on the focal piece helps make it pop even more. The cute sentiment is one of my favorites that I've been using pretty often for my birthday cards and I thought it was perfect for this card too. It's from the 3 Tiered Birthday itty bitty stamp from Unity.


I tied a bit of twine around the card front and tied a little bow. I think it adds a cute little touch to the card. You can check out my process video for this card here... Monochromatic Birthday Card | April 2022 Uniquely Unity | Unity Stamp Co.


I love how pretty this card turned out using a color palette that I normally wouldn't use! You can check out the Uniquely Unity membership over at Unity Stamp Co. I have one more card to share with you tomorrow using this beautiful stamp set... I hope you'll come by for another visit!


Thanks so much for stopping by!
See ya next time.

Inky Hugs,
Crystal


{Please note that comment moderation is ON. Your lovely comment will appear shortly.}

Friday, January 14, 2022

{BYSHC} Sketch Challenge 18 ~ Foxy Monochromatic Christmas

 Hello there crafty friend!
Today I'm sharing a cute monochromatic card with a vintage vibe using the {BYSHC} Sketch Challenge 18 for the month of January and an adorable stamp from Unity Stamp Co!! Actually, I used four different stamp kits from Unity for this card... so fun to combine all these stamps for one card!
 

First I stamped the background for the bottom panel with Ground Espresso Distress Oxide ink on Kraft card stock using the Search for those Moments {Layers of Life 11/17} stamp kit and the Magical {Bliss and Wonder} {Layers of Life 10/13} stamp kit. I distressed the edges with a bit more Ground Espresso Distress Oxide ink with a blending brush.


I stamped my favorite Christmas background stamp... The Christmas Tree background stamp... on a scrap of Kraft card stock with Ground Espresso Distress Oxide ink and trimmed it to a banner. I distressed the edges of the banner using the Ground Espresso Distress Oxide ink.


I stamped the Foxy Christmas stamp and the sentiment... yup, you guessed it... with Ground Espresso Distress Oxide ink on Kraft card stock. I trimmed up the panel and then distressed it again with the Ground Espresso ink. I mat each of the layers with a slightly larger piece of Early Espresso card stock and then another slightly larger mat of Kraft card stock. Each mat was approximately 1/8" larger. 


I added a few scraps of card stock underneath the fox layer on the left side so that it would lay flat. I also added a couple scraps under the right side of the sentiment. A great trick to get all flat layers! I adhered the entire panel to a Kraft A2 top fold card base {turned on the side}. I finished off the card with a few Kraft enamel dots from the Cozy Flannel Gloss enamel dots pack from Gina Marie Designs.

Here's another look at the {BYSHC} Sketch 18 for the month of January!
I hope you'll join us and play along with the sketch! Come join in the fun over at the Build Your Stash Holiday Cardmakers Facebook group! If you're interested in seeing a bit more inspiration, check out the {BYSH} Cardmakers blog! I'll be back next Friday with my weekly Christmas card and more inspiration for the Sketch Challenge 18! And on a side note... Unity is having a sale with fun new releases for Angela's birthday!! Head over to the Unity website to check it out!


Thanks so much for stopping by!
See ya next time.

Inky hugs,
Crystal


{Please note that comment moderation is ON. Your lovely comment will appear shortly.}

Saturday, August 7, 2021

~ Friends of Unity August 2021 Blog Hop ~

  Hello there crafty friend!

It's time for our August 2021 Friends of Unity blog hop!! Before I get to this month's fun cue and the cards I created... we have a new friend joining us!!

Please give April Sarandrea a great big welcome!!!

I've admired her fantastic creations... such a talented lady and I was super excited when she accepted our invitation to join our little hop! Let's get to it, shall we?!
This month we have a super fun cue...


LET'S GO FOR A RIDE!
I had fun with this cue... it's actually a great one for masculine cards, but I took three totally different takes on the cue. I hope you'll check them out and let me know in the comments which is your favorite!


My first card using the gorgeous Fall truck from the August 2021 KOM called Pumpkin Season. I wanted to do a monochromatic card but then I also had to color the truck and the pumpkins so this is a mix of monochromatic and selective coloring! LOL... I used a fun Happy Fall embossing folder for my background. Not sure what company it's from... it doesn't say on it.


I die cut the truck with a large circle die from Waffle Flower called Additional Circles die. I trimmed the sentiment... also from this month's KOM... and adhered it to the circle. Then I popped up the sentiment and focal piece with lots of foam tape. Here's a quick list of the Copic markers I used:

Truck ~ BG70, BG72, BG75
Pumpkins ~ YR15, YR21, YR68, YG61, YG67, E37, E55
Grounding ~ N0, N2


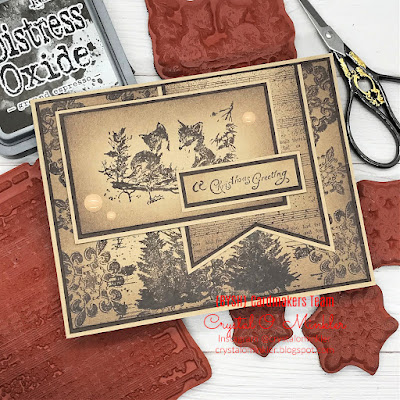
For my second card I also used a fun embossing folder called Diamond Plate from Sizzix and Tim Holtz. I embossed the True Black card front and a scrap of Weathervane card stock. I trimmed the Weathervane card stock and adhered it to the card front. I adhered those to a white A2 top fold card base and set it aside.


I stamped the motorcycle from the Ride it Out stamp set with Memento Tuxedo black ink and colored it with a few neutral grey Copic markers ~ N0, N1, N3; and a couple cool grey markers ~ C00, C2. I fussy cut the motorcycle cleaning up the edges with a Memento Tuxedo black marker and adhered it to the card. I stamped the sentiment from the For the Guys stamp set with Wow Clear embossing ink and melted some Alabaster White embossing powder from Brutus Monroe. I trimmed the sentiment and popped it up on the card. I'm thinking this one will be my husband's birthday card.


And for my last card, I had a little fun with the cue... witches gotta ride, too!! Am I right?! LOL 
I thought it would be fun to make a quick Halloween card with the adorable Little Witchy stamp set. I again used an embossing folder for my background... the Spider Web embossing folder from Provo Craft Cuttlebug... and used some fun Halloween pattern paper this time. This is the Hocus Pocus papers from Whimsy Stamps. The pattern paper cracked a bit when I embossed it but I kinda like the distressed look it gives the background.


I stamped the adorable witch with Memento Tuxedo black ink and colored her up with the following Copic markers:

Skin ~ E000, E00, E11, R00, R20
Hair ~ RV06, RV10, RV21
Clothes / Hat / Shoes ~ YG11, G14, N0, N2, N3, N5
Broom ~ E21, E27, E33, E51

I fussy cut the witch and cleaned up the edges with my Memento Tuxedo black marker. I adhered her to the card and then stamped the sentiment with Wow Clear embossing ink and melted some Alabaster White embossing powder. I trimmed the sentiment and adhered it to the card. Done!

Well, that's it for my cards this month... before you head off to the next person in the hop I need to announce my winner from last month's hop.


Congratulations Andre M.!!
Please email me at crystalominkler@gmail.com to claim your prize. 
Prize must be claimed within two weeks. 

Please hop along and enjoy some more inspiration from the Friends of Unity. I'm sure that some of my friends are having a giveaway so be sure to comment as you hop along.


Let's get to the hopping...

Crystal <--- you're here

up next ---> April


Thanks so much for supporting our little hop!
See ya next time.

Inky Hugs,
Crystal


{Please note that comment moderation is ON. Your lovely comment will appear shortly.}