Showing posts with label pocket card. Show all posts

Monday, October 17, 2022

Membership Monday ~ October 2022 BOM Santa Express ~ Unity Stamp Co.

 Hello there crafty friend!
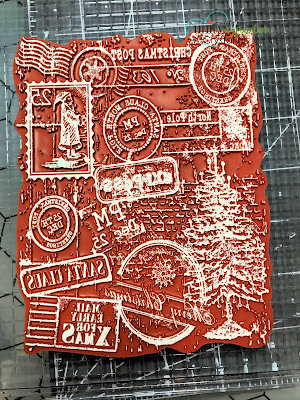
Today I'm sharing some inspiration for the amazing October 2022 Background of the Month from Unity Stamp Co. called Santa Express! This background is so amazing! I love the beautiful mix of images and really just wanted to showcase them as a whole for my card!


So I was thinking a pocket would be a fun way to showcase the background without covering it up too much. Of course, I did put that big bow on it but it doesn't cover it up too much. I stamped the background twice on Kraft card stock with Sugar Cube Pigment ink from Taylored Expressions. I covered the background with Alabaster White embossing powder tapping off the excess into a coffee filter. I melted the ep with my Wagner Precision Heat Tool.


Here's the stamp all inked up... look at all the detail!! Love love love it!


A bit of ink smooshing for both backgrounds with Candied Apple and Mowed Lawn Distress Oxide inks. I didn't want to cover the backgrounds completely... letting some the Kraft show. I die cut both backgrounds with the largest die from the Postage Stamp {nesting dies} from Unity. I distressed the edges of both backgrounds with Vintage Photo and Ground Espresso Distress Ink.


I tore off the top of one of the backgrounds and distressed the torn edge as well. I used iCraft Easy-Tear Tape to adhere the sides and bottom of the top background piece to the other background piece creating my pocket. I wrapped the pocket with Cherry Cobbler Sheer Linen Ribbon from Stampin' Up and tied a pretty bow.


I adhered the background to a Kraft A2 top fold card base using liquid glue. I then stamped the sentiment with Black Amalgam ink from Gina K Designs. I trimmed it and distressed the edges with Vintage Photo Distress Ink leaving some white in the center. I adhered it directly to the card... I considered popping it up with foam tape but the ribbon is enough bulk on here I think. The pocket is great for gift cards, a bookmark, or even just a note. I really love how this turned out!


Such an amazing new background stamp! You can check out the Background of the Month membership over at Unity Stamp Co. I'll be back next Monday with more inspiration for the beautiful Kit of the Month!


Thanks so much for stopping by!
See ya next time.

Inky Hugs,
Crystal


{Please note that comment moderation is ON. Your lovely comment will appear shortly.}

Wednesday, November 10, 2021

Hot Cocoa Pocket Card ~ Coffee With a Heart ~ Unity Stamp Co.

 Hello there crafty friend!
Today I'm sharing a cute Hot Cocoa Pocket card using the awesome new Coffee With a Heart stamp kit from Unity Stamp Co. I love making pocket cards and it's even more fun when it's a gift you can send to a friend!


The design is very simple. The bottom layer is just a 4-1/4 x 5-1/2" piece of pattern paper. The two front papers also measured 4-1/4 x 5-1/2" {these can be cut wider because my pieces didn't quite cover the whole front}. 


I cut the two front papers at a diagonal. I scored the front papers on the longer edge and adhered them to the back of the bottom layer.


I then adhered the two front papers to just the bottom of the card and to each other where they overlapped. I haven't found my tear tape or red tape liner so I just used liquid glue for this and was careful not to put too much glue.


I stamped the pretty heart cup and marshmallows and then I colored them with the following Copic markers:

Cup ~ Y15, YR15, YR21, YR68
Cocoa ~ E23, E27, E50
Marshmallows ~ C00, C2


I trimmed the sentiment and adhered it to the heart mug. I then adhered the sentiment and the bottom portion of the heart mug to the front of the pocket card. I wrapped the card with some twine and tied a pretty bow. This size of pocket card works perfectly with the cocoa packets. I plan to send this to a friend in a little care package. I hope my directions make sense... if you have any questions, please feel free to ask in the comments. I'll do my best to answer any questions you might have.


Thanks so much for stopping by!
See ya next time.


Inky Hugs,
Crystal


{Please note that comment moderation is ON. Your comment will appear shortly.}

Sunday, January 12, 2020

Polka Dot Orchard ~ Anything Goes Card ~ Pocket Card that's a Gift!

Hello there crafty friends!
Today, I'm sharing a cute little gift idea that I made for Christmas gifts using the adorable From Our Gnome to Yours digi set. I made these for Christmas, but I think these could be used any time of the year and for all occasions! 


I did customize the measurements to fit the Starbucks hot cocoa packets that I was including in the pockets. I started with a 8-3/8 x 6-1/8" piece of kraft card stock. I scored it at 1/4", 4-1/4",  and 4-3/8". I creased the scored lines well with my bone folder and then adhered the 1/4" flap to the inside of the pocket using tear tape. With the pocket ready to go, now it was time for the fun part... adding pretty papers and the adorable gnome from the From Our Gnome to Yours digi set.


I cut the patterned paper from Lawn Fawn's Snow Day Remix papers to 3-3/4 x 6" and then used a pencil to lightly mark off my cut points for the diagonal cut on the top portion. Once I had all of those cut, I used those cut off diagonal pieces to add another layer of paper to the pocket. 


I mix matched a bunch of the papers and for this particular pocket, I adhered the bunny paper on the top portion where the gnome would be adhered. On my other pocket cards (sadly, I forgot to take a picture), I adhered the diagonal piece of paper on the bottom portion where the gnome would be adhered. I hope that makes sense.


Now for the cute gnome... I resized and combined the Christmas tree digi with the gnome holding the sign that says "Wishing you a Merry Gnomemas and lots of holiday cheer for a bright year" in a Word document. I was able to fit 9 of these on one full 8-1/2 x 11" sheet of card stock. I printed off a few of these sheets with this little guy on kraft card stock and colored them all with the same prismacolor pencils. I trimmed each of them down and mat them on a piece of white card stock that I had die cut with a small stitched square die.


I adhered the mat gnome panels to the front of the pocket cards with tear tape. I did leave the top of the gnome panel open on some so I could slide in a gift card. It really turned into quite a fun gift idea and even though I assembled over 20 of these, I had so much fun and can't wait to make more!


To finish these off, I added the hot cocoa packets and candy canes... I even added some twine to some of the ones that I sent to family and friends (sadly, I didn't get a picture before sending those off). I sure hope that the family and friends that received them really enjoyed them!

Thanks so much for stopping by!
See ya next time.

Inky Hugs,
Crystal

Tuesday, July 30, 2019

Unity Stamp Company ~ Cuddlebug Raccoon with Pumpkin Patch {border backgrounds} ~ Happy Fall

Hi there crafty friends!
I wanted to share one of the cards that I created for the latest Unity Stamp Company release using the adorable Cuddlebug Raccoon and gorgeous Pumpkin Patch {border backgrounds} stamps!!

My original plan was to make a simple card with the cute raccoon in the back and the pumpkins in the corner but then I colored the raccoon and the leaves and nuts and realized that the pumpkins would cover a lot of that up so, I got to thinking how to work around that and decided to make a pocket card!


 Like I said, I colored the raccoon and also the pumpkins.
 I used the following Copic markers:
Raccoon ~ W00, W1, W2, W4, N0, N1, N2, N4, N7
Ground ~ E21, E23
Pumpkins/Leaves ~ BG09, BG18, BG72, YR14, YR15, YR21, YR24, YR27, YR68, G24, G94, G99 Nuts ~ E55, E57, E59

Once the images were colored, I die cut the pumpkins on the edge and then fussy cut the inner portion. I die cut the raccoon and layered him with some pretty fall paper from Carta Bella called Hello Fall. I adhered that to a True Black card measuring 3-3/4 x 4-7/8"... on the other side of the Cuddlebug Raccoon I added a piece of white card stock measuring 3-1/2 x 4-5/8". That's where I can add a personal message to the recipient. I tied off some jute twine and set that part of the card aside.


I die cut a piece of kraft card stock with the same stitched rectangle die I used for the edge of the pumpkins and then I adhered the kraft piece to a True Black card measuring 4-1/4 x 5-1/2... so it's not a card base, it's just a card front. Using tear & tape adhesive I adhered the pumpkins to the card just on the very edge leaving the pocket for the raccoon card.


A fun way to incorporate a portion of the new Pumpkin Patch {border backgrounds} stamp along with the adorable Cuddlebug Raccoon! I just love how this turned out! I hope you do too!

Thanks so much for checking out my blog today!
See ya next time.

Inky Hugs,
Crystal