Showing posts with label cuddlebug. Show all posts

Tuesday, October 25, 2022

Halloween Series 2022 ~ Have a Killer Halloween ~ Unity Stamp Co.

 Hello there crafty friend!
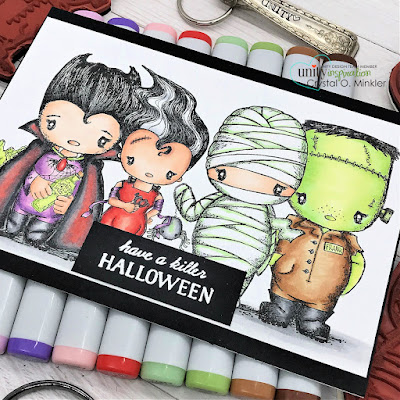
I am back with my final post for my Halloween Series 2022 and today I have a fun card that I've been wanting to make forever!! I just love the Cuddlebug stamps from Unity Stamp Co. and couldn't resist these adorable Halloween stamps when they released but I've always thought it would be super fun to make a card with all of them together!


Aren't they the cutest?! I stamped the Bride of Frank first... you know, ladies first! LOL. I actually wanted her in the front just a little bit so I stamped her first and then I also stamped a mask for her. I fussy cut the mask and placed it over her. And then I stamped Count. No mask for him since he's on the end. Woo hoo!


I kept the mask on Bride of Frank and stamped Mummy... I didn't want to lose his little spider friend so I didn't have them overlap too much. And then I stamped a mask for Mummy. I fussy cut that one too and then I stamped Frank.

 Now a good tip for when you are cutting masks is to cut on the line. Even cutting most of the black line is okay because when the second image is stamped the height difference in the papers will make it to where there's a little gap between images. If you cut away some of that black line there's less of that gap. Another good tip is to have a Black Copic Multi Liner pen... I had a couple spots where there were gaps so I used my 0.03 Copic Multi Liner pen to draw those lines back in. Easy peasy!


My list of Copic markers this time isn't quick... there was a lot of coloring. I think it took me about an hour. Maybe a tiny bit more to color all these cuties. Here's the list of Copics I used:

Count ~ E000, E00, E11 {skin}; N4, N2 {hair}; V000, V12, V15, V17 {clothes}; N0, N2, N4, N6 {boots}; N0, N2, N4, N6, R20, R14, YG11, YG21{cloak}; YG11, YG03, E31, E35 {bottle}; R20, R14, R27 {spider}; YG11, YG03, YG21 {frog} 
Bride of Frank ~ E000, E00, E11, E04 {skin}; C00, C2 {hair}; R000, R14, R20, R27, V000, V12, V15, V17 {clothes}; R20, R14, N2, N4 {heart}; N2, N4 {bolts}
Mummy ~ E000, E00, E11 {skin}; YG11, C00, C2 {cloth}; N0, N2, N4, YG11 {spider}
Frank ~ YG21, YG11, YG03 {skin}; YG11, YG03, N2, N4, N6 {bolts}; E31, E34, E35, E37 {clothes}; N0, N2, N4, N6 {boots}; N4 {hair}
Ground ~ N0, N2, N4


I just love how this turned out! I had hoped to color a background but time has not been on my side so maybe I'll add one but for now it's done. This is a large card measuring 6-1/2 x 9"; scored at 4-1/2". Because of the size I went with a simple black card front. The sentiment is from the Bride of Frank. I stamped it with Sugar Cube Pigment ink on True Black card stock and heat embossed some Alabaster White embossing powder.

I hope that you've enjoyed my Halloween Series for 2022! I've enjoyed getting inky with some of my Halloween stamps. I'll be back a little later this morning with my Christmas card for today.


Thanks so much for stopping by!
See ya next time.

Inky Hugs,
Crystal

{Please note that comment moderation is on. Your lovely comment will appear shortly.}

Thursday, October 20, 2022

Happy Halloween Count ~ October Sketch Challenge ~ Unity Stamp Co.

 Hello there crafty friend!
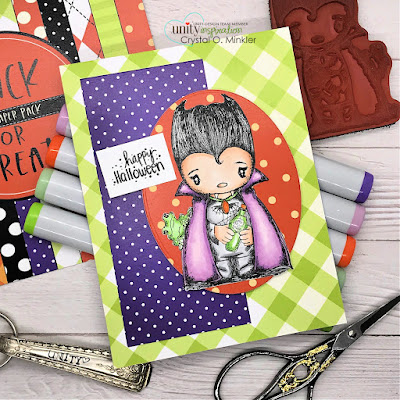
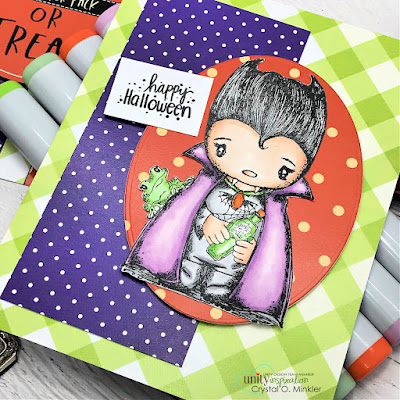
Today I'm sharing more inspiration for the Unity October Sketch Challenge that I'm hosting in the Unity Show & Tell Facebook group. With Halloween quickly approaching I just had to make one more Halloween card! The adorably spooky Count stamp is just about THE cutest vampire I've ever seen!


I paired up the Count with the sweet Trick or Treat {paper pack} that's also available at Unity. Last week the birthday gnome card that I made needed mats to break up the layers of pattern paper. But the colors in the papers I chose for this card make it easy to just layer them up without any mats.


Feel free to alter the sketch to work with your design! The original piece of striped green paper that I planned to use behind the Count didn't quite work so I opted for the orange polka dot oval that was in my paper pack. The Count looked better centered on the oval rather than offset so I altered that part of the sketch. Here's a quick list of the Copic markers I used for this spooky cute vampire:

Skin ~ E000, E00, E11
Hair ~ N1, N3
Clothes ~ N1, N3
Cape ~ V000, V12, V15, V17, YG11, YG23, G14, YR21, YR68
Frog ~ YG11, YG23, G14
Bottle ~ YG11, YG23, G14, YR21, YR68


I stamped the sentiment from Little Boos with black ink, trimmed it and adhered it to the oval before popping up the whole focal piece. You can check out my video for this card here... Happy Halloween Count | October Sketch Challenge | Unity Stamp Co.


Here's another look at the sketch! Please note that the sketch is meant to inspire and not require. Feel free to alter it to work for your creation and most importantly have some inky fun! I can't wait to see what you create! Be sure to share your cards in the Unity Show & Tell group and also add them to the sketch challenge album in the group to be entered for a prize!! I'll see you back here next Thursday with one last card for this month's sketch challenge.


Thanks so much for stopping by!
See ya next time.

Inky Hugs,
Crystal

{Please note that comment moderation is on. Your lovely comment will appear shortly.}

Friday, July 16, 2021

{BYSHC} Sketch Challenge 12 ~ Santa's Lil Helper Cuddlebug ~ Unity Stamp Co.

 Hello there crafty friend!
I'm back with my weekly card using the fun {BYSHC} Sketch Challenge 12 along with an adorable stamp from Unity Stamp Co. called Santa's Lil Helper Cuddlebug. I love this sweet deer and his little birdie friends!! I've had this adorable stamp in my collection for some time and I don't think I've inked it up until now.


I started by picking my pretty Christmas papers... I went with the beautiful A Perfect Winter paper pack by Echo Park Paper. Love the combinations of grey, blue and red in these papers! So beautiful!


I stamped the sweet deer with Memento Tuxedo black ink and colored it with the following Copic markers:

Birdies: BG000, BG01, BG10
Collar: R000, R14, R27, Y06, Y35
Deer: R00, R20, E21, E25, E27, E51, E55

Once I had the deer colored, I fussy cut it and set it aside. And then I stamped the sentiment that's included with the deer in the set... only I decided to trim it so it wasn't too long.


Here's a look at the fun {BYSHC} Sketch 12 for the month of July!
I hope you'll join us and play along with the sketch! If you're interested in seeing a bit more inspiration, check out the {BYSH} Cardmakers blog! I'll see you next week with another fun Sketch 12 card!


Thanks so much for stopping by!
See ya next time.

Inky hugs,
Crystal


{Please note that comment moderation is ON. Your lovely comment will appear shortly.}

Saturday, August 3, 2019

~ Friends of Unity August Blog Hop ~

Hello there crafty friends!!
Our hop this month is all about friends... of the furry variety!! Lol! Such a fun cue and Unity Stamp Company has a huge variety of animal stamps! So many to choose from!


One of my favorite lines of stamps available at Unity are the adorable Cuddlebug stamps designed by the wonderful Tierra Jackson. And it just so happened that I was needing a baby card so I grabbed the adorable Cuddlebug Fox and some Canson XL watercolor paper and got to watercoloring!


I had already picked out my papers ahead of time... the Little Adventurer paper pad by Pink Paislee. I just love that little fox in the paper (can you see him peeking from the right side?) so I decided to go with the Cuddlebug Fox though there are so many different Cuddlebugs to chose from that would have been just as cute... a bunny, a raccoon, a teddy bear, and an elephant.


It had been awhile since I had done any watercoloring. I need to do more... I'm rusty! I usually heat emboss my image to keep the watercoloring contained and I forgot my own tip and the little fox got a little messy, but he's still pretty cute! Once he was dry, I die cut him with a die from the My Favorite Things Blueprints 24 and then I mat it with Spring Rain card stock and then fussy cut around it. I trimmed my patterned papers and adhered them to a Spring Rain card base. I then stamped the sentiment from Bundle Congrats that says "Congratulation on your new little bundle"... isn't that the cutest!?! Perfect for my card! To finish off the card I added a Spring Rain button with some white baker's twine. A cute card for an adorable new baby boy!!!


Now onto my second card... yup... I'm still working on Christmas cards! Why not?! It's been so hot the last week I've been dreaming of cooler temps and this cute Winter Bunny Cuddlebug was the perfect stamp to get me thinking about cooler days ahead. For this card I started by coloring the sweet bunny with Copic markers and then I was lucky enough to match it with the gorgeous Plaid Patterns Merry & Bright paper pad by My Favorite Things! And then it was fun finding the right card stock to coordinate but thank goodness for my hoarding tendencies because Cool Caribbean was the perfect blue!! Anyone else hoard that retired Stampin' Up! color?! Lol! I also chose Lavender Moon (PTI) which looks a bit more purple in the pictures here but in person it's perfect! The card needed a little something to give it that wintry feel and some die cut snowflakes were the perfect touch. I used Simon Says Stamp Rina Snowflake... such a cute snowflake! I adhered all my layers to a white card base and the popped up my winter bunny and the sentiment. Done!

Here's a list of the Supplies I used that weren't mentioned above:
Copics ~ W00, W1, W3, R000, R20 (bunny), C00, C1, R81, R85 (clothes), 
BG11, BG23, V06 (gift)
Lawn Fawn Everyday Sentiment Banners
Taylored Expression Stitched Oval Stacklets
Sakura Clear Gelly Roll pen (sparkle on the snow)


Here's a close up photo of the sweet bunny! I just adore this stamp!
I'm linking up my Winter Bunny Cuddlebug card to the fabulous Mojo Monday Sketch challenge that inspired my card design! Love a fabulous sketch challenge and Julee Tilman has some of the best sketches!!


Now, I heard a rumor that there's some giveaways along our hop... just kidding! There's always giveaways!! In fact, I have two duplicates that I've discovered this week so I'll be picking two lucky winners and I'll announce them during next month's hop! Be sure to check out all the fabulous creations along the hop and comment on each blog for a chance to win!! As always, I'm super thankful for your support of our little hop!

Let's get to the hopping...

Crystal <--- you're here

up next ---> Eileen


Thanks so much for checking out my blog post!
See ya next time.

Inky Hugs,
Crystal


Tuesday, July 30, 2019

Unity Stamp Company ~ Cuddlebug Raccoon with Pumpkin Patch {border backgrounds} ~ Happy Fall

Hi there crafty friends!
I wanted to share one of the cards that I created for the latest Unity Stamp Company release using the adorable Cuddlebug Raccoon and gorgeous Pumpkin Patch {border backgrounds} stamps!!

My original plan was to make a simple card with the cute raccoon in the back and the pumpkins in the corner but then I colored the raccoon and the leaves and nuts and realized that the pumpkins would cover a lot of that up so, I got to thinking how to work around that and decided to make a pocket card!


 Like I said, I colored the raccoon and also the pumpkins.
 I used the following Copic markers:
Raccoon ~ W00, W1, W2, W4, N0, N1, N2, N4, N7
Ground ~ E21, E23
Pumpkins/Leaves ~ BG09, BG18, BG72, YR14, YR15, YR21, YR24, YR27, YR68, G24, G94, G99 Nuts ~ E55, E57, E59

Once the images were colored, I die cut the pumpkins on the edge and then fussy cut the inner portion. I die cut the raccoon and layered him with some pretty fall paper from Carta Bella called Hello Fall. I adhered that to a True Black card measuring 3-3/4 x 4-7/8"... on the other side of the Cuddlebug Raccoon I added a piece of white card stock measuring 3-1/2 x 4-5/8". That's where I can add a personal message to the recipient. I tied off some jute twine and set that part of the card aside.


I die cut a piece of kraft card stock with the same stitched rectangle die I used for the edge of the pumpkins and then I adhered the kraft piece to a True Black card measuring 4-1/4 x 5-1/2... so it's not a card base, it's just a card front. Using tear & tape adhesive I adhered the pumpkins to the card just on the very edge leaving the pocket for the raccoon card.


A fun way to incorporate a portion of the new Pumpkin Patch {border backgrounds} stamp along with the adorable Cuddlebug Raccoon! I just love how this turned out! I hope you do too!

Thanks so much for checking out my blog today!
See ya next time.

Inky Hugs,
Crystal

Friday, March 8, 2019

Unity Stamp Company ~ Cuddlebug Owl ~ Sweet Birthday Card

Hello there! Today, I am sharing a sweet birthday card that I made for my niece. Isn't this adorable Cuddlebug Owl from Unity Stamp Company just the cutest you've ever seen!! I love it so much!
I have had this stamp on my desk for a long time just waiting for inspiration.


And finally inspiration came when I resolved to finish a paper pad I had laying around my desk. I thought this pretty pink star paper would pair nicely with the kraft paper in the paper pad and both of those would look very nice with a pink and purple owl. I trimmed the papers to fit on a top fold 4-1/4 x 5-1/2" white card base. I adhered the papers with mono multi purpose liquid glue 
and set the card aside.


I stamped the Cuddlebug Owl using Memento tuxedo black ink and started coloring using the following Copic markers ~ RV10, RV21, V0000, V04, V12, YR15, YR16, YR21, YR27. I die cut the owl with the Pleated Lace Rectangle die from Gina Marie Designs. I popped the die cut image up on the card using stampin' dimensionals. I then stamped the sentiment from the Hugs, Kisses & Birthday Wishes sentiment kit using VersaMark watermark ink and heat embossed a fine white embossing powder. I trimmed the sentiment into a banner and adhered it to the card with a combination of stampin' dimensionals and liquid glue. My final touch for this card was some Sprinkled Sugar Stickles that I applied to the little heart on the owl. Aww... love how this turned out!


Thank you friends for checking out my blog post!
See ya next time.

Inky Hugs!
Crystal