Showing posts with label Newton's Nook. Show all posts

Wednesday, February 16, 2022

Coolest Chick Square Notecards ~ Coolest Chick Ever ~ Unity Stamp Co.

 Hello there crafty friend!
Unity has an amazing new release and sale going on right now! I couldn't wait to play with the cute chicken in the Coolest Chick Ever stamp kit!! This adorable chick with the glasses has got to be my favorite chicken from the trio in the set... SO cute! 


I decided to make a couple note cards with basically the same colors but change up the color of the glasses and the coordinating card bases.


I kept the design of each card pretty simple with just the chicken and sentiment together. And then I stamped the cloud stamp four times and colored just the bottom of the clouds with blue Copic Markers.


I fussy cut the clouds and cleaned up the edges by coloring them with a Memento Tuxedo Black marker.


I was able to use two clouds per card to make it look like four partial clouds. I adhered one side of the cloud and cut along the edge with my scissors and then used the cut off portion on the other side of the card. A super easy trick!


The chicken layer that measures 3-1/2" squared was adhered to a Kraft piece of card stock that I die cut with the Square dies from Newton's Nook Designs. And then I adhered the layers to the Daffodil Delight and Real Red card bases. The card bases measure 8-1/2 x 4-1/4"; scored at 4-1/4".


I just realized that I didn't color the sky around the chicken... LOL! Well, I think it still works. Maybe it was a cloudy day. Oh, well... I still think they turned out cute!


Here's a list of the Copic Markers I used for both cards:

Chickens ~ C00, C2, C3, YR21, YR15, R00, R20, R27
Bows ~ Y11, Y15, R20, R27
Glasses ~ R00, R20, R27, Y11, Y15
Clouds ~ B0000, B000
Hearts ~ R20


Be sure to stop by Unity Stamp Co. and check out the amazing new releases and, of course, the fab sale!


Thanks so much for stopping by!
See ya next time.

Inky Hugs,
Crystal


{Please note that comment moderation is ON. Your lovely comment will appear shortly.}

Thursday, December 16, 2021

Hello Bookmark ~ Advent Calendar Day 16 ~ Unity Stamp Co.

 Hello there crafty friend!
It's Day 16 of my Countdown to Christmas series!! I'm sharing a little reveal and a project each day on my YouTube channel using the fantastic Advent Calendar from Unity Stamp Co!! Please be sure to subscribe to my channel so you don't miss a day of this fun countdown series!


Day 16 ~ a cute stack of books with a succulent!


I paired it up with the Simple Spring {paper pack}, also from Unity. 


The sentiment is from the Not the End of Your Story {February 2021 Sentiment Kit}, and is stamped with Wow Clear Embossing ink on black card stock and then I melted some Alabaster White Embossing powder.

Check out my process video here... Unity Advent Calendar Day 16.


I'll be back tomorrow with Day 17 of the Advent Calendar reveal and another cute card!


Thanks so much for stopping by!
See ya next time.


Inky Hugs,
Crystal


{Please note that comment moderation is ON. Your comment will appear shortly.}

Monday, July 26, 2021

Christmas in July 2021 {BYSHC} Hop ~ Sweater Weather ~ Newton's Nook Designs

 Hello there crafty friend!
It's day 4 of the Christmas in July 2021 {BYSHC} Hop and I am super excited to share a card that I made using some really sweet products from new Sponsor Newton's Nook Designs!! I've been a huge fan of Newton's Nook Designs for some time... and I was tickled pink when they said yes to sponsoring our little Christmas themed hop!! Yay!


I was so excited that I actually had a hard time picking which products to use for my card! I finally decided a simple winter scene would be fun using the awesome Forest Scene Builder dies. I die cut the four trees, a few birds and the cute squirrel and colored them up with the following Copic markers:

Trees ~ YG11, G29, G46, E51, E55, E57
Cardinal ~ R000, R14, R46, YR15
Canada Jays ~ N1, N3, C00
Squirrel ~ E21, E23, E25, E27 
Eyes ~ 0.05 Copic Multi Liner


The cute bunny is from the Sweater Weather stamp set and I die cut it with the coordinating Sweater Weather die set, both from Sponsor Newton's Nook Designs. The sweet mug is from the Cup of Cocoa stamp set, also from Newton's Nook Designs. I colored up the images with the following Copic markers:

Bunny ~ C00, C2, R01, R20, E51 
Clothes ~ R000, R14, R46, C00, C2, YG11, G24, G46
Mug ~ YG11, G24, G46, R000, R14, R46, C00, C2, E21, E23, E25, E27

I fussy cut the mug and adhered it to the bunny. The plaid background paper is the Perfectly Plaid Christmas paper pack from Lawn Fawn. I die cut a hillside with a stitched border die and built my scene on my card. The sentiment is also from the Cup of Cocoa stamp set
I just love how this turned out!

I'm having a giveaway during the hop... to enter you just need to comment on my blog posts each day during the hop! Each comment {one per blog post, please} will get your name in a hat and my daughter will pick a winner. Winner will be announced here on my blog Sunday, August 1st.
 To see the prize package I'm giving away, check out my blog here.


Have you checked out the Christmas in July 2021 {BYSHC} Hop over on the {BYSH} Cardmakers blog? So many wonderful Christmas/Holiday cards being shared!! I hope you'll join us and start building your stash of holiday cards!


Thanks so much for stopping by!
See ya next time.

Inky Hugs,
Crystal


{Please note that comment moderation is ON. Your lovely comment will appear shortly.}

Friday, November 8, 2019

Scrapping for Less ~ Waffle Flower ~ Winter Wishes

Hello there crafty friends! 
I'm back with a super cute card using the adorable Winter Wishes stamp set by Waffle Flower!!! 
Oh my goodness... I love this adorable set!!


If you check out the link for this set above, you'll notice that I omitted one of the kids. I knew that I had just enough room for two kids in my card design so... sadly one of them had to be omitted. But since I colored this stamp in steps with my Stampin' Up markers, it was really easy to just color the two kids. This is an easy 2-layer builder stamp set... meaning you stamp one portion and then easily line up the next portion to stamp. I started with the hats and colored them to match the beautiful colors in the Santa's Workshop papers by Carta Bella. I used Green Galore and Cucumber Crush for the little boys hat and Watermelon Wonder and Real Red for the girls hat. The eyes and mouth are also part of this first stamp. I used Chocolate Chip for the eyes and Blushing Bride for the mouth.


Once I had the hats done, I removed the first stamp and lined up the second stamp. It was so easy to line these up! I wanted to add some blue into the card to play off of the background paper I chose so I used the Soft Sky marker. The cheeks and nose are also part of the second stamp... I used the Blushing Bride marker again. Now at this point, I had a little bit of dimension in the hat with the different colored markers I used, but the mittens and pom poms needed a little something so I pulled out my copic markers. I'll be honest, I don't know if coloring on dye ink with copics is totally safe, but I haven't had an issue with my markers. I used BG000 and BG01 on the pom poms, mittens, and bow. Then I got to thinking the faces needed to be colored in... they were just white at this point. So I pulled out my got to skin copic markers ~ E000, E00, and E21. I was careful to color around the cheeks, mouth, nose, and eyes because I really wasn't sure what would happen... Lol! Coloring in the faces really gives this adorable stamp that extra cute touch!!


I stamped the sentiment with the same markers... Cucumber Crush, Watermelon Wonder, and Soft Sky. The dot in the 'i' for the word Winter connected to the letter since I had to ink it up a few times to get nice coverage, so I made a new dot! To finish off my card, I thought a little hot cocoa cup would be a fun addition. I just happened to have the Cup of Cocoa stamp set by Newton's Nook Designs on my desk so I inked up the stamp with the Real Red and Soft Sky markers. I then colored it in with the following copic markers ~ B0000, B00, R00, R14. I stamped the snowflake with the Cucumber Crush marker but it was too dark so I went over it with a white gel pen. It's not quite white... LOL! But the nice tinge of blue works perfectly with the blues I have in the card. I sure love how this card turned out!!

This fun card is another take on the sketch that I created for the November Sketch Challenge in the Scrapping for Less Show & Share Facebook group... we'd love to have you join us and play along!!  You don't need a blog to enter the challenge as you're adding a photo of your creation directly in the Challenge album in the group. You are welcome to include a link to your blog in the description of your creation.


Here's one more look at the card... I'm so happy that I could add the hot cocoa element so that I can enter my card in the Fall | Winter 2019 Coffee Lovers Blog Hop!!


Today is the last day to play along with this hop! I sure hope you get a chance to play!


Thanks so much for stopping by!
See ya next time.

Inky Hugs,
Crystal

Thursday, May 9, 2019

Unity Stamp Company ~ Coffee Lovers Spring I Summer 2019 Blog Hop


Hi crafty peeps!
Can you believe that there's only a couple more days for the Spring/Summer Coffee 
Lover's Blog Hop?! I can't believe it's almost over!! So sad... but I have a fabulous new release to share with you from Unity Stamp Company called Cafe Delights!!


When I saw the gorgeous Cafe Delights stamp set, I just knew I had to combine it with my first and most favorite Unity stamp of all times... Dream of Being!! I decided to go with rich browns for the building and some pops of red and yellow to finish it off. The Dream of Being image just had to be colored with a light aqua to contrast the rich colors. I used the following Copic markers for my card:

Sky/clouds ~ B0000, N0
Sidewalk ~ N0, N2, N4
Menu ~ N2, N5, E57
Cafe/open sign ~ Y06, Y19
Building ~ E07, E08, E09, E55, E57, E59, N0, N2
Canopy/tables ~ R14, R27, R29
Dream of Being Girl ~ E000, E51, BG10, BG32, E55, E57, E59, R14, N2

I used the Newton's Nook Square die to die cut my colored image and the back layer of Aqua Mist card stock. I adhered the layers with mono multi liquid glue and then popped up the whole square panel with foam tape onto a 5 x 5" square card base. I fussy cut the Dream of Being girl and adhered her directly to the panel with liquid glue. I decided to go without a sentiment on the front... I just couldn't cover any of the front panel.


Here's a close up of the colored images. Love love love the new Cafe Delights kit!!

Don't forget to check out the Spring/Summer Coffee Lover's Blog Hop!!

Thanks for checking out my blog!
See ya next time.

Inky Hugs,
Crystal


Friday, January 25, 2019

Scrapping for Less ~ Flavor of the Month ~ Perk Up & Start the New Year


 Let’s “Perk Up and Start the New Year” with our January Flavor of the Month kit. 
I have a little story to tell…I never drank coffee until I retired about 6 years ago from teaching school…cause who wants a cold cup of what is supposed to be hot coffee? So now…with my wonderful flavored creamer I enjoy a cup of coffee every morning and especially love drinking my coffee while watching crafty videos on YouTube…so sit back and take a look at our Coffee themed FOTM blog hop this month. If you have not already snagged your kit please head over to the Flavor of the Month page and scroll down to choose the level of kit you would like! Make sure you head to the website to check out the rafflecopter, as well, to enter to win a prize!

P.S. I am behind on choosing prizes so stay tuned for those winners on the Teresa Talks 
post on Feb. 1st.


Oh My Goodness!!! When I received my card kit this month... I was crazy excited to start playing! If you follow my blog, you may have noticed that I love coffee! It's nearly an obsession... definitely an addiction! LOL! I actually made 8 cards for this hop and release... I could have made more, but I ran out of time! So this kit seriously blew me away and I'll stop chit chatting about it now so we can get to the cards!


For my first card I used Sketch #1 with Collection One.
I wanted to showcase some of the gorgeous Coffee Time papers in this collection but also had to use some of the fabulous ephemera... all by Scrapping for Less!! The browns and blues in these papers are absolutely gorgeous!! So rich and beautiful... I could just gush about them all day! But I won't... because we have more cards!


For my second card I used Sketch #2 with Collection One.
So you're going to notice that I used variations of sketch #2 for each of the collections and I have to admit that I absolutely love this sketch! It has a great balance of papers and endless possibilities for the focal image! Love love love it!! Oh, and for a little tip for this sketch... I cut the papers into strips and didn't actually layer them over each other. So the top paper is 4-1/4 x 2-1/4", the middle paper is 4-1/4 x 1-3/4", and the bottom paper is 4-1/4 x 1/4". All of those papers are adhered to a Whip Cream card base. I used the following Copic markers to color the beautiful coffee cup from the Humming Along stamp set by Scrapping for Less in Collection One.

Steam ~ N0, N1, N4, Colorless Blender
Cup/Saucer ~ BG000, BG90, B0000, B000,T0, T1, T3, (W1 - heart)
Coffee ~ E27, E47, E49


For my third card I used Sketch #2 with Collection Two.
Here is my first variation on sketch #2... I used the wood icon cup and bubbles in place of the oval/banner focal images in the sketch. I just couldn't cover up the pretty cups in the Love, Coffee and Donuts paper by Scrapping for Less... and the plaid!! Oh my! Love it!


For my fourth card I used Sketch #4 with Collection Two.
Isn't Newton just the cutest hanging from that donut?! I adore this stamp... and I just had to pair it with the fun donut papers in the collection. I also added some of the paper with coffee cups on the top so that I could tie the sentiment in with the card. The top sentiment goes with the main image, but the bottom sentiment I borrowed (and masked to get it just right for my design) from the fabulous Melting Snowman stamp set made exclusively for Scrapping for Less by Your Next Stamp that is included in the Banana Split subscription. 
I used ZIG clean color real brush pens to color in sweet Newton on Canson XL watercolor paper from my stash.


For my fifth card I used Sketch #2 with Collection Three.
For this one, I die cut the focal image using a stitched rectangle die instead of an oval, as seen on the sketch. I also popped up the focal image and the sentiment. I just had to use some of the sequins in the collection by Scrapping for Less... such a perfect mix of colors and sizes!
I also colored this image using ZIG clean color real brush pens on Canson XL watercolor paper from my stash.


For my sixth card I used Sketch #3 with Collection Three.
I fell in love with this beautiful blue paper so there was no way I was going to cover it up. With that being said... I did not stick to the sketch on this one. I omitted two elements on the sketch and enlarged my focal image. Speaking of the focal image... is this melting snowman just the absolute cutest!! He just melted my heart! He's part of the Melting Snowman stamp set included in the Banana Split subscription. I stamped him and the sentiment using VersaMark watermark ink and heat embossed a fine black embossing powder. I then water colored him using ZIG clean color real brush pens. In fact, I stamped and heat embossed all of my watercolored images. I find that to be an easy way of keeping the watercolors where you want them to be. :)


For my seventh card I used Sketch #2 with Collection Four.
This is another variation of sketch #2 using the beautiful Anya for my focal image. I am loving this sweet Brew It Anya stamp... I used her for my sneak peek card. If you missed that card you can check it out here ---> Sneak Peek Card
I stamped Anya with VersaMark watermark ink on Canson XL watercolor paper and then heat embossed a fine black embossing powder. I then watercolored the image using ZIG clean color real brush pens. I fussy cut the image and adhered it to a Cotton Candy card base with the strips of Echo Park Coffee papers.


I love the snarky fun coffee sentiments in the Echo Park Coffee paper included in this collection. I wanted to focus on this sentiment so I cut out an additional one and popped it up over the other. Seriously, love this sentiment!


For my eighth and final card I used Sketch #4 with Collection Four.
For this card I flipped the sketch and omitted the half circles. Since I was using a larger focal image (one of the cut aparts included in the collection) the half circles would have just been lost in the design so out they went! To keep a tiny 'touch' of circles in the card design, I did decided to add some of the pretty enamel dots included in the collection. Such a simple card design... what's not to love!

Here's a look at the Double Dip Subscription.


Here's a look at the Banana Split Subscription.


Next up on the hop is Lynnea!

After checking out the hop, make sure to join the Rafflecopter back on the SFL blog to have a chance to win an awesome prize!!


Thank you friends for checking out my blog post!
See ya next time.

Inky Hugs!
Crystal


Friday, October 19, 2018

Scrapping for Less ~ Newton's Nook ~ Sending Warm Thoughts

Hello! Today I'm sharing a couple of cute Fall cards using the Sweater Weather stamp set by Newton's Nook. Now this adorable set is geared a bit more towards a Christmas theme with the snowflakes and the mittens included in the set. I had a different idea for this set since the temperatures are starting to drop and it's finally time to pull out some sweaters, I really wanted to make a Fall themed card using this set so let's have a look at what I came up with... 


I started by blending some Vintage Photo and Walnut Stain distress ink over the Newton's Nook Tree Rings stencil on two pieces of kraft card stock measuring 4 x 5-1/4". I adhered a strip of coordinating card stock on the left edge and then adhered a 1-1/2" strip of Echo Park Celebrate Autumn patterned paper on both pieces of stenciled kraft card stock. I then mat these pieces with a dark brown card stock measuring 4-1/8 x 5-3/8" and adhered them to kraft card bases. I stamped the sentiment on a piece of coordinating card stock using Versamark watermark ink and heat embossed a fine white embossing powder. I then die cut it with a banner die that I trimmed on one end. I adhered these banners to the card and set them aside.


Since I wanted a Fall theme for my card, I decided to use the coffee cup and pumpkins from the Newton's Nook Fall-ing For You stamp set that was included in the September 2017 Flavor of the Month card kit. I stamped all the images in Memento tuxedo black ink and them colored them in with the following Copic markers:

Newton ~ YR0000, YR21, YR24, BG70, BG72, N0, N1, N2, R37, R56
Bear ~ E44, E47, E49, E70, E71, E74, R00, YR15, YR21, YR24, YR68, Y35, BG70, BG72
Pumpkins ~ E55, E57, YR15, YR27, YR68
Coffee Cups ~ R37, R56, BG70, BG72, YR21, YR24, YR68, N0

All that was left to do was fussy cutting the images out and adhering them to the cards using a liquid glue. I sure hope you enjoyed the cards I'm sharing with you today. I had so much fun making them!

Thank you friends for checking out my blog post!
See ya next time.

Inky Hugs!
~ Crystal


Friday, August 24, 2018

Scrapping for Less ~ August 2018 Flavor of the Month ~ For the Love of Pets!


Now, who doesn't love furry little kitties and puppies? We have put together a sweet puppy and kitten kit for you this month. We hope you enjoy!! Thanks so much for continuing to support our kits...keep sharing in the Scrapping for Less: Show and Share group and on Instagram. We love to see your shares! Now, hop on with us and see what our fabulous Design Team and guest designers have to share with you! Make sure you check out our Flavor of the Month page to purchase the kit and check out the A La Carte page for some related products! 


The August Flavor of the Month card kit has got to be my new favorite kit!! Oh my goodness... there are so many adorable puppy and kitty stamps! Cuteness overload!!! 
Let's get to the cards...


For all of my cards this month, I decided to pair the collections with the same numbered sketch... so for my first card from Collection One I used Sketch #1.
I paired some of the fun patterned papers for my layers on the card, even using them for the flag strips. I stamped the adorable puppies on a piece of Neenah 110lb smooth white solar crest cardstock with Memento tuxedo black ink and colored them in with copic markers. I then die cut them out and popped them up on the card. I also partially popped up the sentiment strip by only adding foam tape to the bottom portion of the strip and liquid glue to the top portion. I adhered a few sequins in the bottom right corner and called the front of this card done.
Copic markers used for this card ~ E04, E07, E08, E09, E55, E57, N0, N1, N2, N3, N5, N7, R000, R14, R27, R81, R83, R89, Y06, Y35.


For the inside of the puppy card I stamped this sweet sentiment from the Puppy Pals set and also stamped a few hearts.


For my second card I used Sketch #2 with Collection Two.
Every once in awhile I decide to give a shaker another try. I still struggle with shaker cards and this card was no different. I did manage to get this card to work though so I feel victorious! I started out by blending some Mowed Lawn distress ink over the Puppy Dog Bone stencil included in the collection... I think it adds a bit more fun to the diagonal striped patterned paper. I adhered that layer to a white card base. To break up the diagonal stripes I added the yellow horizontal striped patterned paper to the card and set it aside. I stamped the puppies on a piece of white card stock. I masked the puppies with post-it note masks and then blended my clouds. Using a crafting knife I cut around the bottom portion of the puppies and adhered my stitched hills under the puppies to create my scene. I die cut the square frame using two square stitched dies together. I added my shaker elements and adhered the frame to the scene with some foam tape. Sadly, my adhesive wasn't completely dry and two sequins got stuck on the hills but it kind of looks like the puppies are playing with them, right? At least that's what I'm telling myself. LOL My final touches for this card was the metal bone clip that I adhered in the corner with some multi medium matte, the sentiment that I stamped and die cut using a skinny banner die, and on the inside of the card I adhered a small strip of the polka dot paper.
Copic markers used for this card ~ E21, E30, E31, E40, E41, E43, N0, N5, R00, R20, RV11, RV21.


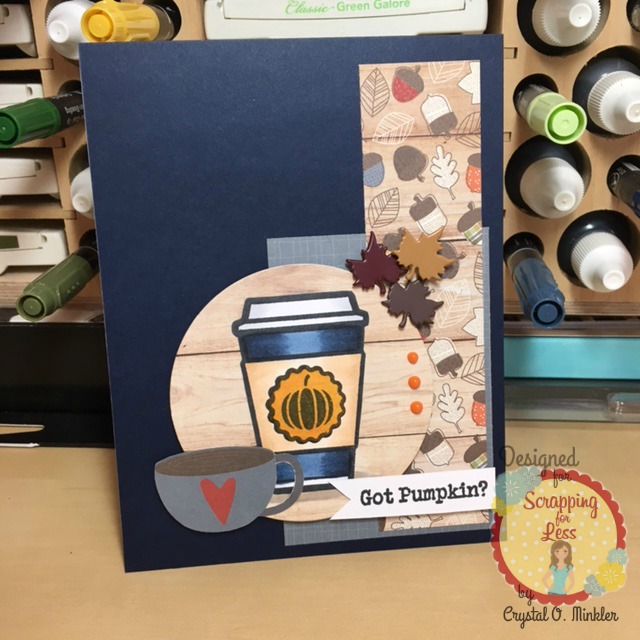
For my third card I used Sketch #3 with Collection Three.
I absolutely adore this collection... the new Scrapping for Less Pretty Kitty stamp set paired with this sweet Kitten Smitten paper from Doodlebug Designs is too stinkin' cute! I love it! The sketch for this card is supposed to be a tall and skinny card, but I decided to make it into an A2 size card. I started by cutting and adhering my patterned paper layers to a Cotton Candy card base. I set that aside and stamped the cute kitty on white card stock. I thought I'd give this kitty a little calico touch and I think she turned out pretty cute. I die cut the kitty with a stitched circle die and mat it on a stitched Black Licorice circle. I popped up the main image with foam tape and then die cut a few more stitched circles to add as embellishments. I stamped the fish bones on the one pink circle and popped it up on the card adhering a little bit of yellow twine... like some yarn for the kitty to play with. I then stamped the sentiment and mat it on Black Licorice card stock. I adhered a few sequins... even adding one to the kitty's paw. So cute!
Copic markers used for this card ~ N0, N2, N3, N5, N7, 0, R00, R20, YR12, YR15, YR21.


To finish off this card I added a piece of white card stock on the inside and I stamped another cute kitty from the set in a light pink ink.


For my fourth card I used Sketch #4 with Collection Four.
This collection has a very cool Cat Paw Print stencil and I used it to add some interest to this card. First I used it on the Sno Cone card base... and then I added my layers of patterned paper that I had mat on Black Licorice card stock. I then stamped the sweet Santoro Girl with Cat on white card stock and colored the image in with copic markers. I fussy cut the image out and adhered it to a piece of white card stock that I had blended just a little bit of Tumbled Glass and Hickory Smoke distress inks for a subtle background. I used the Cat Paw Print stencil to add a few paw prints in the direction that I imagined the cat would have gone around the girl. The sentiment for this card is from the For the Love of Pets stamp set by Scrapping for Less that's included in the Banana Split subscription. Another absolutely adorable stamp set by Scrapping for Less! I popped up the sentiment and adhered a few sequins.
Copic markers I used for this card ~ N0, N1, N3, N5, N6, N8, 100, E0000, E000, E00, R20, R21, R22, R35, BV04, BG70, BG72.


And to finish this card off, I also used the Cat Paw Print Stencil on the inside of the card by blending some Hickory Smoke distress ink.


Here's a look at the Double Dip Sundae subscription.


Here's a look at the Banana Split subscription.


I hope you enjoyed the cards I shared today. I had so much fun creating them to share with you all.
Let's get to hopping and see what the other members of the design team created!


Crystal <--- you're here

up next ---> Desiree


Make sure to join the Rafflecopter back on the SFL blog to win an awesome prize!! 

Thanks for stopping by!

See ya next time.
~ Crystal


Friday, September 29, 2017

Pumpkin Spice & Everything Nice ~ September Flavor of the Month Blog Hop


Who doesn’t love pumpkin spice? 

Oh, do I love that flavor and definitely look forward to this time of the year when I can pop in the grocery store and get that Pumpkin Spice flavored creamer to go in my coffee!!! Well grab some creamer, coffee, and savor this blog hop because this kit is full of Pumpkins, spice and a little bit of everything nice! 

Get your kit by clicking on our Flavor of the Month link and either subscribe or purchase a one time kit!


I cannot tell you just how ecstatic I was when I opened my September Flavor of the Month card kit! I love Fall! It's my absolute favorite and then you bring my most fave beverage into the mix... coffee!!! Oh my goodness! I could not wait to get inky with the collections for this month. I was given the Banana Split subscription to play with...


and let me tell you, there's so much crafty goodness!! Just look at it all!! I had a lot of fun!


My first card features the ingredients from Collection One. I also kept my cards in order of the sketches for this month, so this is also sketch #1. To start, I die cut a circle of white card stock. I then stamped the cute cup and spice shaker from Lawn Fawn's Pumpkin Spice stamp set using Memento Tuxedo black ink. I stamped the images again on a piece of the patterned paper and then fussy cut them out and adhered them to the main image. I colored the inside of the cup, the coffee with whip cream, and the top of the shaker using copic markers. I layered the circle piece onto a scallop circle and set it aside. I die cut a piece of brown card stock using a rectangle stitched die and adhered it to a white card base. I adhered two pieces of patterned paper and then popped up the main image. I stamped, die cut and popped up the sentiment. My last touch for this card was a few dots of the Ripened Pumpkin Nuvo Crystal Drops. 


For my second card, I used the second sketch. I inked up the sentiment from the Falling For You stamp set by Newton's Nook using Distress Oxide inks in Candied Apple, Spiced Marmalade, and Wild Honey. Since the distress oxides take a bit to dry, I decided to emboss the sentiment so I used some fine clear embossing powder. I die cut the sentiment with another circle die and then mat it on a scalloped circle. I set that aside and die cut the brownish orange card stock using a stitched rectangle die. I then adhered that to a white card base. I adhered a couple different pieces of the Flea Market papers from the second collection to the card base and then popped up the main image. I added some faux white stitching to the banner piece as an after thought. 
Then I got to thinking that the little mice in the papers needed a couple of friends so I die cut two little mice and colored them with copic markers. I adhered them to the card... it almost looks like they are trying to read the sentiment. I added a few sequins to the corner and then I got to thinking... what would happen if I added some Nuvo drops to the center of the sequins? Well, the drops just spread out in the bottom of the sequin... it almost looks like a Toffifay candy. 
Not quite what I was hoping for, but I'll take it! 


My third card came together pretty quickly. I stamped the coffee cup from the Got Pumpkin? set by Brutus Monroe with Memento Tuxedo black ink and then I colored it in with copic markers. I fussy cut it out and adhered it to a circle cut out from one of the patterned papers in the third collection. I then cut out the other cup from another piece of patterned paper and adhered that partially to the circle. I layered the different pieces of paper on the navy blue card stock. I popped up the main image and added a few drops of Nuvo drops. I cut off the little fasteners for the leaf brads and used foam tape to adhere them to the card. The light tan leaf has double foam tape so it gives it a bit more dimension from the others. I stamped the sentiment on a scrap piece of white card stock and then fussy cut a flag to add to the card.


My last card was the most fun to put together! I just love this little kitty with the pumpkins from the Newton's Perfect Pumpkin set by Newton's Nook. I had a lot of fun coloring these. I stamped them a few times and colored them in with copic markers. I added a few layers from the Not Too Spooky papers to a purple card base. I also used some distress inks to make a moon that I die cut out. I adhered that and the pumpkins to the black and white stars paper and then I popped up the little kitty with his pumpkin. I had set this aside and then I decided to add the spider and bat using VersaMark and fine black embossing powder. I stamped the sentiment in VersaMark as well, but used fine white embossing powder for that. I die cut the banner out and popped it up on the card. I think it turned out pretty cute.


Crystal O. Minkler <--- you're here

next up ---> Stacy Tiedemann


Don’t forget to head back to the Scrapping for Less blog to enter the Rafflecopter to win one of the collections from the kit! There will be 4 prizes! One collection to each winner.


Thanks for stopping by!

See ya next time.
~ Crystal