Showing posts with label zig clean color real brush. Show all posts

Saturday, May 3, 2025

~ Friends of Unity May 2025 Blog Hop ~

Hello there crafty friend!
It's time for our Friends of Unity Blog Hop!! This month's cue just might be one of my favorites! 


This month's cue is Bloom Where You Are Planted! For me... that means flowers! I absolutely LOVE the assortment of flower stamps available at Unity! It wasn't easy, but I narrowed it down to two for this hop.


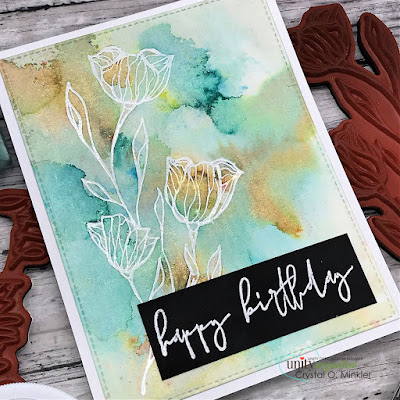
First up is the gorgeous Tulip Symphony. I adore this stamp! I wanted to do some watercoloring and this stamp was the first one that came to mind. I used my ZIG Clean Color Real Brush markers. I used Light Pink, Light Carmine, and Pink for the petals. And Yellow Green, May Green and Green for the stems and leaves. For the blue in the background I used a bit of Light Blue.


Once the panel was completely dry, I die cut it using a die from the Scallops & Rectangles {nesting dies}. I also die cut another piece of watercolor paper using the largest die from the Postage Stamp {nesting dies}. These gorgeous tulips could be a forever postage stamp. I love it!


I used Canson XL 140lb watercolor paper for my watercoloring layers. I adhered the postage layer to an A2 top fold card base of Kraft card stock from Papertrey Ink. I decided to make this a birthday card for my beautiful niece whose birthday was just a few days ago. I hope she liked it.


My next card features the beautiful blooms from the Snarky Mama stamps. I really wish Unity would make this stamp bigger. Don't you think it would look fab as a big slimline stamp?! I think so. I may just ask Ang if we can make that happen. :)


I stamped the flowers and the sentiment on Stampers Select White card stock from Papertrey Ink. And then I die cut it using a die from the BIG Scallops & Rectangles {nesting dies}. I wanted to keep the card CAS so I looked through my embossing folders for a fun background and came across the Tim Holtz Brick 3D Embossing Folder. I finished off the card with some Raindrop Embellishments from the 2024 Advent Calendar.


Here's a quick list of the Copic markers I used:
Big Flowers: Y11, R20
Big Flower Centers: Y11, YR15, R14
Little Flowers: R20, R32
Leaves / Stems: YG11, G02, G07
Background: BG10, Colorless Blender

Now before we get to the hopping, I chose a lucky winner from the comments on last month's hop to win a fun prize and the lucky winner is...


... Denise Bryant!! Congratulations, Denise!!
Please email me at crystalominkler@gmail.com to claim your prize. 
Please claim the prize before June 4th, 2025. 

Well, that's it for me this time! Please hop along and enjoy some more inspiration from the Friends of Unity! I can't wait to see how our friends were inspired by this month's cue. I will be doing another fun giveaway this month!! Be sure to hop along and comment for a chance to win. {When you comment please leave your name just in case it posts as anonymous.} I'll announce the winner next month! 


Let's get to the hopping...

Crystal <--- you're here

up next ---> Amber


Thanks so very much for supporting our little hop!
We appreciate you so much!!

See ya next time.

Inky Hugs,
Crystal


{Please note that comment moderation is ON. Your comment will appear shortly.}


Tuesday, April 6, 2021

Pattern Paper Scene ~ Spring Mouse ~ Unity Stamp Co.

Hello there crafty friend!

Today I'm sharing a sweet little card using an adorable new release from Unity Stamp Co. called Spring Mouse and I've created a fun little pattern paper scene with one of my favorite paper packs from Unity... Pretty Polka's!! I love polka dots! And the colors in this paper pack are so pretty!! I love them!


The sweet little Spring Mouse and sentiment are stamped with Gina K. Amalgam black ink and heat set with my heat tool. I trimmed the sentiment, mat it on Kraft card stock, and set it aside. I then watercolored the sweet little mouse with ZIG Clean Color Real Brush markers. Once it was dry I trimmed it to 2-5/8" square to fit nicely with the Kraft stitched square mat.


I trimmed a piece of the blue polka dot paper for my sky that measured 4 x 5-1/4" but as you can see in the video below I had to trim it slightly to straighten the focal piece. I had two strips of the green polka dot paper that were roughly 2-1/4" and 2" in height and 4" wide. I die cut the tops of both of these with a Grassy Border die from Lawn Fawn. I adhered all the layers together and then wrapped the burlap string around and tied a little double bow. I adhered the pattern paper scene to a Kraft A2 top fold card base and then popped up the sentiment with foam squares. Such a sweet little scene!

As mentioned above, I have a little video sharing how I created a Pattern Paper Scene for this sweet little mouse. You can check that out here... Pattern Paper Scene | Spring Mouse.


I just adore this sweet new stamp... and such a great sentiment too!
Stop by Unity Stamp Co. and check out all the wonderful new releases... I'm hoping to be back in a couple days with a fun set of cards that I have planned to work on today with another of the new releases!


Thanks so much for stopping by!
See ya next time.

Inky Hugs,
Crystal


{Please note that comment moderation is ON. Your comment will appear shortly.}

Wednesday, March 31, 2021

March 2021 Whit Kit ~ Nuvo Shimmer Powder 2-Ways ~ Unity Stamp Co.

 Hello there crafty friend!

As promised yesterday, I am back with a couple more cards using the beautiful March 2021 Whit Kit Wayward Florals from Unity Stamp Co. I used the pretty shimmer powders included in the kit in two different ways for two similar, but different birthday cards.


For the first card, I used the Atlantis Burst and Golden Sparkler shimmer powders to watercolor the floral and then watercolored around the image with a yellow Zig Clean Color Real Brush marker.


I die cut both of the cards with a large stitched rectangle die after they were completely dry. I then stamped and heat embossed the sentiment on black card stock and adhered it to the cards.


For the second card, I added some shimmer powder to the dry card and then spritzed it with lots of water. I got a nice layer of color all over the entire card and then dabbed it with a paper towel. I was then able to tape it to my glass mat and add even more shimmer powder and water to darken the colors.


I dried this one a bit with my Mini Wagner heat tool, but I did let it dry overnight before die cutting it and adhering the sentiment. I have a video sharing my process for both of these cards. You can check that out here... Nuvo Shimmer Powder 2-Ways | March 2021 Whit Kit.


Here's a look at the entire March 2021 Whit Kit... isn't it fabulous?!
If you have the kit, I'd love to see what you've created with it... be sure to share in the Unity {show & tell} Facebook group. If you don't have the kit, check it out on the Unity Stamp Co. website! Today is the last day to sign up and receive this kit!


Thanks so much for stopping by!
See ya next time.

Inky Hugs,
Crystal


{Please note that comment moderation is ON. Your comment will appear shortly.}

Friday, October 5, 2018

Scrapping for Less ~ March 2018 FOTM ~ Let's Make Some Birthday Cards

Hello! Today, I am sharing a handful of cards I created using an older Flavor of the Month card kit from Scrapping for Less.
I found myself in need of some birthday cards and I remembered this sweet March 2018 Flavor of the Month card kit in my stash called It's All About Ice Cream. The perfect kit to replenish my birthday card stash!!


For all of the cards I created, I went with a pretty simple design... I started with a 5-1/4 x 4" piece of patterned paper from the collection. Some of those I mat on a piece of 5-3/8 x 4-1/8" piece of coordinating card stock... some I just left as is and adhered to a white card base.
This first card I watercolored and die cut with a wonky rectangle die. I stamped the sentiment from the Flavor of the Month Year 1 sentiment stamp set and then popped it up on the card with foam tape. I added a few sequins and that was it for card one.


For my second card, I added a strip of the pretty ribbon that I adhered to the back of the patterned paper. I then stamped the cute Flavor of the Month Logo stamp masking the center so I could stamp Happy Birthday from the FOTM Year 1 sentiment stamp instead. I just used a ruler and a Memento tuxedo black marker to add the masked lines back in and then stamped the sentiment. I colored the image using the following Copic markers ~ R14, R20, R29, B02, B21, BG000, BB01, BG45, E0000, E00, E23, E25, Y15. I fussy cut the focal image and then popped it up on the card. I added a few red sequins and this one was done.


For my third card I had to get creative because I didn't have a full 5-1/4 x 4" piece of patterned paper left over so I combined two papers and mat them on a green piece of card stock. This card was pretty simple... I utilized the fantastic cut-a-parts included in the patterned papers. I mat this particular one on red card stock and then popped it up on the card. I added a few of the Silver Glossy Dots and then decided I wanted to also use the cute Lawn Fawn Treat Yourself stamp set. 


I thought it would be fun to add a gift card for an ice cream shop (only had this gift card to show... sorry!) inside so I paper pieced the ice cream tub using the papers from this collection and adhered it on a strip of the same patterned paper that I had stamped the sentiment. I colored the little bit of ice cream using R20, E27, E51. I left the bottom portion of the card empty so I can write my birthday wishes to the recipient.


Now getting creative again, I cut the music note patterned paper in half and adhered it along with the green/white polka dot paper to the mat of orange card stock. I mat another cut-a-part paper onto red card stock and popped it up on the card with foam tape. I used my last five Silver Glossy Dots to finish off this card.


My last card came together pretty simply with the layers of patterned paper and the addition of the tag. I stamped the Ice Cream Marci directly on the tag along with the sentiment and then set the tag aside. I stamped Ice Cream Marci again on a scrap piece of white card stock and then paper pieced her shirt with the pink/white polka dot paper. I colored her in with the following Copic markers E0000, E00, E17, E23, E27, E47, E49, B91, B95, RV10, RV14, RV21. I then fussy cut her out and adhered her to the tag. I added some pink and white ribbon that I tied off with some twine... all from my stash. I then popped up the tag on the card and called this last card done!

There are some March 2018 Flavor of the Month card kits still in the shop. There's also some mini collections available in the shop. You can check out all of those kits... here.

Thanks so much for stopping by!

See ya next time.
~ Crystal