Saturday, October 19, 2024

Falling for the Holidays 2024 {BYSHC} Linky Party ~ Bunny & Guinea: Reindeer Ride ~ Rachelle Anne Miller Stamps

 Hello there crafty friend!
I'm back for Day 2 of the Falling for the Holidays 2024 {BYSHC} Linky Party with another cute holiday card! It was so much fun checking out the inspiration shared yesterday for the start of the Linky Party. So many wonderful cards! Today I'm sharing a card using a sweet digital stamp called Bunny & Guinea: Reindeer Ride from our lovely return Sponsor Rachelle Anne Miller Stamps AKA RAM Stamps.


When I create with digital stamps or digis, I always fill up a whole sheet with images and sentiments. So I printed this sweet digi off along with the cute bear from yesterday. I combined and resized all the images into a Word Document and printed them off. The sentiment actually came with the bunny and guinea pig but I cropped it and separated them. Because of this there was a tiny bit of the rein just over the sentiment and I covered that bit up with one of the red enamel dots {over the 'r' in Christmas}. I colored up the adorable bunny and guinea pig with my Copic markers and fussy cut them leaving a white border around the edges.

Here's a quick list of the Copic markers I used:
Bunny: C00, C1, C2, R00, R20
Reindeer Antlers / Reins: E21, E23, E25 
Antler Band: YG11, G24, G46, G00, G12
Guinea Pig: E21, E23, E25, R00, R20
Hat: C00, C2, R20, R14, R46


To create my background I used the awesome Fractured Card Layout Die Set from our wonderful Sponsor Newton's Nook Designs. I trimmed five pieces of pattern paper from the lovely Watercolor Winter {Paper Pack} from Unity Stamp Co. I secured them two at a time from the front of the die using washi tape and ran them through my Big Shot. I die cut a white card front measuring 4-1/4 x 5-1/2" using the die to get the white fractured piece. This also die cuts the center square and triangles which I'll save for a future project.


I adhered all my layers together using iCraft UltraBond Adhesive from Sponsor Therm O WebAnd then adhered the fractured card front to a white A2 top fold card base. I added foam tape from our awesome Sponsor Therm O Web called iCraft 3D Foam Tape Jumbo Roll (white) to the back of the critters and sentiment and popped them up on the card. I then added the four red enamel dots from the Red & Green Foil Mirror Enamel Dots from our lovely Sponsor Gina Marie Designs to finish off the card. 


 Woohoo!! I'm so excited to have another card done for my stash! If you haven't already, stop by the Falling for the Holidays 2024 {BYSHC} Linky Party to check out all the wonderful Holiday inspiration being shared!! Have a fantastic day!


Thanks so much for stopping by!
See ya next time.

Inky Hugs,
Crystal


{Please note that comment moderation is ON. Your comment will appear shortly.}

Friday, October 18, 2024

Falling for the Holidays 2024 {BYSHC} Linky Party ~ Beary Nice ~ Angie Blom Digital Designs

Hello there crafty friend!
I'm so excited to share my first card for the Falling for the Holidays 2024 {BYSHC} Linky Party hosted by the Build Your Stash Holiday Cardmakers Facebook group! I can't believe that it's time for our last Linky Party of 2024... where has the year gone?! So bonkers!


Today I'm sharing a sweet holiday card featuring the absolutely adorable Beary Nice Digital Stamp from our amazing Sponsor Angie Blom Digital Designs. This bear just released recently and I had to add him to my collection! I combined the cute bear with the fun sentiment from Blessing Poinsettia Digital Stamps in a Word Document. I resized them both and printed them off with a couple other digital stamps.

Here's a quick list of the Copic Markers I used to color up the bear and birds:
Bear: C00, C2
Nose: N0, N2, N4, N6
Scarf: N0 N2, N4
Birds: R20, R22, R43, R27
Bird Hat & Scarf: C00, C2, N0, N2, N4, N6 


I paired up the cute bear with the beautiful Hot Cocoa Warm Hearts 6x6 Paper Pad from our lovely Sponsor Not 2 Shabby. I used the pretty plaid pattern paper for my background layer measuring 4-1/4 x 5-1/2". It's adhered to a white A2 top fold card base using iCraft UltraBond Adhesive from our awesome Sponsor Therm O Web. 


I die cut the bear panel using the X Stitched Rectangle dies from our wonderful Sponsor Gina Marie Designs. I also die cut a couple scraps of the pattern paper using two washi dies from the Wonderful Washi {die set} from our fabulous Sponsor Unity Stamp Co. I popped up the bear panel using iCraft 3D Foam Tape Jumbo Roll (white) from Therm O Web. A quick and cute card to start off the Linky Party! Yay!


My card was inspired by the {BYSHC} Sketch 23! Have you visited the Build Your Stash Holiday Cardmakers Facebook group? We host a fun sketch challenge each month to inspire our holiday cardmaking all year long. I love using sketches for my cards... makes designing the cards so easy! I wouldn't be surprised if I use a couple more of our past sketches for the Linky Party.


I'm also a Sponsor for the Falling for the Holidays 2024 {BYSHC} Linky Party!! I have a wonderful prize set aside for one lucky winner. No photo for the prize as I'm leaving it as a fun surprise but it's retail value is $42 and all the goodies are from our fabulous Sponsors!! For a chance to win my fun prize make a Christmas card and link it up to the linky party blog post on the Build Your Stash Holiday Cardmakers blog. The winner will be announced on the {BYSHC} blog on Tuesday, October 29th.


Before you leave, be sure to stop by the Falling for the Holidays 2024 {BYSHC} Linky Party to check out all the wonderful Holiday inspiration that's been entered already!! I'm so excited to continue building my stash of holiday cards for 2024... I hope you'll join in the fun and play along!


Thanks so much for stopping by!
See ya next time.

Inky Hugs,
Crystal


{Please note that comment moderation is ON. Your comment will appear shortly.}

Wednesday, October 16, 2024

Membership Wednesday ~ October 2024 UU Simply Holiday Deer with BOM Holiday Jingle ~ Unity Stamp Co.

  Hello there crafty friend!
Today I'm sharing another pretty holiday card featuring the fantastic background stamp from the October 2024 Background of the Month membership from Unity called Holiday Jingle. This time I paired it up with the gorgeous stamps in the October 2024 Uniquely Unity membership. I just can't get enough of these fabulous holiday stamps this month!


I stamped the gorgeous Holiday Jingle background onto True Black card stock from Papertrey Ink using Wow Clear Embossing ink and dusted the wet ink with Night Red Embossing Powder from Brutus Monroe. This fun embossing powder actually came in a set of three for a special Halloween mix. No clue if it's still available. I just wanted to try a red and this was the only thing close to red in my stash.


I stamped the sweet deer and two of the trees using Black Amalgam ink from Gina K. Designs. I colored them up with my Copic markers and then fussy cut them leaving a white border around the images.

Here's a quick list of the Copic markers I used:
Deer: E21, E23, E25, C00, C2
Scarf: C00, C1, C2, R20, R14, R46
Ornaments: R20, R14, R46, YG11, G24, G46, Y11, Y15
Trees: YG11, G24, G46


A tore a scrap of Stampers Select White Card Stock from Papertrey Ink and adhered it to the bottom of the 4 x 5-1/4" black background. I adhered the trees and deer to the card. Stamped the sentiment using Candied Apple Distress Ink on a scrap of white card stock. Trimmed it up and adhered it to the card too. No foam tape for this one! The panel was adhered to a white A2 top fold card base.


Here's a quick look at this month's Uniquely Unity membership! Isn't it just the sweetest?!


Here's a quick look at this month's Background of the Month membership! Love it!

Well, that's it for me today! I hope you've been inspired to play with your membership stamps! 
Hope you have an ink-tastic day!


Thanks so much for stopping by!
See ya next time.

Inky Hugs,
Crystal


{Please note that comment moderation is on. Your lovely comment will appear once approved.}

Tuesday, October 15, 2024

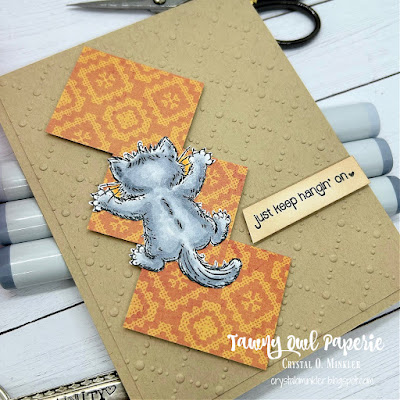
September Scraps Cards in October ~ Purr-Fect Time Kitty with a Planner Gal ~ Unity Stamp Co.

 Hello there crafty friend!
Today I'm sharing the last two cards I created using the leftover scraps I opened up last month. I've been working on these for awhile. I'm so glad I finally got them finished up.


Here's a look at the cards together. I love how the kitty card turned out! If I could change one thing, I would distress the edges of the girl. Just add a bit of Vintage Photo Distress Ink around the edges so it isn't so white on all the Kraft.


I adhered the strips of pattern paper to the base leaving a nice edge around the card base. And then I adhered the pink layer over top. I think it's a fun design. I found the gal from Planner Gal: Brave & Beautiful already stamped on my pile of images. I thought she would look nice with these papers. I die cut her using a die from the Deckle & Stitches Nesting Die Set. Colored her up with my Copic markers and then popped her up on the card with foam tape.

Here's a list of the Copic markers I used:
Skin: E000, E00, E11
Hair: E43, E44, E47
Hat: E21, E23, E25, R81, R83, R20, R14, YR27
Blouse: R81, R83, YG61, YG63
Pants:B91, B97


I thought it would be fun to use one of my many sentiment dies from Unity. I die cut a scrap piece of white card stock with the hello die from Chic Script Salutations {die set}. It was way too white for the card so I decided to color it with Copics. I used R81, R83, R20, and R14. I die cut the hello outline from Kraft card stock.


I really got stuck on this card! This card may be why it's taken me so long to finish up these paper scraps. I had the orange pattern paper rectangles adhered together and sitting on a Kraft card base... that's as far as I got. It just sat on my desk taunting me. Until I remembered the little kitty from the {Clearly Unity} Purr-Fect Time stamp set. {This stamp set is also available in red rubber... Purr-Fect Time.} I inked him up and colored him with the following Copic markers: C00, C2, C4, C5, YR21, and YR15 (orange background around the whiskers).


 I fussy cut the kitty and adhered him to the pattern paper. The Kraft card base was too plain so I ran a piece of Kraft card stock through my Big Shot with a random embossing folder. I trimmed the panel down to 4 x 5-1/4" and adhered it to the A2 top fold card base. I blended a bit of Vintage Photo Distress Ink around the sentiment to soften the white and then I popped it up and the kitty/pattern paper focal piece up using foam tape. So happy to finally be done with these papers! I'll be back next week with one last card for the Tawny Owl Paperie Inky Inspiration Sketch 26. Have a wonderfully inky week!

Thanks so much for stopping by!
See ya next time.

Inky Hugs,
Crystal


{Please note that comment moderation is on. Your lovely comment will appear once approved.}

Monday, October 14, 2024

Inky Paws Challenge #233 ~ Color Challenge {Week 2}

Hello there crafty friend!
It's week two of the Inky Paws Challenge! We're playing with a fun mix of colors this month for a Color Challenge! I sure hope that you'll join us and play along with your Newton's Nook Designs products! Our challenges are now a whole month long so there's lots of time to play along with us! Yay! You have until Friday, November 1st to get your entries in for the #233 Color Challenge and a chance to win a $20 store credit to Newton's Nook Designs!


We have a gorgeous mix of colors that are perfect for an Autumn card but they can also be good for other occasions. Our lovely colors are... Burnt Orange, Olive Green, Slate Gray, and Ivory!! 


I'm sharing a sweet CAS birthday card featuring the adorable Newton's Birthday Balloons Stamp Set.


I started with a fun CAS background of Autumn colored clouds that I blended using Carved Pumpkin and Rusty Hinge Distress Inks over the awesome Clouds Stencil.

Here's a quick list of the Copic markers I used for the kitty and balloons:
Kitty: R00, R20, N0, N2, N4
Ivory Balloon: E40, E81, Colorless Blender
Olive Green Balloon: YG91, YG95, Colorless Blender
Burnt Orange Balloon: YR21, YR16, YR27
Polka Dot Present: E40, E81, white gel pen polka dots


Once the sweet kitty was colored, I die cut it using the coordinating Newton's Birthday Balloons Die Set. I popped the kitty up on the card using foam tape. I heat embossed the sentiment on a gray card stock using white pigment ink and white embossing powder for a bright white sentiment. Trimmed the sentiment with a fishtail end and popped it up on the card.


Now it's your turn to get your paws inky with your Newton's Nook Designs products and create a project using the color combo of Burnt Orange, Olive Green, Slate Gray, and Ivory. Be sure to link up to the Inky Paws Challenge! Can't wait to see your projects!


Thanks so much for stopping by!
See ya next time.

Inky Hugs,
Crystal


{Please note that comment moderation is on. Your lovely comment will appear once approved.}

Friday, October 11, 2024

{BYSHC} Sketch Challenge 50 ~ Festoons Stencil ~ A Colorful Life Designs

Hello there crafty friend!
I'm back with a little inspiration for the {BYSHC} Sketch Challenge 50 hosted in the Build Your Stash Holiday Cardmakers Facebook group! Today I'm sharing a super quick Christmas card featuring another wonderful stencil from our amazing sponsor, A Colorful Life Designs


I may have mentioned that I am a HUGE fan of A Colorful Life Designs stencils! I just can't get enough of all the unique and awesome stencils that Mary Kay has in stock! Just looking at all the stencils gets my mojo revving! Anywho, I saw a fun card shared in the A Colorful Life Designs Fan Group and I thought it was a great idea that would work well with this month's sketch! 


I blended over the awesome Festoons Stencil onto my Stamper's Select White card stock panel measuring 4-1/4 x 5-1/2" using Candied Apple and Mowed Lawn Distress Inks.


The panel was trimmed down to 4 x 5-1/4" and adhered to an A2 top fold card base of Pure Poppy card stock from Papertrey Ink.


This was my first attempt at the card. Isn't that sentiment just too funny! Both of the sentiments are from the awesome Ho Ho No Pissy Kitty stamps from Unity.


The sentiments are heat embossed on Pure Poppy card stock and popped up on the cards with foam tape. I finished off both cards with Crystal Opaque Christmas Green Card Bling, also from A Colorful Life Designs.


Here's a look at {BYSHC} Sketch Challenge 50 for the month of October. Loving this simple sketch! I am really enjoying all of the awesome entries for this month's sketch! I hope you'll join us and play along with the sketch. If you're interested in seeing a bit more inspiration for this sketch, check out the amazing inspiration from the design team over on the {BYSH} Cardmakers blog! Lots of super creative inspiration this month from the design team.


Thanks so much for stopping by!
See ya next time.

Inky hugs,
Crystal


{Please note that comment moderation is ON. Your lovely comment will appear shortly.}

Wednesday, October 9, 2024

Membership Wednesday ~ October 2024 BOM Holiday Jingle ~ Unity Stamp Co.

  Hello there crafty friend!
Today I'm sharing a pretty simple holiday card featuring the fantastic background stamp from the October 2024 Background of the Month membership from Unity called Holiday Jingle. I used one of my favorite color combos of kraft and red... love it!


The beautiful background was stamped on Kraft card stock with Candied Apple Distress Ink. I mat it with Pure Poppy card stock from Papertrey Ink. And then adhered the panel to a Kraft A2 top fold card base.


My sweet card was inspired by an adorable card by Julissa Sargo that is included with this month's Background of the Month membership. Did you know that some of the members of the Unity Design Team share step-by-step instructions of cards for the memberships each month? I just had to CASE Julissa's card and put my own twist on it!


The adorable chicken from Hold on Santa was colored up with Copic markers. I die cut the sweet chicken using a die from the Scallops & Banners {nesting dies} and the sentiment and mat were die cut using a pair of dies from the Scalloped & Stitched Sentiment Nesting Dies. I distressed the edges of the chicken and sentiment with a bit of Vintage Photo Distress Ink. The chicken banner and sentiment are both popped up on the card with foam tape. I finished off the card with a few shiny pieces of confetti from the Hologram Red Card Bling set from A Colorful Life Designs.

Here's a quick list of the Copic markers I used:
Chicken: E21, E23, E25
Beak: YR21, YR15
Feet: YR15, YR27
Wattle: R00, R14, R46
Hat: C00, C2, R20, R14, R46
Ground: E21, E23


Here's a quick look at this month's Background of the Month membership! So much fun!

Well, that's it for me today! I hope you've been inspired to play with your membership stamps! 
Hope you have an inkredible day!


Thanks so much for stopping by!
See ya next time.

Inky Hugs,
Crystal


{Please note that comment moderation is on. Your lovely comment will appear once approved.}