Showing posts with label #memorydexcards. Show all posts

Monday, August 29, 2022

Halloween Memory Dex Cards ~ New Halloween Stamps from Unity Stamp Co.

 Hello there crafty friend!
I'm a bit behind on projects... I'm afraid my Membership Monday posts have been hit and miss this month but I did get to play with some of the awesome new Halloween stamps that Unity just released!!! I love making Halloween cards... and Memory Dex cards are so fun to make! I couldn't resist making a bunch! I used the Smell My Feet Background stamp, Winnie the Pooh: Trick or Treat, and 31!!


I used the Ink Swipe Technique for the oxide backgrounds with Carved Pumpkin, Wilted Violet, and Villainous Potion Distress Oxide inks. Basically this technique is just swiping the ink pad directly on the card stock. It's a fun technique that I was reminded of during the Unity get-together I went to back in June. I stamped the inked swiped backgrounds with the Smell My Feet background using Jet Black Archival ink.


I die cut the backgrounds along with some black card stock with a memory dex die in my stash {sadly, it's no longer available}. I also used some Spider Web Doilies from Stampin' Up! that I've had in my stash forever. This cute haunted house is in the 31 stamp kit along with the '31'. The sentiment on this card is from the Winnie the Pooh: Trick or Treat stamps. I used the following Copic Markers to color up the Haunted House:

House ~ N0, N3, N5
Windows ~ Y11, YG11
Door / Window Frames ~ E55, E59
Pot ~ Y06, YR15, YR68
Tombstones ~ YG11, N0, N3, N5


I just love this Mummy Winnie the Pooh stamp... so darn cute! I used the other half of the Spider Web doily for this card and added some {Black} May Arts Burlap String underneath Pooh bear. I used the following Copic Markers to color up Pooh bear:

Pooh ~ Y11, Y15
Mummy Costume ~ YG11, C00, C3
Honey Pot ~ Y11, Y06, Y15, Y38, R20, R14, R27


For the Piglet card I used a Spider Web Embossing Folder from Cuddlebug. I swiped it with a Sugar Cube White Pigment ink pad from Taylored Expressions. The green enamel dots are from my stash. I used the following Copic Markers to color up Piglet:

Piglet ~ RV10, RV21
Ghost Costume ~ YG11, C00, C3
Pumpin ~ YR21, YR15, YR68, Colorless Blender


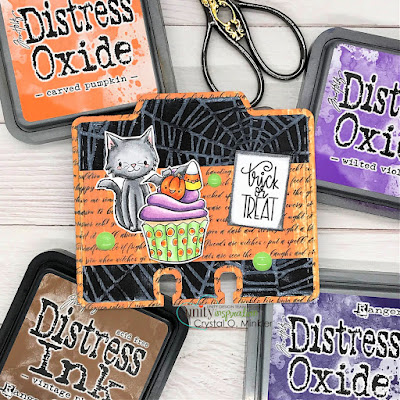
For the last Memory Dex Card, I used the same Spider Web Embossing Folder for the background and added a few of the same green enamel dots. Rather than adding another layer to the sentiment I used a marker and colored it... a fun alternative. I colored up the cute kitty and cupcake with the following Copic Markers:

Black Cat ~ RV10, R20, N0, N3, N5
Cupcake ~ E30, E31
Wrapper ~ YG11, YG23, YR15, YR68, Y06
Frosting ~ V000, V12, V15, V17
Bat ~ N0, N3, N5
Pumpkin ~ YR21, YR15, YR68, E55
Candy Corn ~ Y11, Y06, Y15, YR15, YR68, C00, C3


All of this fun took me just over 2 hours of recording (not including all the prep - stamping, die cutting, the ink swiping, etc). I was able to edit my video down to about 23 minutes. Of course, the editing took several hours. I hope that you'll check it out! If you enjoy it or the cards, I'd love to hear what you liked. You can check out the video here... Halloween Memory Dex Cards | New Halloween Stamps from Unity Stamp Co.


Be sure to stop by Unity and check out all the amazing new releases!! So many awesome Halloween goodies and another cute Winnie the Pooh set too!


Thanks so much for stopping by!
See ya next time.

Inky Hugs,
Crystal


{Please note that comment moderation is on. Your lovely comment will appear shortly.}

Thursday, October 21, 2021

Not a Card ~ All Things Halloween Challenge ~ Unity Stamp Co.

 Hello there crafty friend!

Today I'm sharing not one... but TWO fun Halloween creations for the All Things Halloween Challenge going on this month in the Unity Show & Tell group! I decided to make a Halloween tag for a treat bag and I just couldn't help making a fun Halloween Memory Dex card too!


I started by blending Scattered Straw, Mustard Seed, Carved Pumpkin and Black Soot Distress Oxide inks on a piece of white card stock. I die cut the piece with a stitched tag die from my stash and stamped only the one side of the fun haunted house from the Haunted House Halloween stamp. I stamped the Spooky sentiment from the Kooky Spooky & Batty stamp in the background with Carved Pumpkin Distress Oxide ink. I wanted it to blend into the background and not be the main sentiment.


Now I mentioned above that I blended with Black Soot Distress Oxide ink and unfortunately, when I tried stamping the Happy Halloween stamp on the bottom part of the tag the embossing powder got messed up. So... I grabbed a scrap of black card stock and redid the sentiment... stamping it with Wow Clear Embossing ink and I melted the Golden Gourd embossing powder from Brutus Monroe. I die cut it with the same stitched tag die so it'll fit in the bottom of the tag and I tore the top to give some texture to the tag. To finish it up and tie the whole project together I stamped the sweet little pumpkin from the Little Boos stamp kit and colored it up with the following Copic markers:

Pumpkin ~ YR15, YR21, YR68
Stem / Leaf ~ E23, E27, G24, G46

I fussy cut the pumpkin and cleaned up the edges by running my Memento Tuxedo black marker along the edges and then just adhered the pumpkin to the tag. I used some {Black} May Arts Burlap String to tie the tag to the treat bag.


I had so much fun making the tag that I decided to make a Memory Dex card with the same colors and basically the same technique. I stamped the haunted house with Gina K. Black Amalgam ink... I love how some of the oxide inks bleeds through adding texture to the house. I stamped the same Spooky sentiment with Caved Pumpkin Distress Oxide ink. And then I stamped the cute bat from the same Kooky Spooky & Bat Itty Bitty stamps. I fussy cut it and then clean up the edges with my Memento Tuxedo marker. I popped it up on the Memory Dex card with tiny pieces of foam tape.

To finish up my Memory Dex card, I stamped the happy Halloween sentiment from the Little Boos stamp kit and trimmed it into a flag. I then added a bit of Black Soot Distress Oxide inks around the edges with a Tim Holtz Distress Blending Brush and stapled it to the memory dex card.

Thanks SO much for stopping by today! I sure hope you've been inspired by my Halloween makes... if you'd like to see a few more pictures of my tag and Memory Dex card head over to the Unity blog! I'd love to see what amazing and fun Halloween creations you've been making with your Unity stamps. Join in the fun over at the Unity Show & Tell group! I'll see you all back here next Thursday with one more Halloween card for the All Things Halloween Challenge!


Inky Hugs,
Crystal

Monday, September 27, 2021

Santa's Workshop Memory Dex Card ~ Little Elves ~ The Greeting Farm

 Hello there crafty friend!

 I'm back with my third guest designing post for The Greeting Farm! This month has flown by! Today, I'm super excited to share a really cute Memory Dex card that I created!! Do you ever have a fun and wild idea and then you make it?! Well, I had a fun idea for a Memory Dex card that opens like an actual card and I'm excited to share it with you all today.


I used the adorable Little Elves stamp set {sadly, I don't see this one in the shop} along with the tree stamp from the Fa La La stamp set. I die cut the Memory Dex card with a retired die in my stash. My snow for the card is a combination of scallops that I punch from white card stock and a stitched cloud die.


See all that fun glittery goodness?! It's so pretty in person. I used a ruler and a couple of Copic markers to create a "log cabin" design for the building. The cute little chimney is a piece of pattern paper. I stamped the Santa's Workshop sign with clear embossing ink and melted some white embossing powder. I then trimmed the signs and adhered them to the front of the building. Here's a list of the Copic markers I used for the front of this card:

Skin / Mouth ~ E00, E11, R14
Hair ~ Y06, YR31
Clothes ~ YG11, G14, C00, C2, N2, N5
Building ~ E27, E33
Windows ~ Y02, Y35
Tree ~ YG11, G24, G46, E21, E27


And then you open the card and get a sneak peek of Santa's Workshop! This was so much fun to create!
I combined images from the Little Elves stamp set and the Christmas Day digi set.


Santa's elves are making the toys and wrapping them in pretty packages.
Here's a list of the Copic markers I used for these images:

Skin ~ E00, E11
Hair ~ Y02, E43
Clothes ~ YG11, G14, G46, C00, C2, N2, N5
Teddy Bear ~ E21, E27
Santa's Workshop ~ R000, R14, R46, E21, E27, E33
Christmas Tree ~ YG11, YG23, G14, E21, E27, R000, R14, R46, Y06, Y35, B000, B00
Presents ~ R000, R14, B00, B00, RV10, RV21
Wreath ~ YG11, G24, G46, R000, R14, R46, Y06, Y35, RV0000, RV10, RV21, E21, E27
Dino ~ YG11, G14
Doll ~ E00, Y06, RV10, RV21, E33
Train ~ B000, B00, B02


The elves are helping Santa check his list by the cozy fire.
Here's a list of the Copic markers I used for these images:

Skin ~ E00, E11
Hair ~ YR31, YR68, E21, E25
Clothes ~ R000, R14, R46, C00, C2, N2, N5
Santa's List ~ C00, C2
Presents ~ YG11, G14, Y06, Y35, B000, B00
Fireplace ~ N0, N1, N2, N3, N4, E21, E25, E27
Stockings ~C00, C2, R000, R14, R46


I'll admit this card is very thick! It's kind of stuck on my Memory Dex holder, but I really love how it turned out! I think it would make a great card for a fellow Memory Dex cardmaker!


A close up of the glittery goodness!
I hope that I've inspired you to give those fun and wild ideas a try... you just may make something you really love!


Thanks so much for stopping by!
See ya next time.

Inky Hugs,
Crystal


{Please note that comment moderation is ON. Your lovely comment will appear shortly.}

Friday, November 13, 2020

Scrapping for Less ~ Fall Inspired Memory Dex Cards

Hello there crafty friend!
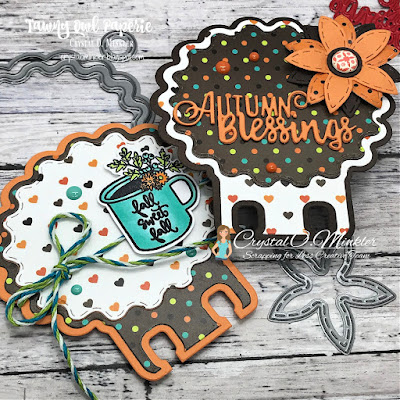
Today I'm sharing a couple Fall inspired Memory Dex cards using the newly released Scallop Flower Create-a-Dex die set from Scrapping for Less along with a few other fun products from the shop!


How cute are these?! I used the pretty Always Changing papers for these sweet Memory Dex cards with the Autumn Blessings die and the Sweater Weather stamp set. Now, I've shared a few different cards using the Autumn Blessings die... I love the beautiful font in this die!! Check out my Cozy Fall card, my Let's Bundle Up card, and my Fall is Coming card for more inspiration with these products. 


A closer look at the Fall Sweet Fall memory dex card... I love the colors in these papers! I used the following copic markers on this card ~ YG03, YR12, YR16, BG0000, BG01, BG11, BG23.

I'm entering my Fall coffee themed memory dex card in the Fall | Winter 2020 Coffee Lovers Hop... I adore the CLC hop each time it comes around and just can't help but play along as much as I can! 


Today is the last day to play along in the hop... but you should check it out! Lots and lots of fabulous inspiration from all kinds of talented cardmakers!! Okay... back to my cards.. lol


I have a little video sharing the coloring and assembling of this card. You can check that out here...


And a closer look at my second memory dex card using the Autumn Blessings die and I created a pretty Fall flower using the stitched flower that's included in the Scallop Flower Create-a-Dex die set. I die cut the flower three times and using my bone folder I rounded the petals a bit. The brad that I added in the center of the flower is from my stash... I'm actually not sure where it's from.


I finished off the memory dex card with a few orange enamel dots from Carta Bella's Fall Break collection. I just love how these turned out!! That's it for me this week... I'll see you next week with my sneak peek for the November FOTM card kit!!

Thanks so much for stopping by!
See ya next time.

Inky hugs,
Crystal

Wednesday, October 21, 2020

Scrapping for Less ~ Summer Memory Dex Cards

 Hello there crafty friend!

Today I'm sharing a few Summer themed memory dex cards that I've created for my spinner to keep track of the birthdays in my life, be it family or friend. I've been struggling this year with sending out birthday cards... not sure if it's just a 2020 thing, but I got to thinking that it sure would be handy to have a way to keep track of those birthdays in a more efficient way.


So I happened to have some Summer themed papers on my desk and I got to thinking that I'd just start with those!! I also had the new fabulous Barn Create-A-Dex die on my desk... so naturally, I used it!! I started by die cutting the stitched barn die from the pretty papers. I used a piece from the Strawberry Fields paper pad, the Rustic Watermelon paper pad, and the Golden Beach paper pad. And then I also pulled out my ephemera pieces... Strawberry Fields ephemera and Rustic Watermelon ephemera (looks like that is sold out). I didn't have any Golden Beach ephemera so I just cut a bunch of images out of two different patterned papers. I just love how easy these cards came together. Let's have a closer look...


I used a red card stock from my stash for the memory dex card base. I adhered the beautiful Strawberry Field patterned paper that I had die cut with the stitched barn die. Then I adhered the leaves and jam jar ephemera pieces. I popped up the strawberry ephemera piece with foam squares and then I just trimmed June from an old calendar set that I had from a couple of years ago. I mat it on the same red card stock and adhered it to the card. I wanted to add a bit of ribbon and decided to just punch a couple holes in the card and tie the bow through there... it was pretty easy. I'm going to die cut another piece of red card stock with the base die and adhere it to the back just to make the whole card a little more stable.


I also added a little Nuvo aqua shimmer to the strawberry ephemera piece. You can see a little bit of the sparkle in this photo.


For my July memory dex card, I die cut a base of black card stock and then adhered the pretty Rustic Watermelon patterned paper. I also die cut the red heart from that same paper (it's the other side of the double sided patterned paper). I covered up the black hole with the cute ephemera pieces and the red patterned paper heart. I also punched a couple holes in the card and added a bit of white baker's twine. And to finish this one off, I added a few white enamel dots... oh, and a little sparkle to the watermelon slice in the gnomes hand with the Nuvo aqua shimmer pen. I'm also going make this one a bit more sturdy by die cutting another black base.


And my last card... which just may be my favorite! My base for this one uses my all time favorite card stock... Tempting Turquoise. I adhered the pretty star fish patterned paper from the Golden Beach paper pad to the base and adhered the bikini, life preserver, and sunblock bottle directly to the card. I then popped up the flip flops and seashell. I mat 'August' with the same turquoise card stock and adhered it to the card.


I also added some shimmer to the flip flops and the seashell. I wish it showed up better in the photos. So now I have three memory dex cards done!! Woo hoo! I think I'll do the Fall months using papers from the September 2020 FOTM Card Kit Orchards & Patches. I'll try to remember to share them in the Scrapping for Less: Show & Share group. Well, that's it for me this week! I'll see you next Friday for my sneak peek of the new October kit!! You are going to love love love it!! 

Thanks so much for stopping by!
See ya next time.

Inky Hugs,
Crystal