Monday, June 14, 2021

Membership Monday ~ June 2021 UU So Dang Loved ~ Unity Stamp Co.

 Hello there crafty friend!

Welcome back to Membership Monday!!! Unity has SO many fabulous memberships that it's really hard to pick a favorite. I've really been loving the beautiful stamps in the Uniquely Unity membership and the June 2021 set does not disappoint!!


This one is called So Dang Loved... and I love the combination of flowers and leaves in this beautiful bouquet! The pretty hello sentiment and those hearts... LOVE! I paired this pretty stamp with the Stella Ruby papers by Basic Grey... yes, my precious hoard of discontinued Basic Grey papers. I love the luscious colors in this paper pack and they worked well with the colors I had chosen to color the stamp so it was a match made in crafty heaven. I used the Stitched Square Stacklets from Taylored Expressions to die cut the flowers. I fussy cut the sentiment leaving a white border. And I wrapped the card front with Black May Arts Burlap string tying a pretty double bow. I adhered the card front to a white A2 top fold card base.


I used the following Copic markers for this card:

Reds ~ R11, R14, R29
Greens ~ YG11, G07, G14, G24, G99
Yellos ~ Y15, Y38
Purple ~ V04
Outline ~ B0000

I hope you've been inspired to pull out your Uniquely Unity stamp and get it inky! I'll see you next Monday with a fun tropical card I created using the June 2021 Background of the Month membership stamp!


Thanks so much for stopping by!
See ya next time.

Inky Hugs,
Crystal


{Please note that comment moderation is ON. Your lovely comment will appear shortly.}

Saturday, June 12, 2021

A Lovely Place ~ Between the Pages ~ Polka Dot Orchard

 Hello there crafty friend!
Today I'm sharing a card using one of the illustrations that I made for Polka Dot Orchard called Between the Pages. I am a book worm... it's true! Though I listen to audiobooks more often now than actually flipping through the pages of an actual book, I love stamps with anything book related! This digi stamp is so fun to color and create a quick scene with.


I resized the digi stamp in a Word document along with the sentiment and print it off. I trimmed the sentiment and set it aside. I colored up the scene with the following Copic markers:

Skin ~ E000, E00
Hair ~ E51, E53, E55
Clothes ~ V000, V06, V20, YG03, G24
Book ~ W00, W1, W2, W4
Trees ~ YG03, YG11, YG63
Mountains ~ YG93, YG97, G94, C00, C1
Sun ~  Y000, Y11, Y15
Sky ~ YR01, YR82, R21, RV93, V20, B0000, B000, B91


I ran a 5-1/2 x 4-1/4" piece of kraft card stock through my Big Shot with the Inspiration Impression Plate from Papertrey Ink. I then ran a 2-1/2 x 4-1/4" piece of Mossy Meadow card stock through my Big Shot with the Linen/Canvas Impression Plate. I adhered the two pieces together and adhered them to a kraft A2 side fold card base. I die cut the colored scene with a stitched rectangle die and adhered it to a 4 x 3-1/8" piece of kraft card stock. I then tore a strip of kraft card stock and trimmed it to fit on the side of the colored scene. I used my 1/16" hole punch to make three holes along the side and added the Antique Brass brads from Stampin' Up. I mat the sentiment on a scrap of Mossy Meadow card stock. I adhered the sentiment to the bottom portion of the colored scene and then popped up the entire piece with foam tape. I just love how this turned out. I hope you do too!


Here's a look at the Between the Pages Digi Stamp Set.


Here's one more look at the card and I'm linking up my card to the following challenges:


Thanks so much for stopping by!
See ya next time.

Inky Hugs,
Crystal


{Please note that comment moderation is ON. Your lovely comment will appear shortly.}

Friday, June 11, 2021

{BYSHC} Sketch Challenge 11 ~ Gifts Galore {Snowpeep Nicholas} ~ Unity Stamp Co.

 Hello there crafty friend!

These weeks are just flying by! I'm back with another cute Christmas card and this time I've used the adorable Gifts Galore {Snowpeep Nicholas} from Unity Stamp Co. I've collected all of the adorable snowpeeps from Unity but other than maybe a tag that I made a couple years ago, I haven't inked up these cuties... that ends today with this fun card!


I paired up this adorable snowpeep with the Santa's Workshop papers by Carta Bella. I actually had the stitched partial circle in my scraps for this paper so I decided to use it. I used a 4-1/4 x 5-1/2" piece of Real Red card stock for my card front and adhered my layers of paper directly to it. I mat the colored image with the scrap circle and adhered it to the card front. I stamped the sentiment with Memento Tuxedo black ink, trimmed it and mat it with a scrap of Real Red card stock. I adhered a scrap of card stock under the 'tis the season to' portion of the sentiment to make it level on the card and then I adhered the sentiment to the card front. All that was left was to adhere the card front to a white A2 top fold card base. Done!


Here's a list of the Copic markers I used for this card:

Snow ~ C00, C2
Nose ~ YR15, YR68
Buttons ~ R000, R14, R27
Hat / Scarf ~ BG10, BG01, C00, C2
Gifts ~ BG10, C00, C2, R000, R14, R27, G21, G24, G46
Background ~ B0000, B00


Here's another look at {BYSHC} Sketch 11.
 I am really loving this sketch! I hope that you are inspired to get a start on your holiday cards if you aren't already working on them. For more inspiration for this sketch check out the {BYSH} Cardmaker's Blog!!


Thanks so much for stopping by!
See ya next time.

Inky Hugs,
Crystal


{Please note that comment moderation is ON. Your comment will appear shortly.}

Monday, June 7, 2021

Membership Monday ~ June 2021 KOM Magical Summer Days ~ Unity Stamp Co.

 Hello there crafty friend!
Today I am starting something new here on my blog... Membership Monday! I'm hoping to share inspiration for different memberships that are available over at Unity Stamp Co. each Monday of the month, as long as life doesn't get in the way. *Smile* For my first post, I have a fun mini slimline using the beautiful moths from the June 2021 Kit of the Month called Magical Summer Days.


This is a pretty simple card with the moths stamped on a piece of white card stock with Gina K. Design Amalgam black ink. I heat set the ink and then colored up the moths very simply with a few Copic markers. Since I don't have any mini slimline dies yet, I die cut the panel with a Scalloped Stitched Slimline die from Gina Marie Designs and then repositioned the die to cut off the bottom portion. If you look closely at the bottom there's a couple stitched lines from the first cut, but it's not super noticeable. 


Here's a quick list of the Copic markers I used for this card:

Top Moth ~ BG000, BG01, BG15, YR14, YR24
Middle Moth ~ B0000, B00, YR14, YR24
Bottom Moth ~ G000, G00, YG41, YR14, YR24


I added some Liquid Pixie Dust splatters to the scalloped panel and set it aside to dry. I have been wanting to use the cool eyelash ribbon that my sweet friend Bobbie Sue sent me forever ago and I thought it would be fun to use with these moths. I chose a light brown one that coordinates nicely with the bodies of the moths and wrapped it around a 3 x 6" piece of black card stock taping the ends to the back of the panel. I then adhered the panel to a white 6 x 6" card base that I scored at 3". I popped up the scalloped panel with foam tape and then popped up the sentiment, also with foam tape.

I hope you've been inspired to pull out your Kit of the Month and get it inky! I'll see you next Monday with a pretty card I created using the June 2021 Uniquely Unity membership stamp!


Thanks so much for stopping by!
See ya next time.

Inky Hugs,
Crystal


{Please note that comment moderation is ON. Your lovely comment will appear shortly.}

Saturday, June 5, 2021

~ Friends of Unity June 2021 Blog Hop ~

  Hello there crafty friend!
Welcome to our June 2021 Friends of Unity Blog Hop!! Where has the time gone?? I can't believe it's already June!! Our cue this month is...


... Masculine cards!!! 

Masculine cards can be hard to make... I struggle sometimes with what colors to use and what about embellishments?! Ribbons? Buttons? Brads? Twine? What to use, what not to use!?!? I know I am not alone in this struggle... thank goodness!


So my first card is my go-to... classic black & kraft! Can't go wrong with this combo for a masculine card! I used the must have Favorite Dad stamp to create a background. I did a little first and second generation stamping for the background... if you're not familiar with those terms, that means I stamped the image once for the first generation and then stamped it again without reinking the stamp for the second generation. I did that technique with Memento Tuxedo black ink and my Stamp Platform.


I then stamped the Good Ol' Days stamp and the Happy Father's Day sentiment, also with Memento Tuxedo black ink on Kraft card stock. I die cut the background with a large stitched rectangle die and then die cut the car with a smaller stitched rectangle die. I mat the background with a 4-1/4 x 5-1/2" True Black card front and then adhered the panel to a white A2 top fold card base. I trimmed the die cut Good Ol' Days car and then mat it on True Black card stock, as well. I adhered the car to the card and then trimmed and mat the sentiment with True Black card stock. I added a couple scraps of card stock under the 'Happy' portion of the the sentiment so it would be level on the card. Done. 

I'm entering my first card in the Simon Says Stamp Wednesday Challenge, Masculine.


My second card is a punny card... another kind of card that works for the guys! I have been on a mission to ink up those stamps that I just HAD to HAVE but still haven't inked up... and this is one of those stamps! These potatoes from the PUN Potato, Fry {and beans} stamp set are awesome! So fun and they are perfect for my anniversary card for my husband.


I added a bit of texture to the card using a Woodgrain Impression Plate from Papertrey Ink and to play off of the sentiment I used some campfire paper from the Pink Lemonade paper pack by The Paper Studio. I colored up the potatoes with the following Copic markers ~ E30, E33, E37, E51. I die cut the potatoes with a circle die from the Stitched Circle Stacklets from Taylored Expressions. I stamped and trimmed the sentiment and then added a couple layers of scraps under the sentiment to make it level and adhered it to the card. Done.


And my last card is a CAS card... another go-to for the guy cards!! I used the picnic paper from the same paper pad I used for the potato card... Pink Lemonade by The Paper Studio. I also used the Woodgrain Impression Plate again for this one. BUT I used the fun new release Barbecue King by Graciellie Design, available in red rubber at Unity, and...


The fun sketch from Freshly Made Sketches #488. I flipped the sketch on the side for my card.


Here's a list of the Copic markers I used for this card:

Hot Dogs ~ E08, E09, E11, Colorless Blender
Burgers ~ E08, E09, E11, E27
Charcoal ~ Y06, YR15, YR68, R05, N0, N1, N4, N6, N8
Grill ~ E55, E57, N1, N4, N8

Well, that's it for me this time. Be sure to hop along with the rest of the Friends of Unity for even more Masculine card inspiration! And I'm sure some of my friends are having giveaways so be sure to comment on each of our blogs as you hop along!

Let's get to the hopping...


Crystal <--- you're here

up next ---> Colleen


Thanks so much for supporting our little hop!
See ya next time.

Inky Hugs,
Crystal


{Please note that comment moderation is ON. Your lovely comment will appear shortly.}

Friday, June 4, 2021

{BYSHC} Sketch Challenge 11 ~ Ornate Joy ~ Unity Stamp Co.

 Hello there crafty friend!
I am back with my weekly Christmas card and this time I've used a sweet Itty Bitty set from Unity Stamp Co. called Ornate Joy! I just love this beautiful stamp and it's another one that I just haven't inked up until now.


I stamped the Ornate Joy stamp with Memento Tuxedo black ink, but before I colored it I actually looked for a pretty paper to use for my card and decided to use the lovely Snowy Winter Greetings from a past Whit Kit. Of course, I gravitated to the blue papers... love these!! 


I colored up the ornaments with the following Copic markers:

Snowflake Ornaments ~ BG70, BG72
Red Ornament ~ R000, R14, R27, Y15
Tree Ornament ~ BG70, BG72, YG11, G24, G46, R27, Y15, B00, E55, E57
Noel Ornament ~ C00, C2, R000, R14, R27


Here's another look at {BYSHC} Sketch 11.
I sure hope that you're inspired to pull out your holiday stamps and papers and get a jump on your holiday cards! If you'd like to see more inspiration for this sketch check out the {BYSH} Cardmaker's Blog!!


Thanks so much for stopping by!
See ya next time.

Inky Hugs,
Crystal


{Please note that comment moderation is ON. Your comment will appear shortly.}

Thursday, June 3, 2021

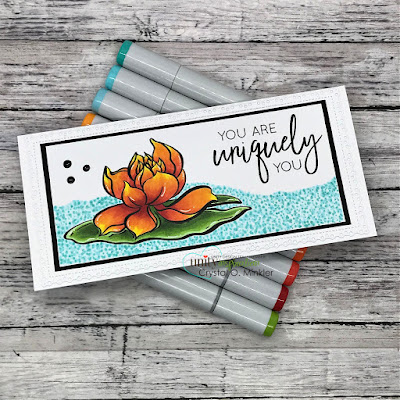
Water Texture ~ Remarkably Made ~ Unity Stamp Co.

 Hello there crafty friend!

I am back with one more new release from Unity Stamp Co. called Remarkably Made... a beautiful lily pad by Sandhya Iyer! Isn't it lovely?! I had so much fun coloring it! Typically I would color the water lily white or pink, but I decided to check out google and see if there are other variations and there are!! I was surprised to see a lot actually and I decided to do a yellowish-orange. 


I love the vibrant colors on the mostly white card! I also thought it would be fun to do something a little different for the water and just do dots. I went over the whole area three times with three different blue-green Copic markers... I love the texture it gives to my water.


Here's a list of the Copic markers I used for this card:

Lily Pad ~ Y06, YR15, YR68, R05, R17, R46, YG11, YG25, YG67
Water ~ BG000, BG01, BG13, BG15


This slimline measures 3-1/2 x 7-1/2". A mini slimline was a little too small, but I also didn't want to go full size for a regular slimline so... I went right in the middle. Since I did an irregular size, I had to die cut one side of the card stock at a time. What I mean is, I partially die cut half of the card stock panel with the die... I then pulled the die off and scooted it over to the left a bit being sure that the circles around the edge were lined up. I then ran the die through my Big Shot but only partially again. The die cut piece is the same width but it's about 7-1/8" instead of being 8-3/8". I really hope that makes sense. If you have any questions, just comment below. Be sure to stop by Unity to check out the new releases and see the fun Summer Sale going on! 


Thanks so much for stopping by!
See ya next time.

Inky Hugs,
Crystal


{Please note that comment moderation is ON. Your lovely comment will appear shortly.}