Showing posts with label #cartabella. Show all posts

Friday, April 19, 2024

Spring into Christmas 2024 {BYSHC} Linky Party ~ Believe in the Magic, Santa ~ Angie Blom Digital Designs

Hello there crafty friend!
I'm so excited to share my first card for the Spring into Christmas 2024 {BYSHC} Linky Party hosted by the Build Your Stash Holiday Cardmakers Facebook group!! This is our fourth annual Spring Linky Party!! Woohoo! Just a note... though it has Spring in the name the linky party is focused on Christmas and wintry holiday cards. It's a great way to get ahead on those holiday cards to relieve some of the stress later on in the year during the holidays. I am super excited to add a bunch of cards to my Christmas card stash and I sure hope that you'll join in the fun. 


For my first card I'm featuring the super cute Believe in the Magic, Santa Digital Stamp from our wonderful return Sponsor Angie Blom Digital Designs. I adore this digi stamp! I paired this sweet stamp up with the Santa's Workshop 6x6 Paper Pad from Carta Bella. I adhered all my layers to a white A2 top fold card base using the iCraft UltraBond Adhesive from our lovely Sponsor Therm O Web.


I combined and resized the Santa digi and the sentiment in a Word Document and printed it off. I then die cut it using a large stitched circle die from the Scallops & Circles {nesting dies} from our fabulous Sponsor Unity Stamp Co. And then I Copic colored Santa using a bunch of Copic markers. Here's a quick list:

Skin: E000, E11, E11, R20
Hair / Beard: C00, C1, C3, Colorless Blender
Santa's Suit: R20, R14, R46, C00, C1, C3
Belt ~ N1, N3, N5, Y11, Y15
Gloves / Santa's Bag: N1, N3, N5
Bow: R20, R14, R46


I adhered my papers to a 5 x 3-3/4" piece of Real Red card stock from Stampin' Up. I adhered my panel to a 5-1/2 x 4-1/4" piece of pattern paper and then adhered the panel to a white A2 top fold card base that I turned on its side. I covered the back of the circle with foam tape and then popped it up on the card. And I finished off the card using a few enamel dots from the coordinating Santa's Workshop Enamel Dots from Carta Bella.


My card was inspired by the {BYSHC} Sketch 41 that we used back in January. This sketch has definitely become a favorite! Have you visited the Build Your Stash Holiday Cardmakers Facebook group? We host a fun sketch challenge each month to inspire our holiday cardmaking all year long. I love revisiting the sketches and will likely be sharing a few during the Linky Party.


I'm also a Sponsor for the Spring into Christmas 2024 {BYSHC} Linky Party!! I have a wonderful prize set aside for one lucky winner. No picture this time. That way it'll be a fun surprise! For a chance to win my fun prize make a Christmas card and link it up to the linky party blog post on the Build Your Stash Holiday Cardmakers blog. Stop by the Spring into Christmas 2024 {BYSHC} Linky Party to check out all the wonderful Holiday inspiration that's already been shared from our Sponsors and the {BYSHC} Design Team!! I'm so excited to continue building my stash of holiday cards for 2024... I hope you'll join in the fun and play along! Let's build our stash of holiday cards this week!! Have an ink-tastic day!


Thanks so much for stopping by!
See ya next time.

Inky Hugs,
Crystal


{Please note that comment moderation is ON. Your comment will appear shortly.}

Saturday, January 27, 2024

Mischief Giggles Fun and Love ~ Little Mister ~ Unity Stamp Co.

Hello there crafty friend! 
I just had to ink up the adorable Little Mister stamp from Unity Stamp Co. I couldn't make a card with the baby girl and not also ink up the baby boy! Isn't he just darling!?


I paired him up with the adorable Little Adventurer paper pad from Pink Paislee. I've had these baby boy papers in my stash forever and it's so fun to finally use them!


I stamped the Little Mister cutie with Black Amalgam ink on Stampers Select White card stock from Papertrey Ink and colored him up with my Copic markers to coordinate with the fun papers.

Here's a quick list of the Copic Markers I used:

Skin: E000, E00, E11 
Hair: E70, E87, E74
Rug: B91, B93, B95
Outline: N0


 I die cut the sweet baby boy using a stitched square die from the Scallops & Squares {nesting dies}. My card stock mats are Stampers Select White card stock from Papertrey Ink. And the enamel dots are the Flora Enamel Dots from Carta Bella Paper Co. That's it for me today! Have an ink-tastic day!

Thanks so much for stopping by!
See ya next time.

Inky hugs,
Crystal

{Please note that comment moderation is on. Your lovely comment will appear shortly.}

Thursday, March 30, 2023

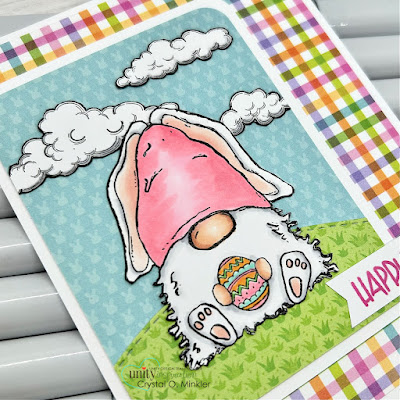
Sweet Easter Gnome ~ March Sketch Challenge ~ Unity Stamp Co.

 Hello there crafty friend!
Today I'm sharing my last bit of inspiration for the Unity March Sketch Challenge that I'm hosting in the Unity Show & Tell Facebook group. I'm sharing a cute Easter card using the super adorable Sweet Easter Gnome stamps. And I'm sharing another bonus card so be sure to read through to the end!


Eeep!! Isn't this Easter card just the cutest?! It turned out better than I hoped. Paired up the adorable Sweet Easter Gnome with the Hippity Hoppity paper pad from Doodlebug Design. I did consider using the new Plaid Builder {layering stencils} to make my own plaid but I'm afraid that time was not on my side so I went with the pattern paper.


The cute little clouds in the background are from the March 2023 Kit of the Month called A Good Man & Some Butterflies. I just adore the detail in these cute clouds!!


The Easter gnome and clouds were stamped with Black Amalgam ink and then colored up with Copic markers. Here's a quick list of the Copic markers I used to color up the adorable gnome:

Skin ~ E000, E00, E11, E04
Beard ~ C00, C1, C3
Hat ~ RV10, RV13
Ears / Feet ~ R000, R00, R20, C00, C1, C3
Easter Egg ~ YG11, G14, BG10, BG23, YR21, YR15, RV10, RV13


This time I decided not to use a die for my focal image. Just went with straight edges but I used a corner rounder punch for both of my focal image layers. The ground for my gnome was created by die cutting the green grass papers with the Land Borders Die Set from Newton's Nook Designs.

You can check out my process video here... Sweet Easter Gnome | March Sketch Challenge | Unity Stamp Co.


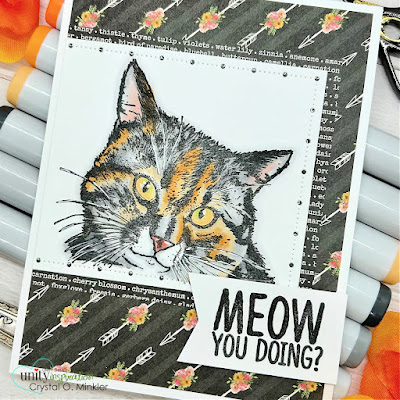
Also sharing a BONUS card!! Our family has been considering get a kitty and I am smitten with the tortoiseshell cats. Love the pretty mix of colors in their fur. 


I found a cute picture online and tried to replicate the coloring… it turned out okay. I do like how the eyes turned out though. Here’s a quick list of the Copic markers I used to color up the kitty:

Fur ~ YR21, YR15, YR16, N0, N2, N4, N6, C00, C1, C3
Nose ~ R00, R20, R14
Ears ~ R00, R20, N0, N2
Eyes ~ YG11, YR21, E00


 I die cut the Copic colored kitty with the third largest die from the Big and Little Pierced Chain Rectangle dies from Gina Marie Designs. Another paper pad of Spring papers made my background and my mat for the kitty layers. I used the Spring Market paper pad from Carta Bella. The sentiment was stamped, trimmed and then popped up on the card with thin foam tape. A few touches of white gel pen on the eyes, nose, and whiskers finish off my card.


Here's another look at the sketch! Today and tomorrow are the last days to play along with the sketch!! Please know that the sketch is meant to inspire and not require. Feel free to alter it to work for your creation just as I did for both of my cards! Most importantly have some inky fun! I can't wait to see what you create! Be sure to share your cards in the Unity Show & Tell group and also add them to the sketch challenge album in the group to be entered for a prize!! I have had so much fun hosting the challenges in the group for the last couple of months. Hope you all had fun too! Thank you all so much for playing along! 


Thanks so much for stopping by!
See ya next time.

Inky Hugs,
Crystal


{Please note that comment moderation is on. Your lovely comment will appear once approved.}

Wednesday, June 1, 2022

{BYSHC} Sketch Challenge 23 ~ Deck the Halls ~ Unity Stamp Co.

 Hello there crafty friend!
It's time for a new Sketch Challenge over at Build Your Stash Holiday Cardmakers and I have a sweet Christmas card to share using a beautiful stamp from Unity Stamp Co. called Deck the Halls. I've been wanting to ink up this stamp for quite awhile but it's been too large to work with our sketches so I chose a sketch that would work with this stamp and other large stamps. I can't wait to see the creations made this month with this sketch design... I think it'll be fun!


I paired up this beautiful stamp with the Christmas paper pad from Carta Bella Paper Co. I've only used these papers once or twice and they are gorgeous!! I really wanted to use as much of it as I could. The banners in this sketch really allow for you to showcase your pretty pattern papers.


I stamped the cute Deck the Halls couple with Gina K. Design Black Amalgam ink and colored it up with the following Copic Markers:

Skin ~ E000, E00, E11, E04
Hair ~ E51, E55, E57, E59
Hats ~ YG11, G24, G46, C00, C2, N2, N4, N6
Boots ~ E51, E55, E57, N2, N4, N6 
Her Clothes ~ R20, R27, R59, B91, B95, B97
His Clothes ~ R20, R14, R27, YG11, G24, G46, B95, B97, B99
Glove ~ N2, N4, N6
Tree ~ YG11, G24, G46, E55, E57, E59
Ground ~ C00, C2
Outline ~ N0, N1


I trimmed my copic colored panel down to 3-5/8 x 4-7/8" cutting off a bit of the trunk because I wanted to show more of the pretty holly pattern paper. I adhered my pattern paper banner strips to the panel and then trimmed off the excess. I cut a black card stock mat measuring 3-3/4 x 5" and adhered the panel to it. And then I adhered the mat panel to the holly pattern paper card front measuring 4-1/4 x 5-1/2". I then adhered the entire card front to a white A2 top fold card base. I added a few touches of white gel pen to the tree and a little bit to his glove. I stamped the sentiment and trimmed it and then adhered it to a black mat. I wanted to add a little something under the sentiment... it just seemed like a lot of empty space so I added a few red rhinestones from the Rainbow Bling rhinestones from Gina Marie Designs.


Here's a look at the fun {BYSHC} Sketch 23 for the month of June!
I hope you'll join us and play along with the sketch! If you're interested in seeing a bit more inspiration for this sketch, check out the amazing inspiration from the design team over on the  {BYSH} Cardmakers blog! Since this new sketch is starting mid-week I'm going to count this card as my weekly Christmas card and I'll be back June 10th with my regular weekly Christmas card using this fun new sketch!


Thanks so much for stopping by!
See ya next time.

Inky hugs,
Crystal


{Please note that comment moderation is ON. Your lovely comment will appear shortly.}

Friday, August 20, 2021

{BYSHC} Sketch Challenge 13 ~ Owl Bundle Up ~ Unity Stamp Co.

 Hello there crafty friend!
I am really loving the {BYSHC} Sketch Challenge 13 over at the Build Your Stash Holiday Cardmakers Facebook group... mini slimline cards are so fun!! For my card today I used the adorable Owl Bundle Up stamp set from Unity Stamp Co!! I adore the sweet owls illustrated by Lisa Arana for Unity... some of my most favorite stamps!


I paired up this sweet owl with the beautiful Santa's Workshop papers from Carta Bella Paper Co. I was looking for a paper that coordinated with the blue greens I colored the owls little sweater, but I couldn't find the right one. However, I do like the slight contrast... I think it helps Mr. Owl to pop on the card! And these papers created a nice background for him. 


Here's a quick list of the Copic markers I used:

Owl ~ W00, W1, W3, W5, YR15, YR21, YR24
Scarf ~ R000, R14, R46
Sweater ~ BG0000, BG10, BG13, BG23


Here's a look at the fun {BYSHC} Sketch Challenge 13 for the month of August!
I hope you'll join us and play along with the sketch! If you're interested in seeing a bit more inspiration, check out the {BYSH} Cardmakers blog! I'll see you next week with one last Sketch 13 card!


Thanks so much for stopping by!
See ya next time.

Inky hugs,
Crystal


{Please note that comment moderation is ON. Your lovely comment will appear shortly.}

Friday, June 11, 2021

{BYSHC} Sketch Challenge 11 ~ Gifts Galore {Snowpeep Nicholas} ~ Unity Stamp Co.

 Hello there crafty friend!

These weeks are just flying by! I'm back with another cute Christmas card and this time I've used the adorable Gifts Galore {Snowpeep Nicholas} from Unity Stamp Co. I've collected all of the adorable snowpeeps from Unity but other than maybe a tag that I made a couple years ago, I haven't inked up these cuties... that ends today with this fun card!


I paired up this adorable snowpeep with the Santa's Workshop papers by Carta Bella. I actually had the stitched partial circle in my scraps for this paper so I decided to use it. I used a 4-1/4 x 5-1/2" piece of Real Red card stock for my card front and adhered my layers of paper directly to it. I mat the colored image with the scrap circle and adhered it to the card front. I stamped the sentiment with Memento Tuxedo black ink, trimmed it and mat it with a scrap of Real Red card stock. I adhered a scrap of card stock under the 'tis the season to' portion of the sentiment to make it level on the card and then I adhered the sentiment to the card front. All that was left was to adhere the card front to a white A2 top fold card base. Done!


Here's a list of the Copic markers I used for this card:

Snow ~ C00, C2
Nose ~ YR15, YR68
Buttons ~ R000, R14, R27
Hat / Scarf ~ BG10, BG01, C00, C2
Gifts ~ BG10, C00, C2, R000, R14, R27, G21, G24, G46
Background ~ B0000, B00


Here's another look at {BYSHC} Sketch 11.
 I am really loving this sketch! I hope that you are inspired to get a start on your holiday cards if you aren't already working on them. For more inspiration for this sketch check out the {BYSH} Cardmaker's Blog!!


Thanks so much for stopping by!
See ya next time.

Inky Hugs,
Crystal


{Please note that comment moderation is ON. Your comment will appear shortly.}