Thursday, March 13, 2025

Anya's Candy Shop ~ Preview Day 3 ~ The Greeting Farm

 Hello there crafty friend!
It's the final day of previews at The Greeting Farm for the March release! Introducing Anya's Candy Shop! Isn't she just the sweetest?! Oh. My. Gosh!!


I stamped Anya and the cute candy jars with Memento Tuxedo Black ink and colored them up with Copic markers. I fussy cut each of the images on the line and colored the edge of the fussy cutting with a black marker.


Here's a quick list of the Copic markers I used:
Skin: E000, E00, E21, E51
Hair: E51, E95, E97, E09
Bow: V000, V12, V15
Dress: V000, V12
Tie: V000, V12, V15
Vest / Shoes: N0, N2, N4, N6
Jars: C00, C2
Candy: Y11, Y15, B000, B00, YG11, YG03, RV10, RV02, C00, C2


I paired up Anya with some fun pattern papers in my stash. I thought the fun circles in the paper worked really nicely with the candy. I even colored them so they were similar. I used a white gel pen to add the white dot.


I stamped the sentiment, trimmed it and popped it up on the card with foam tape. So fun! The release goes live in the store on the 15th at 12am EST! Woohoo!

Thanks so much for stopping by!
See ya next time.

Inky Hugs,
Crystal


{Please note that comment moderation is on. Your lovely comment will appear once approved.}

Some Hearts Feel Like Home ~ Pookie ~ Unity Stamp Co.

Hello there crafty friend! 
I'm so excited to share another card for Unity's March release. I couldn't pass up playing with the adorable new kitty rightly named, Pookie!! Isn't she just the most adorable addition to the Rescue Tales collection?! Love her!


I stamped Pookie with Black Amalgam ink and colored her up with just a few Copic markers.

Here's a quick list of the ones I used:
Pookie: N0, N2, N4, R00, R20
Eyes: G12, G05
Ground: R00, R20


I die cut the adorable kitty using a die from the Scallops & Circles {nesting dies}. And I paired up Pookie with the Gosh, I Love You {paper pack}.


I finished off this cute card with a few pink enamel dots.


Thanks so much for stopping by!
See ya next time.

Inky hugs,
Crystal

{Please note that comment moderation is on. Your lovely comment will appear shortly.}

Wednesday, March 12, 2025

You Are My Sunshine ~ Preview Day 2 ~ The Greeting Farm

 Hello there crafty friend!
It's Day 2 of previews at The Greeting Farm for the March release. Oh. My. Cuteness... all the critters in the You Are My Sunshine stamp set are just too cute for words!!


I created a sweet little scene on a slimline card with some fun layers. I used the Slim Line Cloud Coverage Stencil from Picket Fence along with the Hills & Grass Stencil from Newton's Nook Designs. And I used Tumbled Glass & Mowed Lawn Distress Inks to blend over those stencils.


I stamped all the images with Memento Tuxedo black ink and colored them up with Copic Markers. I used a bunch of markers so the list is a bit long this time:
Bird: B000, B00, Y11, Y15, YR15
Deer: R00, R20, E21, E51, E23, E25
Daisy Garland: C00, C2, Y11, Y15
Bunny: C00, C2, R00, R20
Bear: R00, R20, E51, E33, E35, E37, N2, N4, N6
Bear's Flower Crown: YG11, YG03, YG63, R11, R22, V000, V12, V15, Y11, Y15
Fox: E51, E95, E97, E09, N2, N6
Flowers: Y11, Y15, YR15, V000, V12, R00, R11, B000, B00


I die cut the stenciled layers using dies from the Scalloped Card Panels Die from Trinity Stamps. I fussy cut all the critters and flowers and then colored the edges of my fussy cutting with a black marker.


I adhered the layers to a slimline card measuring 7 x 8-1/2"; scored at 3-1/2". And then I adhered all the critters and flowers to the card. To finish it off, I stamped the sentiment directly onto the card. This was so fun to make! I enjoyed coloring all the critters and flowers for the scene. The release goes live in the store on the 15th at 12am EST.

Thanks so much for stopping by!
See ya next time.

Inky Hugs,
Crystal


{Please note that comment moderation is on. Your lovely comment will appear once approved.}


Membership Wednesday ~ March 2025 KOM Chapters & Crossings ~ Unity Stamp Co.

Hello there crafty friend!
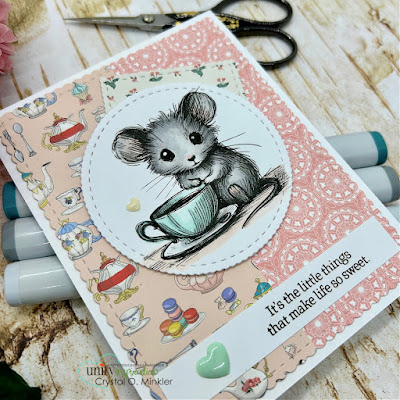
Happy Membership Wednesday! Today I'm sharing a sweet card featuring the adorable mouse from the March 2025 Kit of the Month membership from Unity called Chapters & Crossings. 


I just had to ink up this cutie from the KOM! Isn't it just too sweet!? I stamped the mouse with Black Amalgam ink and colored it up with some Copic markers that coordinated with the papers I chose ahead of time.

Here's a quick list of the Copic markers I used:
Mouse: N0, N2, N4, R00, R20
Cup: BG0000, BG10, BG72
Saucer: C00, C2
Table: R00
Outline: N0


Here's a look at the fun sketch for Tawny Owl Paperie Inky Inspiration Sketch Challenge 30. The sketch, as always, is meant to inspire not require. So let the sketch lead in your design, but don't feel limited by it.


I paired up the sweet mouse with some old papers in my stash that just seemed perfect! Coincidentally enough, they are called Practically Perfect by Carta Bella. I die cut the papers using the largest die from the Scallops & Rectangles {nesting dies}. The cute mouse was die cut using a die from the Scallops & Circles {nesting dies}.


I stamped and trimmed up the sentiment and then I adhered it directly to the card. I added foam tape to the back of the mouse and popped it up on the card. And then I finished it off with a couple of heart enamel dots from my stash. So fun! I love how it turned out!


Here's a quick look at this month's Kit of the Month membership! Love it!

Well, that's it for me today! I hope you've been inspired to play with your membership stamps! And if you're inspired by the sketch, I'd love to have you join in the fun and play along with us. The sketch challenge ends on Monday, March 24th at 11:59pm PST. Have an inkredible day!


Thanks so much for stopping by!
See ya next time.

Inky Hugs,
Crystal


{Please note that comment moderation is on. Your lovely comment will appear once approved.}

Tuesday, March 11, 2025

Regency Couple ~ Preview Day 1 ~ The Greeting Farm

 Hello there crafty friend!
I'm so excited! It's the first day of previews at The Greeting Farm for the March release! Yay!


Oh my goodness, Anya and Ian from the Regency Couple stamp set were SO much fun to color!! I love them! They made me think of shows like Downtown Abbey or the Pride & Prejudice movie. 


I stamped sweet Anya and Ian with Memento Tuxedo black ink and colored them up with Copic Markers. I fussy cut them both and colored the edge of the fussy cutting with a Memento Tuxedo Black marker. I adhered them to a die cut piece of vellum card stock. 

Here's a quick list of the Copic markers I used:
Anya's Skin: E000, E00, E21, R00, R20
Anya's Hair: E33, E35, E37, E79
Dress: Y11, Y15, B91, B95, B97
Head Piece: Y11, Y15, B91, B95, B97
Ian's Skin: E000, E00, E21, E04
Ian's Hair: Y32, E33, E35
Ian's Clothes: B91, B95, B97, Y11, Y15, N0, N2, N4, N6
Flowers: R01, R12, R02, YG11, YG03, YG63
Tea Cup: B000, B01, B95, C00, C2


I paired up this beautiful couple with the gorgeous Flora Paper Pad from Carta Bella. I die cut the floral piece and the vellum layer using dies from the A2 Lacy Layers Dies from Waffle Flower. I stamped the beautiful flowers and fussy cut them leaving a white border and then I popped them up on the card with foam tape.


I stamped, trimmed and popped up the sentiment, too. Lots of fun layers for this card! Release goes live in the store on the 15th at 12am EST.

Thanks so much for stopping by!
See ya next time.

Inky Hugs,
Crystal


{Please note that comment moderation is on. Your lovely comment will appear once approved.}


Tawny Owl Paperie Inky Inspiration Sketch 30 ~ Rise & Whine Pissy Kitty ~ Unity Stamp Co.

 Hello there crafty friend!
Today I'm sharing a bit of inspiration for the Tawny Owl Paperie Inky Inspiration Sketch Challenge 30 in the Tawny Owl Paperie Inky Inspiration Facebook group. I inked up the hilarious new Rise & Whine Pissy Kitty.


Another awesome kitty! That face! LOL! I stamped the kitty with Amalgam Black ink and colored him up with a bunch of Copic Markers.

Here's a list of the Copic Markers I used:
Cat: R00, R20, YR21, YR15, YR14
Eyes: YG11, YG03
Pillow: BG70, BG72
Blanket / Sheet: RV10, RV02
Background {Behind the Pillow}: C00


Here's a look at the fun sketch for Tawny Owl Paperie Inky Inspiration Sketch Challenge 30. The sketch, as always, is meant to inspire not require. So let the sketch lead in your design, but don't feel limited by it. 


I paired up the grumpy kitty with the Rainbow Wishes {paper pack}. I die cut the kitty with a die from the Scallops & Squares {nesting dies}. I also die cut a piece of striped pattern paper to go behind the kitty layer.


I stamped the sentiment on a scrap that wasn't quite long enough to go across the card but I still went with it. I've been having lots of fun with this sketch! I hope you can find time to play along. I can't wait to see what you create. Have an ink-tastic week!

Thanks so much for stopping by!
See ya next time.

Inky Hugs,
Crystal


{Please note that comment moderation is on. Your lovely comment will appear once approved.}

Monday, March 10, 2025

Inky Paws Challenge 238 ~ Showers & Flowers Theme Challenge {Week 2}

 Hello there crafty friend!
 Have you played along with the Inky Paws Challenge 238 - Showers & Flowers Theme Challenge yet?! You have until Friday, March 28th to get your entries in for this fun challenge and a chance to win a $20 store credit to Newton's Nook Designs!


I am loving this fun theme challenge! I hope you have some time to play along with us.


I stamped the cute daisies from the Dainty Daisies Stamp Set on a scrap of white card stock and die cut it using the coordinating dies from the Dainty Daisies Die Set. I had fun coloring the daisies a pinky purple. 

Here's a quick list of the Copic markers I used:
Petals: RV10, RV11, V12, V15
Flower Centers: Y11, Y15
Leaves / Stems: YG11, YG23, YG17


I set the daisies aside and blended some Tumbled Glass Distress Ink over the Petite Clouds Stencil. I kept a light touch around the edges. And then I blended Mowed Lawn Distress Ink over the grass side of the Hills & Grass Stencil.


I die cut the panel using a stitched rectangle die from the Basic Frames Die Set. I adhered all of my layers to a white A2 top fold card base. I stamped the sentiment, trimmed it and popped it up on the card using foam tape. I finished off the card with a few translucent enamel dots from my stash.


Now it's your turn to get your paws inky with your Newton's Nook Designs products and create a project using the theme. Be sure to link up to the Inky Paws Challenge! Can't wait to see your projects!


Thanks so much for stopping by!
See ya next time.

Inky Hugs,
Crystal


{Please note that comment moderation is on. Your lovely comment will appear once approved.}