Saturday, December 29, 2018

Brutus Monroe ~ Botanical Banners ~ Happy Birthday

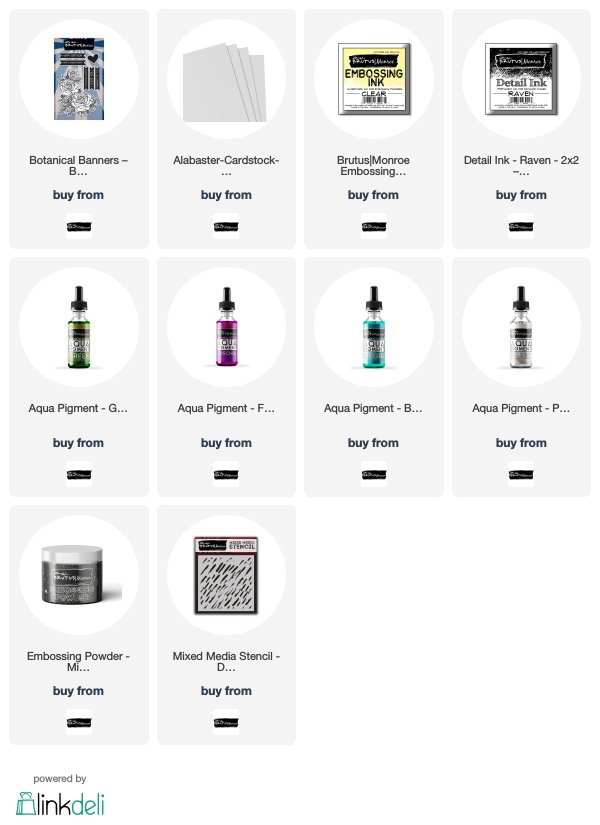
Hello! I'm here with another guest spot featuring the gorgeous Botanical Banners stamp set... Oh My Goodness! These gorgeous flowers were a dream to watercolor! Let's get right to it, shall we?


I stamped the Botanical Banners floral set onto Canson XL watercolor paper (140lb) with Brutus Monroe Clear Embossing Ink and heat set a fine black embossing powder. This is my favorite technique for watercoloring because the raised edges of the heat embossed image keep the watercolors pretty well contained. I then watercolored the image by putting a couple drops of the Aqua Pigment on my acrylic blocks, one color per block so there wasn't any chance of mixing.


 I used my watercolor pen to pick up the colors, cleaning off my pen with paper towel between colors. I have to admit when I used the Pearl Aqua Pigment to blend with the Fuschia on the petals of the flowers... I was blown away! It was just so gorgeous and the shimmer! Love it!


All the shiny on the card made it a little difficult to get a picture. In this picture though, I think you can see the shimmer from the Pearl Aqua Pigment watercolors on the petals but also around the flower with the Blue Green Pigment watercolors.... I just couldn't resist using the Pearl again after seeing how beautiful it was on the petals.


Here's one last shot at the shimmery layers on the card. I just can't get enough of it!


Once my watercolored panel was dry, I die cut it with a stitched rectangle die and set it aside. I have just been itching to give this Milky Way embossing powder a try every since it arrived and I have to tell you it is so cool! I thought I'd give it a try on a colored piece of card stock but didn't want to do your typical black or maybe dark blue... so I grabbed this Lavender card stock from my stash. I laid the Down Pour stencil over the Lavender card stock and dabbed the Clear Embossing Ink all over the stencil making sure not to push too hard because the ink pad is really juicy, but I did make sure to get good coverage through the stencil. I removed the stencil, added the Milky Way embossing powder and then heat it up and Oh. My. Goodness. Wow! I love this stuff! It has such an awesome look to it! Love love love! Anywho, I trimmed my background piece and adhered it to a card base of Alabaster card stock. I then popped up the watercolor panel with some foam tape. My last touch for the card was the sentiment... I stamped the happy birthday banner from the Botanical Banners stamp set with Raven Detail Ink and then just fussy cut it by hand. I adhered it to the card and called this one Done!

I have had so much fun sharing my creations with you this month. I hope you've enjoyed them!

Thanks so much for stopping by!
See ya next time.

Inky Hugs,
~ Crystal


{Supplies}

Affiliate links are used:

Friday, December 28, 2018

Scrapping for Less ~ December 2018 Blog Hop ~ Animals in the Arctic


December’s kit is all about Arctic Animals…Now if you are anything like me, you hate the cold weather, snow, and anything that would mean being cold. However, snow and these cute little critters in this kit are all about fun! So grab your warm beverage, sit back, and hop along with us to see these adorable critters and all the inspiration our designers have to share. Check out the Flavor of the Month page to place your order if you haven’t subscribed. Also, don’t forget to check the A La Carte items (items that are leftover - full packs and such - from putting the kits together, and other items that we have on the website that may coordinate with this kit). Make sure you also put your name in for that Rafflecopter prize!


Hey there! I am loving the theme of this month's kit... Animals in the Arctic! The critters in the stamp sets are all so cute! Let's not waste anymore time and get straight to the cards!


For my first card I used Sketch #2 with Collection One.
I did a mix of layers using the Winter Skies patterned paper by Scrapping for Less along with some Sno Cone card stock. I adhered all of the layers on a white card base. I added a few sequins to the main image and on the card base.


Here's a close up of the watercolored bear. In real life the watercolors coordinate a whole lot better with the colors in the background. You can also see the touches of purple organza ribbon on either side of the bear.


For my second card I used Sketch #4 with Collection Two.
I say I used sketch #4 for this one but it's a loose interpretation... what I mean is, I went rogue! LOL! I kinda sorta used some of the elements of the sketch, but it really had a mind of it's own. ;)  Now you may notice that this card looks kind of similar to my sneak peak card... and that's because I made them at the same time. I just loved this color palette that I pulled from these Alexandra Renke papers included in Collection One so I had to use it for this card too. I trimmed my layers of patterned paper and adhered them to a kraft card stock base. I stamped the adorable penguin with memento tuxedo black ink and colored him in with the following Copic markers:
Penguin ~ C0, C2, C4, C8, R20, YR15, YR27, YR68
Hat/Scarf ~ BG10, BG11, N0, N1, Colorless Blender
Mug ~ B0000, B000, B39, B99, N1


I added some sparkle to the hat and marshmallows using stickles from my stash. I then die cut the image using a wonky square die. I popped it up on the card base and adhered a few die cut snowflakes using the snowflake die from Collection Three. The sentiment was simply stamped, trimmed, and then popped up, as well.


For my third card I used Sketch #1 with Collection Three.
I adhered my layer of grey snowflake patterned paper to a piece of Grape Jelly card stock. I stamped a few snowflakes on the white card base using Wilted Violet and Hickory Smoke Distress Oxide inks. I adhered my grey/purple panel to the card base and then stamped the 'Snow Much Fun' sentiment using Wilted Violet Distress Oxide ink.


I trimmed a small piece of white card stock for my focal scene and stamped the mountains and chunk of ice using Memento Tuxedo black ink. I then stamped the owl and penguin on a scrap piece of white card stock and got to coloring using the following Copic markers:
Mountains ~BV20, BV23, N1
Sky ~ B60
Water/Ice ~ B000, B02, BG0000
Penguin ~ N0, N1, N5, YR15, YR68, V17
Owl ~ C1, YR15, YR68, B02, BG0000
I fussy cut the penguin and owl and adhered them to the scene. I added a few banners cut from the Frosty patterned paper by Pink and Main in the collection. And my last touch was a few sequins here and there.


For my last card I used Sketch #3 with Collection Four.
Now for this card, I flipped the sketch because I wanted to use the Winter Tree Stencil from the Banana Split subscription in my focal panel. I blended Worn Lipstick, Tattered Rose, and Shaded Lilac Distress Oxide inks over the stencil and then set it aside to dry while I stamped and colored the owl and moose. The owl is part of the stamp set included in Collection Four, but the moose is from the Arctic Sentiments set by Scrapping for Less that is in the Banana Split subscription. I colored the images using the following Copic markers:
Owl ~ BV04, BV20, BV31, YR27, YR68
Moose ~ E00, E01, E02, R01, RV95, W5


I fussy cut the images and adhered them to the focal panel that I had mat on Bubblegum card stock. I adhered a few banners on the back of the focal panel and then popped up the panel on the card base. I adhered some snowflakes and sequins all over the card and then realized I didn't have a sentiment yet... so I stamped out the 'Snow Much Fun' sentiment again, trimmed it, and adhered it to the card.
Such a fun kit to play with!! I had a blast creating these cards. I sure hope you've enjoyed them as much as I have.

Here's a look at the Double Dip Subscription.


Here's a look at the Banana Split Subscription.


Next up on the hop is Luci!

After checking out the hop, make sure to join the Rafflecopter back on the SFL blog to have a chance to win an awesome prize!!


Thank you friends for checking out my blog post!
See ya next time.

Inky Hugs!
Crystal

Power Poppy ~ Just One More Christmas Card

Hello! I'm sharing just one more Christmas card today for the CASology challenge - Cue Card: Holly.
I recently got my hands on some Power Poppy stamps and this holly from the Holly Golightly stamp set just had to get inked up!


I wanted to keep the card very CAS so I simply stamped the holly branch and sentiment in the upper center portion of the card front using Memento tuxedo black ink.

I then colored the holly branch using the following Copic markers:
R000, R14, R29, G24, G29, G46, YG63, YG67


I die cut the card front using a Nested Rounded Corner Rectangle Small Stitch die from Rubbernecker Stamps and adhered it to a white card base.


There's still a few days to play along with the CASology challenge. I encourage you to check it out!

Thanks so much for stopping by!
See ya next time.

Inky Hugs!
Crystal

Scrapping for Less ~ Sneak Peek ~ December 2018 Flavor of the Month Card Kit

Hello! Today I'm sharing a Sneak Peek of the December 2018 Flavor of the Month card kit!! Eeep! This kit is so stinking cute! You are going to need it!!


This fabulous shaker card is part of one of the collections and I just HAD to use it to create this sweet card... isn't that little penguin adorable! I just love him with his cup of cocoa! Here's a quick run down of the Copic markers I used:

Penguin ~ C0, C2, C4, C8, R20, YR15, YR27, YR68

Hat/Scarf ~ BG10, BG11, N0, N1, Colorless Blender

Mug ~ B0000, B000, B39, B99, N0, N1


I hope you've enjoyed the week of sneak peeks by the design team! Be sure to join us
 at midnight tonight for the blog hop and full reveal of the Flavor of the Month card kit.

Thanks so much for stopping by!
See ya next time.

Inky Hugs,
Crystal

Tuesday, December 25, 2018

Brutus Monroe ~ Snow Friends ~ Merry & Bright

Hello! I'm back with another guest spot featuring Snowy Friends from Brutus Monroe! I just couldn't resist inking up this snowman... isn't he the cutest snowman?! I can't get enough of him... so I made up a bunch of cards using him!


I started by stamping the snowman from Snowy Friends multiple times with Raven Detail Ink on a light kraft card stock. I colored the snowman first using the following Copic markers ~ B0000, B00, BG000, BG15, BG18, YR15, YR27, YT68, R14, R27, R89.


I love the look of Copics on kraft card stock! To finish off the images, I used some white Prismacolor pencil to highlight here and there. I then fussy cut all the snowmen and set them aside.


I had these note cards in my stash forever and I thought it was time to finally use them. They measure 3-1/2 x 5" when folded. I die cut a circle from a scrap piece of light weight card stock for my 'stencil' and then stamped the trees from the Freshly Cut stamp set by Brutus Monroe and Unity Stamp Company using Pine Needles Distress Oxide ink. I then blended some Shabby Shutters and Vintage Photo Distress Oxide ink around the outer edge of the circle. I used a heat tool to help the oxide inks dry completely and then rubbed an anti-static pouch over the circle area. 


I then stamped the Merry & Bright sentiment using clear embossing ink and heat set Alabaster white embossing powder. I added a few drops of Nuvo white blizzard glitter drops. To finish them up, I wrapped the cards a couple of times with a metallic turquoise twine and tied them with a bow.

Thanks so much for stopping by!
See ya next time.

Inky Hugs!
~ Crystal


{Supplies}

Affiliate links are used:


Friday, December 21, 2018

Scrapping for Less ~ The Greeting Farm ~ Save the Day

Hello! Today, I'm sharing a Valentine's Day card using The Greeting Farm's Save the Day stamp set. I don't know about you all but I needed a little break from the Christmas card making... don't get me wrong, I love Christmas and I love making Christmas cards, but I needed a little creative break. So when I saw this sweet set I knew I was going to use it to make a Valentine's Day card for my husband. He's my hero!


I had a rough idea for my design but believe it or not... it was supposed to be a no layer card. LOL! Isn't it funny how sometimes the card just evolves into something you didn't quite plan?! Well, that was the case with this one. I started with the Stitched Arch Stax dies from My Favorite Things. I die cut the white and the black layers and then decided I wanted to have red in the mix since it's a Valentine, that only made sense... so I thought a red card base would be good. And then on my desk I saw the new Polka Heart Backdrop die from Lawn Fawn... of course, I had to use it! I used it to die cut a white piece of card stock that I trimmed down and adhered to the red card base.


That turned out to be too much white in the background so to break that up I found some papers from my stash with a Valentine's theme and trimmed them down. I adhered it to a piece of red card stock and then used a stitched scalloped edge die on both sides of the patterned paper. I adhered this panel to the card base and set it aside. 

Using a grassy edge stencil, I blended some Mowed Lawn distress ink for the grass on the bottom of the first layer. I then used a mini cloud edge stencil with Tumbled Glass distress ink to create some clouds in the background. I set that piece aside and stamped the images using Memento tuxedo black ink. I then colored them in using the following Copic markers:

Trees ~ G05, G17, G24

Knight ~ C0, C2, C4, C8, R000, R37, R89, E55, E57, E59

Lady ~ E0000, E000, E00, E55, E57, E59, R000, R14, R20, R27

I fussy cut each of them out along the black lines and then went over the edges of the images using a Memento tuxedo marker (that helps to clean up the edges). I decided the Lady needed a little glittery goodness on her dress so I added some Sprinkled Sugar Stickles to the image. I just love how the ombre coloring of her dress looks with the beautiful glitter on it. I adhered the images to create the scene and then popped up the arch panel on the card. I stamped the sentiment using VersaMark watermark ink on a scrap of red card stock and then heat embossed fine white embossing powder. I trimmed it down and then adhered it to the card using foam tape on the left side and liquid glue on the right since it would lay over the popped up arch.


Here's a close-up look at the glittery goodness on the Lady's dress. Love it!
Well, that's it for me. I hope that you enjoyed my first Valentine's Day card for the coming year! 
I wish you all a very Merry Christmas!

Thanks so much for stopping by!
See ya next time.

Inky Hugs,
~ Crystal


Tuesday, December 18, 2018

Brutus Monroe ~ Forest Background ~ Let it Snow

Hello! I am beyond excited to be guest designing for Brutus Monroe during the month of December! Woohoo! I hope to share some fun creations with you this month using some fabulous products!! Let's get started! 


Today, I have a card I created using the adorable Forest Background stamp. I stamped the background using Raven Detail Ink and then colored in the images with the following Copic markers ~ E21, E23, E25, E34, E35, N0, N2, N5, E55, E57, E59, W5, G24, G29, G46, YG17. I knew that I wasn't going to use the entire background so I didn't color the whole thing. In fact, I just realized I missed a tiny bit of tree there in the bottom right corner. Ooops! Haha... well, sometimes that happens. I also added some 'snow' to the background using a snow marker and then heat set it to make it puffy. I then die cut the circle piece I wanted for my focal image and then die cut the stitched rectangle piece. I didn't want to exclude that sweet little bunny so I fussy cut him out and adhered him by the deer adding a bit of snow around him, as well. I then set those pieces aside to work on my back layer.


I just had to try out the Fallen Snow Glitter Glaze and I wanted to see what it would look like on a dark card stock so I chose a piece of dark blue card stock from my stash along with a snowy stencil. I was pleasantly surprised at the texture of the glaze... it was so easy to work over the stencil with the spatula filling in all the snowy bits. I love it! I love the effect of the glittery 'snow' on the dark background, too! The perfect base layer for the design I had in mind.

Once the glaze dried, I trimmed the snowy background and mat it on a piece of grey card stock. I mat the rest of my layers using the same grey card stock and then adhered all of my layers onto a white card base, popping up the focal image in the circle using foam tape. When I adhered that last focal piece I was careful to line up the images with the rectangle background.... it's a great way to give dimension to a card when using just a background stamp.


To finish off the design and tie the whole theme of the card together I chose the 'Let it Snow' sentiment from the Merry and Bright set. I didn't want to cover the background I had colored so I chose to stamp the sentiment on vellum card stock. I stamped it using Brutus Monroe Embossing Ink and then I heat embossed Ultra Fine Alabaster Embossing Powder... OMG! I absolutely love this embossing powder! You can see in the picture above how well it melted... so beautiful! I die cut the sentiment with a circle die and then I adhered it just on the right side where it overlaps the scene in the circle. I didn't want to use foam tape behind the other side since it would be visible through the vellum and it would cover the background so I just left it to kind of float there. 


Here's another look at the finished card. I love how it turned out! I hope I've inspired you to pull out those background stamps and have fun with some layers!

Thanks so much for stopping by!
See ya next time.

Inky Hugs!
~ Crystal


{Supplies}

Affiliate links are used:


Friday, December 14, 2018

Scrapping for Less ~ Sunny Studios ~ Have a Foxy Christmas!

Hello! Today, I'm sharing a few Foxy Christmas cards using the same sketch but changing it up with different papers and little foxes!! Oh my goodness, this Foxy Christmas set by Sunny Studios is so stinking cute! I just adore it! And it pairs up so well with the Sunny Studio Holiday Cheer papers!!


To start I chose my papers, pairing the patterned papers that I wanted for each card. I then trimmed each piece down and mat them on a pink card stock and then a green card stock. The strip of patterned paper in the center of the card is only mat on the pink card stock. I adhered all of my layers and then set them aside.


I decided to focus on just the images with a single fox. I chose the three foxes that looked festive with their cute reindeer headband, beanie, and Santa hat and then colored the images to coordinate with the patterned papers.


I stamped each of the foxes onto a piece of white card stock measuring 2 x 2-1/2" using Brutus Monroe Raven Detail Ink. I colored the images with the following Copic markers:

Foxes ~ E09, E18, YR16, YR21, YR27, W00, W1, W3, W8, W10, R20
Headband/Hats ~ YG11, YG13, YG17, E55, E57, N0, N1, R000, R14, R27, RV04, RV17, RV19
Chilly Sky Background ~ B0000, B00, B02

Copic markers are available in the shop for pre-order. 
Here's a link to check it out... Copic Marker Pre-order.


Once I had all these cuties colored, I added some Snowy Marker across the bottom of the card stock and heat set it to make it puffy and that completed my simple scene with a bit of snow.


I then mat each of the foxy focal images onto pink card stock measuring 2-1/8 x 2-5/8" and then mat those onto green card stock measuring 2-1/4 x 2-3/4". I popped these pieces up on the three card fronts and then set them aside.


I stamped the sentiment and holly onto three scraps of white card stock and trimmed them down and fussy cut a flag on one end. I colored the holly using the following Copic markers ~ R000, R14, R27, YG13, YG17. I adhered the sentiment flags to each card front. I then adhered each of the card fronts to a white card base completing the three cards. I just adore how these turned out! This sweet Foxy Christmas set is available in the shop ---> here!

Thanks so much for stopping by!
See ya next time.

Inky Hugs!
~ Crystal

Thursday, December 13, 2018

Brutus Monroe ~ Snow Friends Watercolor

Hello! I'm sharing a pretty quick CAS card that I created for the CASology challenge Cue Card: North. When I saw the cue card for this challenge I just had to play along.


My design for this card was really simple. I stamped the snowman and the sentiment from Brutus Monroe's Snow Friends stamp set using Brutus Monroe Raven Detail Ink on Canson XL watercolor paper and heat set it with my heat tool so it was fully dry before I started watercoloring. I pulled out my neglected ZIG Clean Color Real Brush pens to watercolor the image picking some fun colors. Once I had the image colored as I wanted, I added some Snow Marker around the bottom of the snowman and heat it up with my heat gun to make it all puffy.
I trimmed the watercolor paper down to 4-1/8 x 5-3/8" and adhered it to a white card base. Really simple... and I love it! I hope you do too!


There's still a few days to play along with the CASology challenge. If you have some time, I encourage you to get inky and play along.

Thanks so much for stopping by!
See ya next time.

Inky Hugs!
~ Crystal


{Supplies}

Affiliate links are used:


Thursday, December 6, 2018

Fall / Winter Coffee Lovers Blog Hop ~ Rubbernecker Stamps ~ Happy Holidays!


Hello! I'm sharing another card for the Fall/Winter 2018 Coffee Lovers Blog Hop... I am having so much fun creating! I've shared a couple other cards for this hop on my Instagram... if you follow me on Instagram you've probably seen them. If you don't follow me there, I invite you to check out my Instagram here ---> link to Crystal's Instagram


During the last Coffee Lovers Blog Hop... the Spring/Summer hop, I bought the sweet owls from Rubbernecker Stamps that was shared so much by others. I just adore these line of stamps by Rubbernecker Stamps! Love them! I knew I had to create at least one card for this hop with one of these cuties. I chose to ink up Garfield... those eyes! I just love this owl! He was so fun to color too! I used the following Copic markers ~ BG70, BG72, BG75, E30, E35, E37, Y11, Y21, YR15, YR27, YR68, Colorless Blender.

Now for the card... I die cut the birch tree die from Simon Says Stamp from a piece of white card stock and then die cut it again with a stitched rectangle die measuring 3-3/4" x 5". I then blended some Vintage Photo distress ink onto a 4-1/8" x 5-3/8" piece of Kraft card stock being sure to keep the middle portion clean so it would appear lighter. Once that was done, I decided I wanted to add a layer of  Lost Lagoon card stock to the mix so I found an oval die (it was actually a stitched die, but the correct size was more important) that was larger than the birch tree die so that the Lost Lagoon layer would not show through my kraft layer. Clear as mud, lol! I hope that made sense. If not just ask for clarification in the comments. :) I adhered the birch tree layer to the Lost Lagoon layer and then popped it up on the Kraft layer using stampin' dimensionals. I then adhered the entire panel onto a white card base. I die cut Mr. Garfield and adhered him to the card.

It was time to figure out a sentiment... I wanted something for the Holidays and something kind of punny. I was thrilled to find the Happy Hoolidays stamp set from A Jillian Vance Design in my stash! (Sadly, it appears this stamp set is no longer available.) This set was perfect! I stamped the sentiment and then trimmed it into a banner and adhered it to the card. And then I got to thinking something was missing... the card needed something. I happened to look at my pile of recent Black Friday purchases and saw the Rina Snowflake die from Simon Says Stamp... perfect! I die cut it four times and adhered two each together and then adhered them to the card being sure to just adhere the centers so I could lift the edges of the snowflake to give them some dimension. I just love how this card turned out! I sure hope you do too!


Here's a close up of Mr. Garfield! Isn't he sweet!

I encourage you to check out the hop, if you haven't already. I always have a great time participating! There's still time to play along! 

Thanks so much for stopping by!
See ya next time.

Inky Hugs!
~ Crystal

Saturday, December 1, 2018

~ Friends of Unity December Blog Hop ~

Hello! It's the first of December AND it's the first Saturday of December... you know what that means!! It's time for another Friends of Unity blog hop... but this month's hop marks one whole year of Friends of Unity sharing our love of Unity Stamp Company with you! Wow! A whole year!! I can't believe it! Time sure does fly on by! Thank you all so much for commenting and supporting our little hop! We truly appreciate it! 

To show my appreciation for your support, I'm having a giveaway! Oh boy... do I have something up my sleeve... but you have to read down to the bottom of my post! No skipping either... lol... check out my card below and I've tried to keep the chatter to a minimum. :) So let's get to it!

 I know a lot of us cardmakers are still working on our Christmas projects. Some of us just started on them... Yikes! Some of the more disciplined of us, are done with our Christmas projects... Yay! So I thought it would be a great time to share a Thank You card with a wintry theme. Our cue for this month's hop is ~ Thank You! 


A lot of the focus this time of the year tends to be about giving and getting... I wish there was more thanking! We're all so thankful during Thanksgiving... it's the thing to do, right?! But it seems to go away when Christmas is coming near. I try to be thankful all year long... but it's easy to get caught in the tide of the seasons. This year, though, I thought it would be nice to make thank you cards for the friends and family that send us cards and gifts during the Christmas season. 


I wanted to keep my card simple for two reasons... I wanted it easy to duplicate so I had enough on hand to send out and I wanted it relatively flat so it wouldn't need the extra non-machinable postage to mail it. I did end up putting those wood elements on... I couldn't help myself! They work so well with the snowflakes in the stamp so this card will be hand delivered... BUT... I could easily change this up with some die cut snowflakes or punched out snowflakes... whatever works!


Now, to the details for my card... I stamped the Burst of Flakes {Border Backgrounds} using VersaMark watermark ink onto two 5-1/2 x 4-1/4" pieces of Kraft card stock. I then heat embossed some ultra fine white embossing powder on both pieces. I also stamped the sentiment from the Like a Snowflake sentiment kit on one of the pieces with VersaMark watermark ink and heat embossed the same white embossing powder. I trimmed the one piece without the sentiment down to 5-1/4 x 4" and adhered it to a Kraft card base. I then die cut the other piece with the sentiment using a stitched rectangle die that measures 4-7/8 x 3-5/8" and popped it up on the card.


I colored one side of the snowflake wood element using a white prismacolor pencil. It gives the wood a subtle white color that I think compliments the kraft and white on the card.


Here's one more look at the card as a whole. I just love how simple but beautiful this card turned out!
I hope I've inspired you to pull out some of your Christmas or Holiday stamps to make some thank you cards.

So... did you read through the post or did you just skip down here to check out my crazy giveaway?!
Are you ready?! 
Well, I was thinking ~ how do we celebrate one whole year of hopping with Unity Stamp Company's fabulous stamps?!?! The obvious answer is we give away Unity Stamps! But I really want to celebrate... so I'm giving away 2 prizes! 

The first prize is a Brand New Winter Beauty SMAK kit <--- click there to check out this kit! It's gorgeous!! And perfect for a Winter giveaway!

The second prize is a bundle of Brand New stamps... December Girl, Jolly Ol' Santa, and Stay Cozy!! You can click on each of those to check them out! Oh... I love these fabulous stamps! 

What do you think?! Crazy awesome prizes, right?! Now, all you have to do to enter is to check out our hop and comment on each of the blogs. I'll use Random.org to choose two lucky winners and share them with you next month for our January hop!! Thank you all again for your support and Happy Hopping!


~ Blog Hop List ~

Crystal <--- you're here

up next ---> Eileen


Thank you friends for checking out my blog post! 
See ya next time.

Inky Hugs!
~ Crystal