Monday, October 31, 2016

Happy Owl'oween!!

Happy Owl'oween!! I have a quick card for you this morning.


Isn't this owl just 
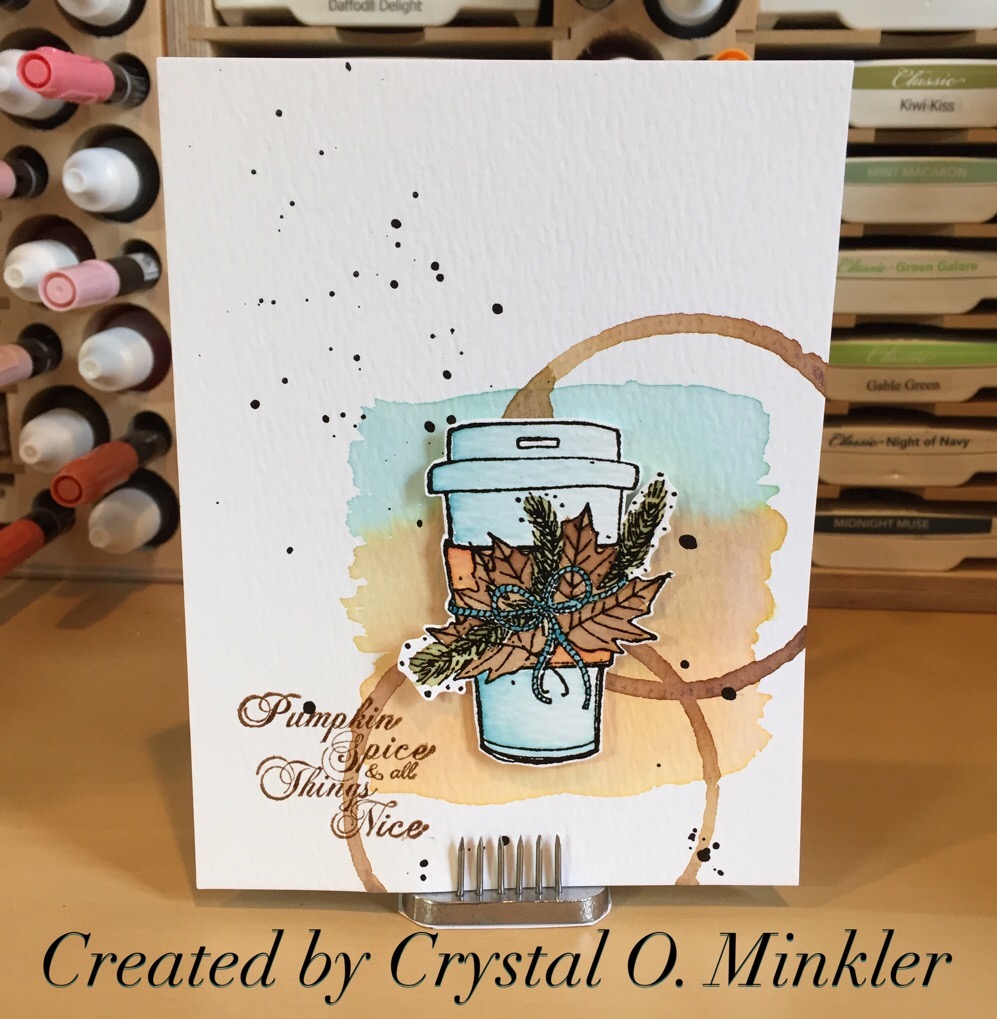
adorable! He was a must have for me... I just love owls! I stamped him and the sentiment in Memento black ink and colored the owl with a few copics. I stamped him again on a post it note and fussy cut it out to make a mask. Then I covered him up and added some distress ink along the edges and splattered away with some silks. I layered the Elegant Eggplant card stock directly on the card base and then off set the owl panel and popped it up using stampin' dimensionals. I added a few Halloween Night enamel dots from Stampin' Up!

Here are the products I used for this card:
Stamps: Happy Owl'oween (Unity)
Card Stock: Whisper White, Elegant Eggplant (SU!), Only Orange (retired SU!), White (PTI)
Copics: C00, C1, C3, BV02, V15, V17, YR04, YR68, E17
Adhesives: Stampin' Dimensionals, Fast Fuse (SU!)

Thanks for stopping by!

See ya next time.
~ Crystal

Friday, October 21, 2016

Time for Coffee!

I saw that the CASology challenge is COFFEE!!! I absolutely could not turn down this challenge!


I did a wash with my distress inks... I only have four distress inks right now, so my colors were limited. Once I got the wash done, I decided it needed some coffee rings but I didn't have a coffee ring stamp the size I wanted, so naturally I went into the kitchen and grabbed my favorite Starbucks coffee mug! I dabbed my distress ink on my acrylic block, sprayed a bit of water and rubbed my coffee mug around in the ink to get it saturated. Plopped it down on my panel and let it set for just a bit to make sure I got a good color. Then I did it again. Absolutely love the way it turned out!!
I added my sentiment also using the distress ink but I heat embossed it with clear ep. Bring on the splatter... I grabbed the dark roast silk and splattered away. Unfortunately, in my excitement I didn't protect my sentiment so there it is... but I still love it!


I watercolored the coffee cup using the same three distress inks plus Stampin' Up!'s Mossy Meadow ink. I fussy cut it out and popped it up using stampin' dimensionals.


 CASology


Here are the products I used for this card:
Stamps: Pumpkin Spice (Unity)
Card Stock: Strathmore watercolor paper
Inks: Basic Black craft (retired SU!); Broken China, Rusty Hinge & Gathered Twigs distress inks (SSS) 
Adhesives: Stampin' Dimensionals(SU!)
Tools: heat tool
Miscellaneous: Dark Roast silks, Clear and Black embossing powder (retired SU!)

Go check out the challenge over at CASology and play along... there's still time!

Thanks for stopping by!

See ya next time.
~ Crystal

Thursday, October 20, 2016

PCC215 Fall into Fall...


I love fall!! The changing of the leaves and the cooler weather... I just adore it! I knew when I saw the latest challenge at Paper Craft Crew that I just HAD to play along!


I stamped and heat embossed the leaves on watercolor paper. Then I decided I wanted a brown watercolored background. I wanted the leaves to pop a bit so I used Daffodil Delight and Really Rust to watercolor them. Then I decided I wanted to do something a little different...


I decided to Reverse Mask the leaves... not sure if that's a technique, but that's what I called it! I stamped all the leaves a couple of times on post it notes and then fussy cut them out. Then I had to make all the pieces fit without overlapping on the leaves so I had more cutting to do. It was a bit of work!


Once I had my background protected, I splattered away!! This part was fun and definitely made up for all the fussy cutting!! I splattered using Fun Stampers Journey silks in Cranberry Bliss, Gold, and Dark Roast. 


As you can see in this close-up, the splatter leaked a bit under the masks. I still love the way it turned out! I added some glossy dots that I had also colored with silks. A neat trick I learned from a crafty friend! I watercolor washed a scrap of watercolor paper using the Really Rust and Daffodil Delight inks again. Stamped and embossed the sentiment from Paisleys & Posies. Cut it out with a die and then cut out a larger piece in Early Espresso card stock. I had to trim the Early Espresso die cut to fit. I just needed to assemble the pieces. I adhered the watercolor panel to a piece of Really Rust card stock and adhered those to a card base of Early Espresso card stock. I added a bit of gold thread behind the sentiment using fast fuse and popped up the sentiment using stampin' dimensionals.


 papercraftcrew.com


I had a blast with this challenge!! I hope you will play along too!

Here are the products I used for this card:
Stamps: Artsy Leaves (FSJ), Paisleys & Posies (SU!)
Card Stock: Watercolor paper, Early Espresso (SU!), Really Rust (retired SU!)
Inks: Black craft (retired SU!), Early Espresso, Daffodil Delight (SU!), Really Rust (retired SU!)
Adhesives: Stampin' DimensionalsFast Fuse (SU!)
Miscellaneous: Cranberry Bliss, Gold, Dark Roast silks, Journey Glaze (FSJ), Gold thread (SU!), 
Black embossing powder (retired SU!)

Thanks for stopping by!

See ya next time.
~Crystal

Saturday, October 15, 2016

PCC214 Paisley Birthday

Today I'm playing along with the challenge over at Paper Craft Crew. I've been itching to use the Paisleys & Posies set for Stampin' Up! Why not use it for this challenge!


This was a very fun sketch to play with and thankfully it's a two week challenge because I haven't had much time to play. I just recently got my hands on some distress inks and was able to incorporate those into this card. I like the way this turned out and I hope you do too. There's still time to check out the sketch challenge over at papercraftcrew.com and join in on the fun!


 Paper Craft Crew 214


Here are the products I used for this card:

Thanks for stopping by!

See ya next time.
~ Crystal


Friday, October 14, 2016

Shaving Cream Marbled Christmas

I made this pretty Christmas card for a challenge in a stamping group. The technique for this is called the Shaving Cream Marbled Technique


I wanted this to be subtle background so I went with Pool Party ink and Sweet Sugarplum ink. I kept with those colors throughout the card. Hope you like it!

Here are the products I used for this card:
Stamps: Holly Jolly Greetings (SU!)
Card Stock: Pool Party (SU!), Sweet Sugarplum (SU!), White (PTI)
Inks: Pool Party, Sweet Sugarplum
Tools: Scallop Stitched Frame (GMD), Sleigh Ride Edgelits (retired SU!)
Miscellaneous: Uni-Ball Signo White gel pen, Sakura Gelly Roll pen, Pretty Flakes Accents (FSJ)

Thanks for stopping by!

See ya next time.
~ Crystal


Sunday, October 9, 2016

Freshly Made Sketches #257 - Thankful Leaves


I'm playing along with a sketch challenge over at Freshly Made Sketches! Love this sketch!


 Freshly Made Sketches

Here are the products I used for this card:
Stamps: Artsy Leaves (FSJ), Holiday Best (retired SU!)
Card Stock: Kraft (PTI), Chocolate Chip (SU!), Watercolor paper, Autumn Prints (FSJ)
Inks: Black Craft (retired SU!), Pumpkin Pie, Chocolate Chip (SU!); Cranberry Bliss, Gold, Dark Roast silks
Tools: Heat tool, black detail ep (retired SU!)
Miscellaneous: Twinkle Trim (FSJ), Rustic Jute Twine (PTI)

Thanks for stopping by!

See ya next time.
~ Crystal

Thursday, October 6, 2016

Happy Birthday Cuppa

I have a couple cards to share today. I started designing these a couple weeks ago. Actually, I started designing the first card a couple weeks ago... the second card was just a bonus since I like the first one so much!


I was very excited when my SOTW (stamp of the week) arrived from my weekly subscription with Unity. I just love any kind of stamp that has to do with coffee or tea! I was also needing some birthday cards... so, these were perfect!


Here are the products I used for these cards:
Stamps: Our Talks (Unity), Endless Birthday Wishes (SU!)
Card Stock: Vintage Cream (PTI), Mint Macaron (SU!), Vellum (SU!)
Inks: Mint Macaron, Pretty in Pink (retired SU!), Blushing Bride markers
Tools: Paper Crimper (retired)
Miscellaneous: Artisan Embellishment Kit (retired SU!), pink ribbon (retired SU!)

Thanks for stopping by!

See ya next time.
~ Crystal

Sunday, October 2, 2016

Butterflies and Roses

When I originally wrote this blog post I was super excited about posting my card. I absolutely love this sketch! But now I'm sad. Unfortunately, the owner/coordinator has decided to discontinue the challenges at Can You Case It?. I truly enjoyed my time with the CYCI Design Team. I'm still very honored to have been asked by my crafty friend, Eva, to join her team. I wish all the members of the team all the best in their crafty adventures.

In order to keep up with my busy busy life as a SAHM to four kids that I also homeschool, my plan to keep on track with the design team was to stay ahead on the challenges. So, I do have a card to share that would have been the next challenge. I absolutely love this sketch! I had a blast designing and creating this card!


I don't know if you've noticed but I tend to go with clean and simple designs. Now, sometimes I'll step out of that and really layer up a card. But typically, it's the pretty simple designs that I create. This grouping sketch is a mix of the two and it just made me happy!!


I stamped the butterfly image from Unity's Butterfly Endearment kit in Scarlet Jewel ink on Very Vanilla card stock and then fussy cut it out. I decided that the butterfly needed a little something so I grabbed my new Gold PanPastels from Fun Stampers Journey and applied some lovely gold shimmer to the butterfly. Sadly, it's not very visible in the picture. I stamped the large butterfly again in Crumb Cake ink on Very Vanilla card stock. I stamped over that image with the splatter stamp from the Touches of Texture set using Baked Brown Sugar ink (retired SU!). I die cut that image using the scallop circle die from the Circle Card Thinlits set (retired SU!) and adhered it to a circle piece I cut out of the Baked Brown Sugar card stock. I rounded out the wings on the larger scarlet butterfly using a bone folder. I adhered the scarlet butterfly to the crumb cake butterfly just adding glue to the thorax of the butterfly and then I lifted the wings.


I decided to stick with the butterfly theme so I stamped the three butterfly image directly on the Crumb Cake card base in Baked Brown Sugar ink. You're probably wondering where the three butterflies are... two are hidden behind the larger butterfly image. Poor butterflies!
I stamped the "hello darling" sentiment in Baked Brown Sugar ink on Crumb Cake card stock. I used the Hexagon punch (retired SU!) to cut the edge of the banner piece and then adhered it to a piece of Scarlet Jewel card stock, also cutting the edge with the hexagon punch. Now it was time to assemble all the pieces. I put a strip of gold glitter washi tape (SU! from Sale-A-Bration) just under the butterfly trio. I popped up the circle image and the sentiment using stampin' dimensionals. The white rose was also popped up with stampin' dimensionals, however, I had to double them so it didn't squish the banner or circle. I adhered the two pink roses with glue dots and called it done!

Thanks for stopping by!

See ya next time.
~ Crystal