Showing posts with label Tim Holtz. Show all posts

Sunday, September 1, 2024

{BYSHC} Sketch Challenge 49 ~ Snow Many Flakes ~ Therm O Web

Hello there crafty friend!
It's time for a new sketch challenge over in the Build Your Stash Holiday Cardmakers Facebook group! Today I'm sharing a fun Christmas card featuring some awesome crafty goodies from our amazing sponsor, Therm O Web! Therm O Web has generously offered up a $25 gift card as a prize for the {BYSHC} Sketch Challenge 49 this month! So awesome!!


I started with a fun, but sadly retired Deco Foil Toner Card Front called Snow Many Flakes by Therm O Web and Unity for my snowflake layer. Therm O Web has a whole bunch of Deco Foil Toner Card Fronts available on their website though. I trimmed a piece of Silver Shattered Glass Deco Foil Transfer Sheet and laid it on top of the card front foil facing up. I heated up my laminator for a few extra minutes after the green light turned on and ran the foil topped card front through my laminator. I've found my laminator does better if it has those extra couple of minutes. I grabbed my Stormy Sky and Chipped Sapphire Distress Mini Ink pads and just pulled them across the card front giving a windy look to the background. I used a water pen to blend out the harsh lines from the ink pads. It's softened up with not much water. The card fronts hold up pretty well to water anyways. I then scraped the edge of the card front with the Chipped Sapphire just giving it a darker edge. A substitute for using a mat.


I die cut a piece of Stampers Select White card stock from Papertrey Ink using a Stitched Hillside Borders die from Lawn Fawn. I adhered the snowflake panel to a white A2 top fold card base using iCraft UltraBond Adhesive from Therm O Web and then adhered the hill on the bottom edge using the same glue. I set the card base aside and started die cutting all the fun pieces from the Sizzix Tim Holtz Cozy Winter Thinlits dies. I pretty much used the cover sheet from the dies as my guide for colors... except for the bears scarf. I wanted to do a fun green. I used Dark Chocolate, Kraft, New Leaf, True Black, Pure Poppy and Stampers Select White card stock from Papertrey Ink for the bear. I Copic colored with YG11, G24 and G46 on the scarf; and colored the front of the mug on white card stock using BG70 and BG72. For the branch I die cut it from Early Espresso card stock from Stampin' Up. The snow is Stampers Select White card stock that I added some shadow to with a C00 and C1 Copic marker.


I die cut all the pieces for the little bird and adhered them all together using the iCraft UltraBond Adhesive from Therm O Web. I used Stampers Select White, Kraft, and Pure Poppy card stocks for the bird. I Copic colored the beak using YR12 and Y11; the Kraft and white card stock of the bird's body using E000, E51, and E55; the Pure Poppy card stock of the head and tail using R20, R14 and a tiny bit of R46; the white card stock of the wing using N0, N2, N4; and lastly YR12 and E55 on the white feet of the bird. To finish off the card, I stamped a sentiment from the Simple Little Joys itty bitty stamp from Unity. It was a perfect fit because I find joy in snow and a good cup of coffee. This was such a fun card to make!


Here's a look at {BYSHC} Sketch Challenge 49 for the month of September. Loving this sketch! I can't wait to see what everyone does with it. I hope you'll join us and play along with the sketch. If you're interested in seeing a bit more inspiration for this sketch, check out the amazing inspiration from the design team over on the {BYSH} Cardmakers blog! Lots of super creative inspiration this month from the design team.


Thanks so much for stopping by!
See ya next time.

Inky hugs,
Crystal


{Please note that comment moderation is ON. Your lovely comment will appear shortly.}

Friday, May 6, 2022

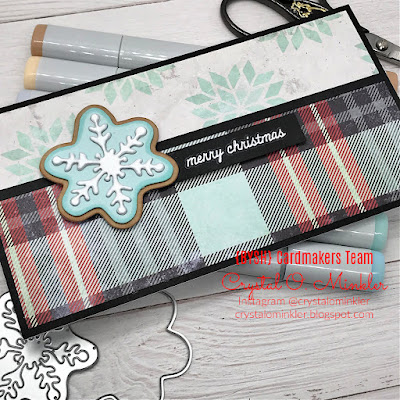
{BYSHC} Sketch Challenge 22 ~ Christmas Cookies ~ Tim Holtz

 Hello there crafty friend!
I'm back with my weekly Christmas card using the current sketch over at the Build Your Stash Holiday Cardmakers Facebook group and this time I'm using some very neglected Tim Holtz products in my stash. As I've mentioned here and there, I'm still slowly unpacking my studio and I reorganized my pattern papers last week. Woohoo!! Now I know what is where and can find what I need more easily! YAY! I was also tickled pink to find my Tim Holtz Christmas papers! I set them aside to make a future card... while I was cleaning off my desk I found the super cute Christmas Cookies dies from Tim Holtz that my sweet and awesome friend, Robyn, gave me for Christmas. Thanks, Robyn!! It was just natural to use these adorable dies with the papers I had set aside.


First I decided I wanted to use the cute snowflake cookie... so I looked through all the pretty papers in the Tim Holtz 8x8" Christmas Paper Stash paper pad and chose two papers. There's just something about plaid for Christmas!! Love the pretty colors in this plaid paper!! I also chose the snowflakes to kinda coordinate with the snowflake cookie.


I cut my pattern papers and adhered them to a True Black card front measuring 6-1/2 x 3-1/2". I also cut a 1/8" strip of True Black card stock from Papertrey Ink and adhered it over the spot where the two pattern papers meet. I adhered the card front to a 6-1/2 x 7" white card base scored at 3-1/2".


I set the card aside and die cut the snowflake cookie. I die cut the cookie base two times from Crumb Cake card stock from Stampin' Up. I colored around the edge of the cookie base with E35 and then blended it with E51. It made the edge a bit darker than I had wanted but I still used it. I die cut the light blue frosting three times from Soft Sky card stock from Stampin' Up. I colored around the edge with BG000 and BG0000. I die cut the snowflake from Stampers Select white card stock from Papertrey Ink four times. I wanted the snowflake to be raised even more than the frosting. I colored the edge of the snowflake with just a tiny bit of C00 and C2. I ended up adding back some white with a Sakura white gelly roll pen.


I adhered all the layers of the cookie together... it's so cute and looks just like a yummy cookie! LOL!
Now I did plan to add some Glossy Accents to the frosting but totally forgot to do that before I took photos so just imagine it's all glossy and shiny and delicious looking!! The sentiment is a Tim Holtz Idea-ology Christmas Remnant Rubs that I applied over a scrap of True Black card stock. This was basically a sentiment sticker that you peel the back off of and use the little stick and rub it on. I've had these in my stash forever and just now finally used one. It's very easy to use and super cute! I trimmed the sentiment and adhered the left side to the bottom of the snowflake cookie and then popped up both the sentiment and cookie with foam tape. Cute!!


Here's a look at the fun {BYSHC} Sketch 22 for the month of May!
I hope you'll join us and play along with the sketch! If you're interested in seeing a bit more inspiration for this sketch, check out the amazing inspiration from the design team over on the  {BYSH} Cardmakers blog! I'll be back next Friday with my regular weekly Christmas card using this fun sketch!


Thanks so much for stopping by!
See ya next time.

Inky hugs,
Crystal


{Please note that comment moderation is ON. Your lovely comment will appear shortly.}

Wednesday, March 24, 2021

Shifter Hex Stencil Background | Gonna Bee Here Gnome | Unity Stamp Co.

 Hello there crafty friend!

I'm back with another fun gnome card... this cutie is a new release at Unity Stamp Co. this week!! I couldn't BEE  more excited to share this fun card I created using the adorable Gonna Bee Here stamp set.


I created the background using Squeezed Lemonade and Wild Honey Distress Oxide inks over the Hex Shifter Stencil by Tim Holtz. I added a bit of black acrylic paint splatter with just a touch of shimmer by also adding a drop of Liquid Pixie Dust to the paint.


I dried the background and trimmed it down to 4 x 5-1/4". I mat it on a card front of Black Licorice card stock from Lawn Fawn measuring 4-1/4 x 5-1/2" and then adhered it to a white A2 top fold card base.


I colored up this cutie with the following Copic markers:

Skin ~ E000, E00, E11
Beard ~C00, C2, C3
Shoes ~ N2, N6, N10
Wings ~ B0000, B00, R27
Honey ~ Y11, Y15, Y38
Hive ~ E21, E23, E27
Bees ~ N2, N6, N10, B0000, B00, Y06, Y11
Honey Pot ~ BG10, BG15, BG57, B06, B99
Ground/Outline ~ E23, E25, N0, N2


I die cut the cute bee gnome with a Stitched Tag Corner Square STAX die from My Favorite Things. I added a bit of shimmer to the wings of the gnome and the bees with a Nuvo Glitter Gloss Aqua pen. I then trimmed off the right edge of the die cut piece and adhered it to the card. I mat the sentiment on black card stock, trimmed it and then adhered it to the card. To finish of the card, I added a couple enamel dots.
 
I have a video sharing how I created the background and finished up the card. You can check that out here... Shifter Hex Stenciled Background | Bee Gnome.


Isn't that sentiment just perfect?! I just love how this turned out... I hope you like it too!
Be sure to stop by Unity Stamp Co. to check out all the fabulous new releases and of course, there's a sale!! Gotta love a sale!


Thanks so much for stopping by!
See ya next time.

Inky Hugs,
Crystal

Saturday, March 7, 2020

~ Friends of Unity March 2020 Blog Hop ~

Hello there crafty friend!!
It's my favorite time of the month... the first Saturday which means it's time to hop with a few of my friends who share an obsession of Unity Stamps!! Woohoo!


This month's cue is Designer's Choice which was so freeing... lol... but then hard to decide what to play with so... I got to thinking we have Easter coming up and Unity just released the latest Sentiment Kit featuring a beautiful Easter Lily!! It was a natural choice!!


So I die cut the stamped image from the Easter Lily Blessings Sentiment Kit with a pretty die called Eyelet Elegance Square from Gina Marie Designs. I then colored the image with the following copic markers:

Lilies ~ C00, C1, C3, Y06, Y15, YG11, YG23
Background ~ V0000, V06

I wanted the lilies to be white so I just used some cool grays to add depth to the already fabulous shading in the stamped image. A touch of yellow to the center of the flower and a bit of bright green for the buds and the leaves. I chose a lovely purple for my background to help make the flowers pop on the card.  


I then found a coordinating piece of purple card stock. I ran it through my big shot with the Wrought Iron Impression Plate from Papertrey Ink. I trimmed it down to 4-1/8 x 5-3/8" and tied a wide organdy ribbon around it with a pretty bow. I adhered it to a white card base and then popped up the main image with foam squares. I trimmed down the sentiment and cut the ends for a banner and adhered it to the card with some liquid glue. I think this turned out lovely.


Once my Easter card was done, I realized that another fun day was soon approaching and it has always been one of my favorite days to make cards for... St. Patrick's Day!! Do you make cards to send for St. Patrick's Day? I know not many people do.


I thought it would be fun to pair some of the brand new Deco Foil Card Fronts by Unity with a couple of fun stamps for some St. Paddy's Day cards!! And how perfect is this adorable owl from the Owl I Do Say Sentiment Kit... he's so cute with his little hat and bow tie!! He paired up so nicely with the Circles A Plenty card fronts!!


And I tied it all together with the cute Happy St. Patty's Button... I stamped this cute stamp four times using Cracked Pistachio Distress Oxide ink first and then Pine Needle Distress Oxide ink second... but I dabbed away some of the Pine Needle ink before stamping to let some of the Cracked Pistachio pop through. I die cut those with a circle die and set them aside.


So back to the foiling... I was able to make four cards using two of the Circles A Plenty card fronts. I ran them through my Royal Sovereign laminator with the beautiful Emerald Watercolor foil. I then blended some Cracked Pistachio and Pine Needle Distress Oxide inks over the foiled card fronts with a blending brush. The ink dulled the foil just a tad but I was able to wipe it off with a cloth and the foil was back to super shiny and beautiful!


Once my foiled card fronts were done, I cut them in half... so I ended up with two pieces measuring 2-1/8 x 5-1/2" and two pieces measuring 4-1/4 x 2-3/4". Fun little accents to add to my cards!!


Now it was time to color up all the adorable owls... I tried not to do them all the same. I wanted each of them to be unique, but I did use similar colors for the hat and bow tie just in different ways.


Here's a run-down of all the copic markers I used for the owl cards:

Owl 1 ~ N0, N1, N2, N5, Y06, Y21, YR15
Owl 2 ~ W00, W1, W3, W5, Y06, Y21, YR15
Owl 3 ~ C00, C1, C3, Y06, Y21, YR15
Owl 4 ~ E000, E00, E21, E23, E25, Y06, Y21, YR15
Hat / Bow Tie ~ Y06, Y15, Y21, Y28, YR15, YG11, G16, G19, N0, N1, N2, N5, N7


Once they were all colored, I die cut them with a stitched rectangle die and set them aside. I thought about using a pretty patterned paper for my backgrounds but I couldn't find one I liked that would work with the Circles A Plenty card fronts so... I decided to do some ink smooshing and splattering!! I used the same two greens I'd used to blend on the card fronts and for the sentiment... Cracked Pistachio and Pine Needle. I ink smooshed by dabbing the Tim Holtz Distress Watercolor card stock into the watered down inks on my Mixed Media Glass Mat. I love that I did this four times for each card and absolutely none of them look the same!! So fun!


I splattered the same two inks onto the card fronts in my splatter box... which is just an old shipping box that I layered a few paper towels in the bottom of the box. I trimmed down the card fronts to 4-1/8 x 5-3/8" and adhered them to a white card base. I then adhered the foiled card front pieces and the main images. And to finish off the cards, I popped up the Happy St. Patrick's Day sentiments with foam squares.


Here's a look at all four of the Owl St. Paddy's Day cards!! Love how they turned out!

Phew! I know that was a lot of photos and info, but I sure hope you've enjoyed my cards and that I've inspired you to get inky!

Before we get to the hop list, I'm having another giveaway this month... I have a sweet and adorable Phyllis Harris stamp called No Bunny Compares to share with one lucky winner!! I'll announce the winner during next month's hop. A few of my friends are also having giveaways so be sure to check out all the fabulous creations along the hop and comment on each blog for a chance to win!! 

Thank you all so much for your continued support of our little hop... and for all of your lovely comments! I really, truly do appreciate each and every one of your sweet comments. 

Let's get to the hopping...

Crystal <--- you are here

up next ---> Eileen


Thanks so much for checking out my blog post!
See ya next time.

Inky Hugs,
Crystal


Monday, October 21, 2019

Polka Dot Orchard ~ Best Witches ~ Happy Halloween

Hi there crafty friends!
Today, I'm sharing a Halloween card using a digi image that I designed with a crafty friend in mind. I had designed the Santa boots for the Magic of Christmas digi set and when I shared the Santa boots digi with her, my crafty friend mentioned her love of witches boots... well, I was inspired to draw these immediately!! I love how they turned out and I hope that you do too!


So, here's my card using the beautiful witches boots from the Best Witches digi set available at Polka Dot Orchard. I just love these boots!! Eeek! 

I would love to have these, but I'm sure my feet and back would argue with me if I wore them. LOL! Anywho, I colored the boots with Copic markers, but unfortunately I didn't write them down. I believe I used my go to 'black' colors which are N0, N1, N3, N5, and N7. I've tried to figure out the purples from the photo but I'm not sure. I fussy cut the boots and set them aside.


I paired them up with the lovely Halloween Paper Stash papers by Tim Holtz. I love the elegance of these papers and they really worked perfectly with the boots. A bit of black wide organdy ribbon across the card front and a big beautiful bow... love it! I trimmed the sentiment and adhered it to a slightly larger strip of black card stock. To finish off the card, I added a few Copper Rose Jewels by Little Things From Lucy's Cards. Don't let the name fool you, the shine on the particular jewels I chose is purple and compliments the card just perfectly!!

This beauty is probably my most favorite Halloween card this year. Did you make Halloween cards? Or maybe you're just starting to make a few for your friends or family? Let me know in the comments, I'd love to hear!!

Thanks for stopping by my blog!
See ya next time.

Inky Hugs,
Crystal

Saturday, July 6, 2019

~ Friends of Unity July Blog Hop ~

Hey there crafty peeps and fellow Unity addicts!!
Today is the day for the Friends of Unity July Blog Hop and I am excited to see all the creations my friends have come up with! Our cue this month is Vintage and let me tell you... vintage cards can be scary! If you've ever tried one, you might understand. 


It's really not my usual style... though I do enjoy to see them. Especially, when our very own friend, Joyce Verdon, makes one of her gorgeous vintage style cards... I'm so excited to have Joyce back and I can't wait to see what she has created to share with us all!! So let's get to it! 


My first card is a Vintage Christmas card... I know some of you may not be ready for Christmas, but I'm trying to make a serious effort to get ahead on my Christmas cards and I thought this cue would be perfect! I started by stamping the Yuletide {border backgrounds} stamp on white card stock with Gina K's Black Amalgam ink. I heat set it with my heat tool and colored the berries... oh my... so many berries! I went over each of those berries... 9 times I'm thinking with the copic markers. I was going a bit cross eyed, I swear!! Anywho, after the berries were done, I finished the rest of the pretty background. And it was really bright and beautiful... not vintage, at all! 

Copic's used for this card: R000, R14, R27, R89, G24, G94, G99


So... I pulled out the Vintage Photo Distress Oxide ink and got to work blending. I also used a touch of Antique Linen Distress Oxide ink... I think the edges got a little dark and the Antique Linen lightened it up a little bit. I fussy cut the middle of the background because I wanted my sentiment to be a separate layer to add dimension to the card. I die cut the background with a large stitched rectangle die and then I started on the sentiment layer. 


I stamped the sentiment from the Vintage Christmas Kit on white card stock using Fired Brick Distress Oxide ink and heat embossed a fine clear embossing powder. I then stamped the Worn Music background stamp using Vintage Photo Distress Oxide ink and also heat embossed it using the same clear ep. The white background was not going to work so I blended the Antique Linen Distress Oxide ink over the piece. I trimmed it down and adhered it to a 4-1/8 x 5-3/8" piece of Cherry Cobbler card stock. I then popped up the Yuletide background using foam squares... lots and lots of foam squares. I probably should have used the foam tape... :)


I wrapped the panel several times with jute twine and added the cute Christmas charm (Tim Holtz) and red jingle bell (SU!). I tied off a bow and adhered the charm to the card using Multi Medium Matte so it would stay stationary. {I'm just noticing that my second twine tail has flown the coop! LOL... totally missed that, but I assure you there is one!} I adhered the panel to a Mossy Meadow card base and called this one done!!! What do you think? I'm really liking it!


On to card two... now, I was totally stuck on this card until I saw the lovely Lisa Arana's YouTube video Vintage & Easy Farm Animal Card Design and bam!! Inspiration!! Thank you so much, Lisa!!
I had already chosen the stamps I wanted to use for this one... Grandma's Needlepoint kit by Susan Weckesser. Such an adorable kit.... I love the little girl, but honestly it was the stitching stamps that got me on this one... love love love!!! So to start my card, I went searching through my many patterned papers and decided to use the beautiful Romance Novel papers by Prima.


I stamped the little girl, the stitching and the sentiment with Gina K's Black Amalgam ink and then I die cut each of the papers using the Blueprints 5 dies by My Favorite Things (sadly, it's retired... but you could achieve the same look by trimming down the papers and using a corner rounder on each corner). I chose another paper for my very bottom layer from Love Nicole called Distressed Neutrals that worked really well with the other papers. Score!! Using my corner rounder punch I punched the bottom two corners on the Distressed Neutrals layer and then I did the same with the bottom corners on my Vintage Cream card base. All I needed to do now was adhere the layers. I used Tombow Mono Multi liquid glue to adhere all of the layers except the last one... 


...my focal image was popped up on the card with foam squares. Yup, lots and lots of foam squares. But before I placed it on the card, I wrapped the card with Very Vanilla Taffeta ribbon and tied a pretty bow.... awww, I just love how this turned out! What do you think? I sure hope you let me know in the comments.

Now, before we get to hopping... a little business. Drum roll please...
the two winners of my 25 stamp grab bag giveaway are... 


... Arianna Barbara and Dorothy Green!!! Woohoo!!!
Ladies, please email me at crystalominkler@gmail.com to claim your prize. 
Prize must be claimed within two weeks.

Thanks to you all so much for your continued support of our little hop... and for all of your lovely comments! I really, truly do appreciate each and every one of your sweet comments. A few of my friends are having giveaways on their blog so be sure to hop and comment on each of our blogs!!

Let's get to hopping... 

Crystal <--- you're here

up next ---> Kim


Thanks so much for checking out my blog post!
See ya next time.

Inky Hugs,
Crystal


Friday, November 16, 2018

Coffee Loving Cardmakers ~ I Just Need Coffee!


Hello! Today, I'm sharing some truth... I just need coffee!! Haha... but really, I'm sharing a fun card for another fabulous guest spot at Coffee Loving Cardmakers
I created an alcohol ink background and also used Alcohol Lift Ink and of course, one of my favorite owl stamps from Rubbernecker Stamps.


Trying to get a photo of this card was a challenge because of the shine on the Yupo cardstock. With that being said, that white behind the owl (to the right) is glare. 
I was having fun the other day creating a bunch of backgrounds using alcohol inks and I thought it would be fun to use some coffee colors. I don't have a lot of alcohol inks so I ended up using Butterscotch, Espresso, and Turquoise (of course!) with a bit of Gold Mixative. Once my background was how I liked, I blended Alcohol Lift Ink over the Tim Holtz Mini Stencil Set 3 - the one with the coffee ring and splatter. I dabbed the background with a paper towel until it wasn't as saturated and then I rubbed the background to remove the rest of the Alcohol Lift Ink. Doing that basically lifts away the alcohol ink that was on the background. Such a fun technique!


I set aside the background piece and stamped Preston ~ isn't he the cutest! ~ onto Canson XL watercolor paper using VersaMark watermark ink and heat embossed a fine black embossing powder. I watercolored Preston with my ZIG Clean Color Real Brush pens and then die cut him out with the coordinating Preston Die Cut.


I set Preston aside and went back to work with the background... I needed a sentiment, but Preston doesn't come with one so I searched through my Rubbernecker Stamps and found the perfect sentiment, ironically, in the Coffee Set. Preston looks like he NEEDS coffee! Don't we all?!
I stamped the sentiment using Versamark watermark ink and heat embossed a fine black embossing powder. Since I was heat embossing on Yupo card stock which is a plastic card stock, I was careful to not heat it too long... just enough to melt the powder. 


I then mat the background piece with Taken with Teal card stock from my stash. I popped the background up on a Vintage Cream card base and then adhered Preston with Multi Medium Matte. I just adore this card! I sure hope you like it too!


Thank you friends for checking out my blog post! 
See ya next time.

Inky Hugs!
~ Crystal

Saturday, September 1, 2018

~ Friends of Unity September Blog Hop ~

Hello! It's time for another Friends of Unity Blog Hop!! Woohoo! I love hopping with my friends!

Before I get any further into my post, we have two new friends hopping with us and I want to officially welcome Kim Klinkovsky and Bobbie Sue McConathy to our hop! Kim has been a sweet supporter of our little hop since we started. She is a fellow lover... AKA... addict of Unity stamps, she has a fabulous blog filled with inspiration - including some really awesome jewelry! And Bobbie Sue has also been a huge supporter of our hop. She just recently started her blog and I was just waiting for an opportunity to invite her to join us. She's a sweet soul and a fabulous cardmaker with so much talent! We are super happy to have both of these wonderful friends join our team!
So please give Kim and Bobbie Sue a huge welcome!

Now let's get back to it... our cue for this month's Friends of Unity blog hop is Wings. We kept the cue simple because it can be used with so many different images... angels, butterflies, birds, dragonflies, etc... that way we had a larger scope of stamps to use which sometimes can make it hard to decide what exactly you want to do. LOL! So instead of just choosing one stamp set to play with, I chose two different sets.


The first set I chose to work with was an easy pick, I bought this Suzi Blu set called Serenity Angel a while back wanting to use it for a card for my niece but the idea, and sadly, the set got pushed aside for other things. So I was really happy to finally get to use this set for this card.


I recently got my hands on some new alcohol inks and I thought it would be fun to work with a rainbow theme. I had already made a background using Wild Plum, Raspberry, Turquoise, and Stream alcohol inks on Yupo white heavystock and I thought it would be perfect for the angel's wings. I stamped the angel on the Yupo and fussy cut the wings out. I stamped her again on white card stock with Amalgam ink and colored her in with Copic markers (listed below). I used my Scan n Cut to cut the angel image out and adhered the wings to the image. I added touches of silver gel pen on the wings and on her outfit. And I also added some clear wink of stella to her hair and the bottom portion of her dress (behind the flowers). I set the angel aside and created my background piece using Poppyfield, Valencia, Sunshine Yellow, and Limeade alcohol inks on Yupo white cardstock. Using the Tim Holtz Rays Stencil, I rubbed some Alcohol Lift Ink over that stencil and rubbed it with a paper towel to get the sun rays on the background. I am loving the new Alcohol Lift Ink!!! So fun to play with! I die cut the piece using the Double Stitch Scalloped Rectangle Frames die from Poppy Stamps. I also die cut a piece of True Black card stock using the same die. I adhered the black and rainbow pieces to a scrap piece of white cardstock because I planned to pop the whole piece up on the Amethyst Allure card base.

{Copic markers used on this card ~ BV000, BV04, BV11, E0000, E00, E21, R000, R17, R20, N5, N7, YR01, YR68, Y06, Y17, Y35, YG03, YG23, B00}


Once I had that part done... I thought the background needed something else. I pulled out my Tim Holtz Mixed Media #2 dies... now at first I thought I would use the die with the flowers, but then I saw the negative pieces of the die sitting on my desk and thought they would be cool on the background and so that's what I did. That was no easy task because there were a lot of small pieces but I placed the die cut wrong side up on a piece of Press n Seal (that stuff in your kitchen to cover your leftovers - it's sticky and perfect for this!) and put all the little pieces on there like I was doing a puzzle. Once I had it filled back in, I added liquid glue to the pieces I wanted on my background and flipped it over and adhered them. Some didn't stick but it was easy to use the die cut as my guide to get the pieces in there. Then I popped up the angel on the card with dimensionals, added a few Peacock Feather jewels from Little Things from Lucy's Cards, and stamped and adhered the sentiment from the set.


Here's a closer look at the angel... I tried to capture some of the glitter in her hair. Not easy to do! But take my word for it... it's there!!


On to my second card... so you remember the black die cut from the first card... well, it was just sitting on my desk next to the left over scallop rainbow piece and they wanted to play too. So... I decided to make a Leftover card! Do you ever do that? It can be a bit of a challenge to use up those leftover pieces but this card came together pretty quickly and I have to say... I Love It!!

I masked off my white card base using microfiber tape. You could use washi or purple tape... even post it notes. Anyhow, I masked it off with about a 1/4" border. I knew I wanted to blend some red and yellow ink behind the die cut so I grabbed my brand new Ripe Persimmon and Mustard Seed Distress Oxide inks... so excited to have these in my collection... and blended them in that bottom right corner. I blended a little and then placed the die cut there to see that I was in the right spot and then I'd blend some more. Once I had that section done, I grabbed the Tumbled Glass and Stormy Sky Distress Oxide inks and blended the rest of the masked off area. Using the Ranger Anti-Static Pouch, I covered the distress oxide background and then stamped the sentiment with VersaMark watermark ink and then heat embossed ultra fine white embossing powder. I pulled off the microfiber tape and adhered my scalloped frame to the black die cut piece and then adhered them to the white card base.


I set that aside and got to work on my dragonfly. Do you recognize those wings?!?! I stamped the dragonfly from the Dreams Take You itty bitty set with Ranger Jet Black Archival ink onto my background that was leftover from the angels wings. I stamped the dragonfly again on white card stock, adhered the fussy cut wings, and fussy cut the whole dragonfly out. I bent the wings up a bit for dimension on the card and adhered just the head and thorax of the dragonfly. And then I spotted the Peacock Feather jewels that were still on my desk and decided this dragonfly needed some bling!! This might just be my favorite Leftover card ever!! 

 One or two of our friends are having giveaways on their blogs for this month's hop so be sure to hop and comment on each of our blogs so you'll be entered into this giveaway. We sure appreciate and love all of your fun comments! 


Now let's get hopping!

Crystal <--- you're here

up next ---> Joyce


Thanks for stopping by!

See ya next time.
~ Crystal