Showing posts with label Halloween. Show all posts

Sunday, August 24, 2025

Hang in There, Boo-tiful ~ Hangin' With My Boos ~ Unity Stamp Co.

Hello there crafty friend! 
Today I'm sharing another fun Halloween card I made using the fun new boos from Unity called Hangin' With My Boos. These fun ghosts have three fun sentiments included in the kit.


I chose the cute ghost papers from the Haunted Hues {paper pack}. I die cut it using the largest die from the Scallops & Rectangles {nesting dies}. The ghosts are die cut using a die from the Scallops & Arches {nesting dies}. And I added just a touch of Copic C0 to give some shadow to the ghosts.


I thought it would be fun to make it look like the ghost panel is hangin' on the card. I used a 1/8" hole punch to make two small holes. Ran the ribbon through to the back and secured it with tape. I popped up the boo panel with foam tape and then secured the other end of the ribbon on the back of the panel with more tape. I then glued the panel to a white A2 top fold card base that I turned on the side for a landscape card. 


I tied to pretty bows and used glue dots to attach them to the ribbon. This was a super fast card {once I had figured out the ribbon... HAHA!}.

Thanks so much for stopping by!

Inky hugs,
Crystal

Friday, August 22, 2025

Halloween Wishes ~ Hexes & Hugs ~ Unity Stamp Co.

Hello there crafty friend! 
Today I'm sharing a fun Halloween card I made using the awesome new monster stamps from Unity called Hexes & Hugs. There's three fab monsters in this kit. I chose to ink up the grumpy witch.


I started by picking some papers... I decided to go with the Eternal Midnight Weave {paper pack} that I hadn't yet cracked open. I chose a couple for my background and then a couple more pattern papers for the circles. Once I had those figured out, I colored up the monster witch using Copic markers.


Here's a quick list of the Copic markers I used:
Monster: YG11, YG03
Hair / Eyes: V12
Costume: N2, N4, YR20, YR15, Y11, Y28
Broom: E11, E33
Pumpkin: YR20, YR15
Moon: Y11, Y15
Ground: N2


I used the Scallops & Circles {nesting dies} to die cut all those circles. The focal image is popped up with foam tape.

Thanks so much for stopping by!

Inky hugs,
Crystal

Tuesday, August 19, 2025

Hey Boo ~ Paranormal Positivity ~ Unity Stamp Co.

Hello there crafty friend! 
I have one more card using new goodies from the Unity release. Today I'm sharing a simple Halloween card featuring the new Paranormal Positivity stamps from Unity.


I had a scrap of this pattern paper in my pack and wanted to use it with this cute duo. I was being lazy and thought it would look good just on a white card base. I probably could have tried a black card base. It would compliment the webs in the paper and the cat, but I digress. 


I stamped the cute ghost and kitty duo and die cut them using a die from the Scallops & Circles {nesting dies}. These two cuties really don't need much as far as coloring goes... I used a little yellow on the ghost but then went over that with purple because the yellow didn't coordinate with anything. You can still see it a little bit but that's ok. 

Here's a quick list of the Copic markers I used:
Ghost: Y11, BV0000, BV02, C0, C2
Ground: E000, E15


The purple scrap of pattern paper is from the Spooky Days {paper pack}. I love the unique colors in these papers. Definitely not your typical Halloween papers! Love them! I stamped and trimmed the sentiment. Adhered it to the circle and then added foam tape to the back of both. Popped them up on the card and was done.

Thanks so much for stopping by!

Inky hugs,
Crystal

Sunday, August 17, 2025

Spells and Sarcasm ~ I Bite Pissy Kitty ~ Unity Stamp Co.

Hello there crafty friend! 
Today I'm sharing a funny Halloween card I made using the awesome new I Bite Pissy Kitty stamps from Unity. This kitty is PURR-FECTION!! I love the sassy face and those bat wings!!!!


I started by picking some papers that complimented our pissy kitty. I chose a couple from the Spooky Days {paper pack}. Once I had those figured out, I colored up the kitty and pumpkin using Copic markers.

Here's a quick list of the Copic markers I used:
Kitty: YR20, YR21, YR15, YR27
Bat Wings / Nose / Eyes: C0, C2, C3, C5
Bow: G000, G21
Pumpkin: G000, G21, Y11, Y15, E000, E15, E59


I then die cut the kitty using a die from the Scallops & Squares {nesting dies}. I tilted the die at an angle for fun. Sometimes it's hip to not be 'centered' square. LOL! 


I couldn't pick just one sentiment... they are just TOO FUNNY!! I adhered the boo sentiment to the top of the square and then added a bunch of foam tape to the back. I also popped up the other sentiment using foam tape. And then I finished off the card with three orange enamel dots.

Thanks so much for stopping by!

Inky hugs,
Crystal

Saturday, August 16, 2025

Have a Spooky Day ~ Ghastly Gourds ~ Unity Stamp Co.

Hello there crafty friend! 
So glad you've stopped by my blog! Today I'm sharing a fun card I made using the cool new Ghastly Gourds stamps from Unity.


I love this background! So perfect for Halloween! I had a little fun with my background. I ink smooshed a piece of Kraft card stock with Carved Pumpkin and Vintage Photo Distress Inks. And then I scraped the panel with the same two ink pads. I love the layers of ink and the texture in the background from the ink smooshing. Once I was happy with the colors in the background, I stamped the Ghastly Gourds with Black Amalgam ink. I die cut the panel using the largest die from the Deckle & Stitches Nesting Die Set.


I wanted to bring the focus to one cute pumpkin so I colored it with a handful of Copic markers: YR15, YR68, YR27, and E29. And then I die cut a piece of Dark Chocolate card stock from Papertrey Ink using two dies from the Scallops & Squares {nesting dies} basically cutting out a frame. I adhered the frame around the pumpkin. 


I wrapped the panel several times with burlap string and tied a bow. Adhered all of my layers to an A2 top fold card base of Dark Chocolate card stock. I chose a fun sentiment from the Witch Way stamps. I stamped it with Black Amalgam ink on Kraft card stock and then I blended just a bit of the two distress inks again.

Thanks so much for stopping by!

Inky hugs,
Crystal

Monday, August 11, 2025

Inky Paws Challenge #243 ~ Sketch Challenge {Week 2}

 Hello there crafty friend!
 Have you played along with the Inky Paws Challenge 243 - Sketch Challenge yet?! I'm a little late to the party myself after a fun road trip with my family. Luckily, there's still lots of time to play along! You have until Friday, August 29th to get your entries in for this fun challenge and a chance to win a $20 store credit to Newton's Nook Designs!


This fun sketch is perfect for any season. Today I'm adding to my Halloween stash with not one, but three, sweet Halloween cards. I had to make up for missing last week. Not really, but I couldn't help myself! LOL


I started all three cards by first cutting my pattern papers. I chose three pieces of pattern paper from the Halloween Meows 6x6 Paper Pad that all had a white background. I have found this tip to be handy in keeping a card background balanced. I made myself a guide for the measurements {below}.


First I cut each of the pattern papers down to 4 x 5-1/4". I then measured 1/2" from the top right corner down and made a mark. I then measured 3-1/4" from the top left corner down and made another mark. Using a ruler I drew a line connecting the two tick marks. And then I measured across that line from the left 1-3/4" and made a mark. I measured 7/8" from the bottom right corner towards the left side and made one last mark. Using a ruler, I drew a line connecting those two tick marks. I cut the top line first and then the bottom line {as noted on the guide}.


Cutting the three pieces of pattern paper gave me enough pieces to make 3 cards. I cut three pieces of copy paper down to 3-3/4 x 5 and adhered the pattern papers together on that paper making sure to line up the edges just right. I did have one or two spots that didn't line up perfectly so I just trimmed off those edges in my paper trimmer. 


I stamped all three adorable stamps from the Newton's Boo-tiful Night Stamp Set with Memento Tuxedo Black ink. I colored them up with Copic markers and then die cut them using the coordinating Newton's Boo-tiful Night Die Set.

Here's a quick list of the Copic markers I used for my first card:
White Kitty: C00, C2, R00, R20
Pumpkin: YR20, YR21, YR15, YR68
Pumpkin Faces: Y11, Y15
Pumpkin Stems: E51, E53, E25


I adhered the pattern paper backgrounds to three top fold card bases of Orange Zest card stock from Papertrey Ink. I added foam tape to the back of the kitties with pumpkins on my first two cards. I heat embossed the sentiments on the same Orange Zest card stock using my favorite combo of products. I prepped the card stock with the TE Anti-Static Powder Tool and stamped the sentiments with Sugar Cube White Pigment ink, both from Taylored Expressions. I then sprinkled the wet ink with Alabaster White Embossing Powder from Brutus Monroe and melted the powder with a Wagner Precision Heat Tool. Once the embossed sentiments had cooled I wiped off the anti-static powder with a microfiber cloth.


I trimmed the sentiments and adhered them directly to the cards.
Copic markers I used for my second card:
White Kitty: C00, C2, R00, R20
Bird: N0, N2, N4, N6, YR15
Pumpkin: YR20, YR21, YR15, YR68
Faces: Y11, Y15
Stem: E51, E53, E25


For my last card, I wanted the kitty to 'fly' on the card. So I die cut the moon from white card stock using a die from the Spooky Sky Die Set. I used the residual ink on my yellow blending brush to add a hint of yellow to the moon and then I used N4, C2 and C0 Copic markers to add some depth to the craters on the moon. I die cut vellum using a die from the Circle Frames Die Set to bring the focus to the little scene I created.


The moon and kitty are adhered to the vellum and then I applied glue just behind the images so no glue showed through the vellum. This also adds a touch of dimension as the edges of the vellum are raised a bit. I just love this fun trio of cards!

Copic markers I used for my third card:
Orange Kitty: YR20, YR15, YR27, C0, C2, R00, R20
Hat: N0, N2, N4, N6, YR21, YR15, YR68
Broom: E51, E33, E53, E25, E57, N2, N4, N6


Now it's your turn to get your paws inky with your Newton's Nook Designs products and create a project using the sketch. Be sure to link up to the Inky Paws Challenge! Can't wait to see your projects!


Thanks so much for stopping by!

Inky Hugs,
Crystal

Monday, May 12, 2025

Inky Paws Challenge #240 ~ Sketch Challenge {Week 2}

 Hello there crafty friend!
 Have you played along with the Inky Paws Challenge 240 - Sketch Challenge yet?! There's still lots of time! You have until Friday, May 30th to get your entries in for this fun challenge and a chance to win a $20 store credit to Newton's Nook Designs!


Have you tried this fun sketch yet? I think it's perfect for any season. Today I'm adding to my Halloween stash with a sweet Halloween card.


I inked up the adorable vampire kitty and candy bag from the Trick or Treat Newton Stamp Set. I colored it up with some Copic markers and die cut them using the coordinating dies from the Trick or Treat Newton Die Set.

Here's a quick list of the Copic markers I used:
White Kitty: C00, C2, R00, R20
Cape: N2, N4, N6
Button: R20, RV04, R37
Candy Bag: R20, RV04


I paired up the cute kitty with the awesome Halloween Party 6x6 Paper Pad. I really love the non-traditional colors in this paper pack. So fun!


I cut my background layers: the gray bat paper measures 4-1/4 x 5-1/2" and the pink bat paper measures 4-1/4 x 1-1/2". I die cut the other layers using dies from the Frames & Flags Die Set and the Circle Frames Die Set. I also die cut a scrap of black card stock using a circle die from the Circle Frames Die Set.


Now it's your turn to get your paws inky with your Newton's Nook Designs products and create a project using the sketch. Be sure to link up to the Inky Paws Challenge! Can't wait to see your projects!


Thanks so much for stopping by!
See ya next time.

Inky Hugs,
Crystal


{Please note that comment moderation is on. Your lovely comment will appear once approved.}

Wednesday, September 18, 2024

Membership Wednesday ~ September 2024 BOM Boo Brigade ~ Unity Stamp Co.

  Hello there crafty friend!
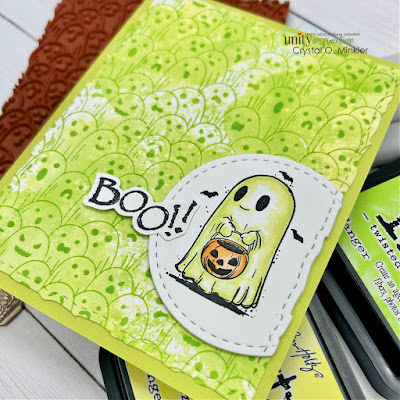
Today I'm sharing a fun ink smooshed card featuring the awesome ghost background stamp from the September 2024 Background of the Month membership from Unity called Boo Brigade. I love using yellowish greens for ghosts.


I started by ink smooshing a bit of Squeezed Lemonade and Twisted Citron Distress Inks on a card front of Stampers Select White card stock from Papertrey Ink. I left some white spots on the card front to coordinate a bit with the focal image and sentiment. I stamped the fun Boo Brigade background stamp using the Twisted Citron Distress Ink. And then I die cut the background using the largest die from the Deckle & Stitches Nesting Dies.


I stamped the sweet ghost from {Clearly Unity} Boo to You using Memento Tuxedo Black ink. So fun to have photopolymer stamps now! I die cut the ghost using a circle die from the Scallops & Circles {nesting dies} and then I die cut the circle using the largest die from the Deckle & Stitches Nesting Dies. That way it had the same edge and I could just line it up with the edge when I adhered it to the card.


I Copic colored the ghost very simply with YG21, YG11 and a Colorless Blender; and for the pumpkin I used YR000 and YR15. I stamped the sentiment and fussy cut it. And then I adhered the sentiment to the half circle and added foam tape to the back of both and popped them up on the card. A quick and easy Halloween card for my stash! Love it!
 

Here's a quick look at this month's Background of the Month membership! So much fun!

Well, that's it for me today! I hope you've been inspired to play with your membership stamps! 
Hope you have an inkredible day!


Thanks so much for stopping by!
See ya next time.

Inky Hugs,
Crystal


{Please note that comment moderation is on. Your lovely comment will appear once approved.}

Wednesday, August 28, 2024

Membership Wednesday ~ Halloween Card ~ August 2024 KOM Thanks in All the Things ~ Unity Stamp Co.

  Hello there crafty friend!
Today I'm sharing a fun no-layer ink blended Halloween card featuring the cool moon and bats stamp from the August 2024 Kit of the Month membership from Unity called Thanks in All the Things. I think this is my third or fourth card using this awesome kit. It's safe to say that this has been my MOST favorite kit! I love it! I'm just bummed I didn't get to the sweet fawn or the flowers!


I started by ink blending Squeezed Lemonade Distress Oxide ink in a circular motion near the top center of my card base. And then I blended a little Mustard Seed Distress Oxide ink in a circular motion around the lighter yellow. Once I was happy with that blend, I went back over the center a tiny bit more with the Squeezed Lemonade Distress Oxide ink. And then I blended Carved Pumpkin Distress Oxide ink around the rest of the front of the card base. I blended around the yellow just a smidge with Mustard Seed to give it a nice blend with the orange.


I'm playing along with the Color Hues Challenge today! Orange and Yellow are so perfect for a Halloween card! This fun challenge is open until August 29th, if you want to play along! 


I probably should have dried the oxide ink, but I was already late making dinner so I just decided to go for it! I stamped the moon and bat stamp and the sentiment with Black Amalgam ink. I did use an acetate grid to double check my placement for the bats and the sentiment. I quick cut two post-it notes to place over the bats and sentiment and then I went a little nuts with the black acrylic paint splatters.


That was it! A super quick Halloween card... I think it took me 10 minutes tops! AND I still had dinner ready by 6pm. LOL! 
 

Here's a quick look at this month's Kit of the Month membership! LOVE it SO MUCH!!

Well, that's it for me today! I hope you've been inspired to play with your membership stamps! 
Hope you have an inkredible day!


Thanks so much for stopping by!
See ya next time.

Inky Hugs,
Crystal


{Please note that comment moderation is on. Your lovely comment will appear once approved.}

Saturday, August 17, 2024

Happy Halloween Trio ~ Eerie Enchantment ~ Unity Stamp Co.

Hello there crafty friend! 
I'm back with a few fun Halloween cards! So excited to add three more Halloween cards to my stash! Woohoo! These three cards were SO super quick to make - it's bananas! All three cards feature stamps from the brand new Eerie Enchantment stamps from Unity! 


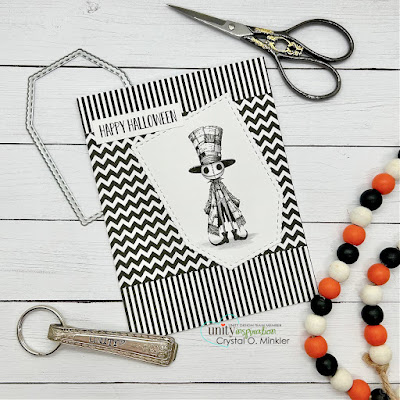
I stamped the scarecrow, witch and grim using Black Amalgam ink from Gina K. Designs and then I colored them up very simply with the following Copic markers: C00, C1, C3. I then die cut the witch using a die from the Scallops & Circles {nesting dies}. And I die cut the scarecrow and grim using a die from the Make A Tag {die set}.


Inspiration for my card today comes from the Tawny Owl Paperie Inky Inspiration Sketch 24. Such a versatile sketch! I love how quickly these cards came together! The sketch, as always, is meant to inspire not require. So let the sketch lead in your design, but don't feel limited by it. I hope you'll join us in the Tawny Owl Paperie Inky Inspiration Facebook group and play along with the sketch!


I wanted to keep the cards simple and easy to duplicate. So a black and white palette was perfect! I went looking through my pattern papers and was surprised to find the perfect papers in the Mousin' Mix Up {paper pack}. Yay! Luckily I had two paper packs so I could make the backgrounds all the same.


I think this last card just may be my favorite! I love the tag turned upside down. I stamped the sentiment three times and trimmed them up and then adhered them to the cards. So much fun and again SO super quick! I hope you have an inkredible day! 

Thanks so much for stopping by!
See ya next time.

Inky hugs,
Crystal

{Please note that comment moderation is on. Your lovely comment will appear shortly.}

Saturday, August 10, 2024

Happy Halloween ~ {Boo} to You ~ Unity Stamp Co.

Hello there crafty friend! 
I'm back with a fun Halloween card for Unity's latest release. Christmas is definitely my favorite season to make cards for, but Halloween is a close second! And I am loving the adorable {Boo} to You stamps from Unity! This adorable set of stamps is also available in photopolymer... {Clearly Unity} Boo to You. Are you loving that Unity is now offering some stamps in photopolymer?! I do!


Such adorable stamps! I, of course, love the kitty! I had to include it with the ghost. I stamped the kitty and ghost using Black Amalgam ink from Gina K. Designs and then I colored them up with my Copic markers. I then die cut them using a die from the Scallops & Circles {nesting dies}.

Here's a quick list of the Copic markers I used:
Ghost: C00, C1, C3
Hat: YG11, YG23, V000, V12, V15, V17, N2, N4, N6
Pumpkin: YR21, YR15, YR16
Cat: R00, R20, N0, N2, N4, N6
Ground: C00, C3


Inspiration for my card today comes from an older Tawny Owl Paperie Inky Inspiration Sketch... lucky number 13! Haha! This is a favorite and it works really well with scraps! I had a bunch of scraps in my Trick or Treat {paper pack} so this was the perfect sketch. Of course, I altered it, but the basic design was my starting point.


I didn't want to use a larger circle to mat the ghost circle so I just die cut a circle from True Black card stock from Papertrey Ink and offset it from the focal circle. I really like the dimension it gives to the card. I stamped the sentiment using Black Amalgam ink and trimmed it up. I mat it with black card stock.


I adhered the circles together and then I adhered the sentiment to the bottom portion making sure it was lined up on the card where I wanted it. I was then able to add foam tape to the back of both pieces and then I popped them up on the card. To finish it off, I added three black enamel dots. Such a fun card to make! I hope you have an ink-redible day! 

Thanks so much for stopping by!
See ya next time.

Inky hugs,
Crystal

{Please note that comment moderation is on. Your lovely comment will appear shortly.}

Monday, October 9, 2023

Inky Paws Challenge #208 ~ Halloween Theme Challenge Reminder

 Hello there crafty friend!
 There's still time to play along with the Inky Paws Challenge #208 - Halloween Theme Challenge!! You have until this coming Friday, October 13th to get your entries in for this fun challenge and a chance to win a $20 store credit to Newton's Nook Designs!


Loving all the pumpkins in the badge for this challenge... I just had to feature some fun jack-o-lanterns for my card this week!


I pulled out a couple of fun pattern papers from the Halloween Meows 6x6 Paper Pad. I cut the background paper to cover the front of my card base. It measures 4-1/4 x 5-1/2". I cut the orange jack-o-lantern paper to 2-1/4 x 3". The black mat is just a tad bigger at 2-3/8 x 3-1/8". The two green papers are scraps I had leftover. They're approximately 1/2" x 3". I cut fishtails on the ends and adhered them together.


The adorable kitty and pumpkin from the Newton's Perfect Pumpkin Stamp Set was stamped with Memento Tuxedo Black ink. I colored it up with my Copic markers {listed below}. I then fussy cut the kitty on the black line and colored the edge with a Memento Tuxedo Black marker. This helps the image look nice around the edges. I adhered the kitty to a piece of vellum that I had die cut this a stitched oval from the Oval Frames Die Set

Copic Markers I used to color up the kitty and pumpkin:
Kitty: C00, C1, C3, R00, R20
Hat: YG21, YG11, YG13, C00, C1, C3, C5
Pumpkin: YR21, YR15, YR68, YR27, E51, E55, E57


To add a little fun touch to the card, I die cut two bats using one of the bat dies from the Witchy Newton Die Set. I chose a cute sentiment from the Spiderweb Oval Stamp Set and colored 'trick' with YG21, YG11 and YG13. I trimmed it up and mat it on a piece of black card stock and then I adhered it to the card. I did add a couple scraps under the left side of the sentiment so it would lay flat on the card. 


Inspiration for my card came from the TOP Inky Inspiration Sketch 15. This has been such a fun sketch. It works great with a small image and a great mix of papers for a background.


Now it's your turn to get your paws inky with your Newton's Nook Designs products and create a project using the stripes theme. Be sure to link up to the Inky Paws Challenge! Can't wait to see your projects!


Thanks so much for stopping by!
See ya next time.

Inky Hugs,
Crystal


{Please note that comment moderation is on. Your lovely comment will appear once approved.}