Saturday, April 20, 2024

Spring into Christmas 2024 {BYSHC} Linky Party ~ Cocoa Love ~ Not 2 Shabby

 Hello there crafty friend!
I'm back for Day 2 of the Spring into Christmas 2024 {BYSHC} Linky Party with another cute holiday card! It was so much fun checking out the inspiration shared yesterday for the start of the Linky Party. So many beautiful cards! Today I'm sharing a card using a sweet stamp from return Sponsor Not 2 Shabby called Cocoa Love Stamp Set.


If you follow my blog, you may be experiencing deja vu! LOL! I copied a card I made back in February for our sketch challenge. I just changed up the papers. If you're interested in seeing this cards twin, you can check it out here... {BYSHC} Sketch Challenge 42 ~ Cocoa Love ~ Not 2 Shabby.


Here's a quick list of the Copic markers I used to color up this cute stamp:

Brown: E21, E23, E25
Red: R20, R14, R37
White: C00, C1, C3
Warm Gray: W00, W1, W2
Cheeks: R00, R20


I adhered all my layers together using iCraft UltraBond Adhesive from our wonderful Sponsor Therm O Web. I heat embossed the sentiment using Sugar Cube Pigment ink from our lovely Sponsor Taylored Expressions. I die cut the heat embossed sentiment and the cup using the Cocoa Love Shabby Snips Die Set. I adhered the two pieces together with the sentiment overlapping the cup a bit and then I added a bunch of iCraft 3D Foam Squares from Therm O Web to the back of both and popped them up on the card.


My card design was inspired by {BYSHC} Sketch 42. I used the measurements directly from the sketch for my card. The only thing I changed up was adding the cup of cocoa with my sentiment for my focal piece. I really enjoyed this sketch!


Before you leave, be sure to stop by Not 2 Shabby! Jamie shared a 15% OFF code with us to shop... use code BYSHC! Woohoo!! And if you haven't already, stop by the Spring into Christmas 2024 {BYSHC} Linky Party to check out all the wonderful Holiday inspiration being shared!! Have a fantastic day!


Thanks so much for stopping by!
See ya next time.

Inky Hugs,
Crystal


{Please note that comment moderation is ON. Your comment will appear shortly.}

Friday, April 19, 2024

Spring into Christmas 2024 {BYSHC} Linky Party ~ Believe in the Magic, Santa ~ Angie Blom Digital Designs

Hello there crafty friend!
I'm so excited to share my first card for the Spring into Christmas 2024 {BYSHC} Linky Party hosted by the Build Your Stash Holiday Cardmakers Facebook group!! This is our fourth annual Spring Linky Party!! Woohoo! Just a note... though it has Spring in the name the linky party is focused on Christmas and wintry holiday cards. It's a great way to get ahead on those holiday cards to relieve some of the stress later on in the year during the holidays. I am super excited to add a bunch of cards to my Christmas card stash and I sure hope that you'll join in the fun. 


For my first card I'm featuring the super cute Believe in the Magic, Santa Digital Stamp from our wonderful return Sponsor Angie Blom Digital Designs. I adore this digi stamp! I paired this sweet stamp up with the Santa's Workshop 6x6 Paper Pad from Carta Bella. I adhered all my layers to a white A2 top fold card base using the iCraft UltraBond Adhesive from our lovely Sponsor Therm O Web.


I combined and resized the Santa digi and the sentiment in a Word Document and printed it off. I then die cut it using a large stitched circle die from the Scallops & Circles {nesting dies} from our fabulous Sponsor Unity Stamp Co. And then I Copic colored Santa using a bunch of Copic markers. Here's a quick list:

Skin: E000, E11, E11, R20
Hair / Beard: C00, C1, C3, Colorless Blender
Santa's Suit: R20, R14, R46, C00, C1, C3
Belt ~ N1, N3, N5, Y11, Y15
Gloves / Santa's Bag: N1, N3, N5
Bow: R20, R14, R46


I adhered my papers to a 5 x 3-3/4" piece of Real Red card stock from Stampin' Up. I adhered my panel to a 5-1/2 x 4-1/4" piece of pattern paper and then adhered the panel to a white A2 top fold card base that I turned on its side. I covered the back of the circle with foam tape and then popped it up on the card. And I finished off the card using a few enamel dots from the coordinating Santa's Workshop Enamel Dots from Carta Bella.


My card was inspired by the {BYSHC} Sketch 41 that we used back in January. This sketch has definitely become a favorite! Have you visited the Build Your Stash Holiday Cardmakers Facebook group? We host a fun sketch challenge each month to inspire our holiday cardmaking all year long. I love revisiting the sketches and will likely be sharing a few during the Linky Party.


I'm also a Sponsor for the Spring into Christmas 2024 {BYSHC} Linky Party!! I have a wonderful prize set aside for one lucky winner. No picture this time. That way it'll be a fun surprise! For a chance to win my fun prize make a Christmas card and link it up to the linky party blog post on the Build Your Stash Holiday Cardmakers blog. Stop by the Spring into Christmas 2024 {BYSHC} Linky Party to check out all the wonderful Holiday inspiration that's already been shared from our Sponsors and the {BYSHC} Design Team!! I'm so excited to continue building my stash of holiday cards for 2024... I hope you'll join in the fun and play along! Let's build our stash of holiday cards this week!! Have an ink-tastic day!


Thanks so much for stopping by!
See ya next time.

Inky Hugs,
Crystal


{Please note that comment moderation is ON. Your comment will appear shortly.}

Thursday, April 18, 2024

Snarky Kitty Card ~ Kitty Boop ~ Unity Stamp Co.

Hello there crafty friend! 
Popping in with a super cute and snarky kitty card featuring the sweet new Kitty Boop from Unity Stamp Co. I am loving this adorable kitty and right now she's the spotlight steal over at Unity!! Can't pass her up at $6.99! A serious steal!


I paired up the cute kitty with the Timeworn Paws Anthology {paper pack}. I love the vintage vibe of these papers! I colored up the kitty with a handful of Copic markers and die cut her with a tag die from the Make a Tag {die set}. I also die cut the HILARIOUS sentiment using one of the dies from the Scalloped & Stitched Sentiment Nesting Dies.


Inspiration for my card came from the TOP Inky Inspiration Sketch 20. If you follow my blog, you've seen a few cards I've made using this fun sketch. I host a fun sketch challenge in my Tawny Owl Paperie | Inky Inspiration Facebook group. Lots of fun inspiration shared just about every day in the group, as well. I'd love to have you join us!


I distressed the edges of the kitty tag and the sentiment with Vintage Photo Distress Ink so the colors coordinated better with the pattern papers. Here's a quick list of the Copic Markers I used for the cute kitty: N0, N2, N4, C00, R00, R20, YR21, YR15.


I adhered the sentiment to the tag and added foam tape to the back of both. I popped them up on the card. Finished off the card with a few heart enamel dots from my stash. Loving how this card turned out! Have a wonderful night friends!

Thanks so much for stopping by!
See ya next time.

Inky hugs,
Crystal

{Please note that comment moderation is on. Your lovely comment will appear shortly.}

Wednesday, April 17, 2024

Membership Wednesday ~ April 2024 KOM & BOM ~ Unity Stamp Co.

  Hello there crafty friend!
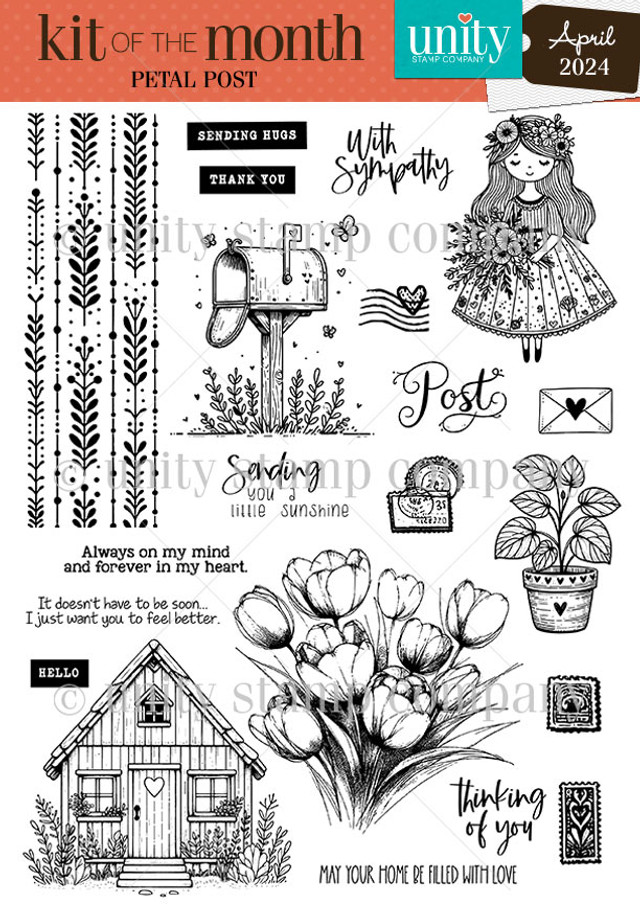
Today I'm sharing a sweet card featuring the beautiful house stamp from the April 2024 Kit of the Month membership along with the awesome April 2024 Background of the Month membership... both from Unity. I wasn't lying when I said I thought I'd play with this month's KOM again! Loving all the fab stamps in the kit!


I stamped the house on a large scrap of Stampers Select White Card Stock from Papertrey Ink using Black Amalgam Ink from Gina K. Designs. I also stamped the background on a card front measuring 4-1/4 x 5-1/2" and stamped the sentiment on a scrap of card stock. I colored up the house using my Copic markers. Fussy cut it on the line around the house and leaving a bit of a border around the plants.

Here's a quick list of the Copic markers I used:

House: BG000, BG02, BG05, E21, E23
Trim: E21, E23, E25, E27
Roof / Stairs: N1, N3, N5
Window: Y11, Y15
Plants / Grass: YG11, G23


I had planned on Copic coloring the houses in the background stamp, as well, but last minute decided to ink smoosh with similar colors to the house. I used Vintage Photo and Peacock Feathers Distress Ink. In retrospect, I kinda wish I had done a different color combo so the house would pop a bit more on the background. What do you think? I die cut the background using the largest stitched die from the Scallops & Rectangles {nesting dies}. I also die cut a scalloped and stitched rectangle from True Black card stock using the largest die from the same die set.


To help the house pop a bit, I die cut a stitched circle from Vellum card stock using a die from the Scallops & Circles {nesting dies}. Adhered it to the background just in the center of the circle using liquid glue. I die cut the sentiment and a black mat using dies from the Scalloped & Stitched Sentiment Nesting Dies. Adhered the sentiment to the bottom of the house and popped them up using a bunch of foam tape.
 

Here's a quick look at this month's Kit of the Month membership! LOVE!! So many fabulous stamps this month! I want to ink them all up!


And here's a look at the awesome Background of the Month membership! Such a fun stamp!

 Well, that's it for me today! I hope you've been inspired to play with your membership stamps!
Hope you have an ink-tastic day!


Thanks so much for stopping by!
See ya next time.

Inky Hugs,
Crystal


{Please note that comment moderation is on. Your lovely comment will appear once approved.}

Tuesday, April 16, 2024

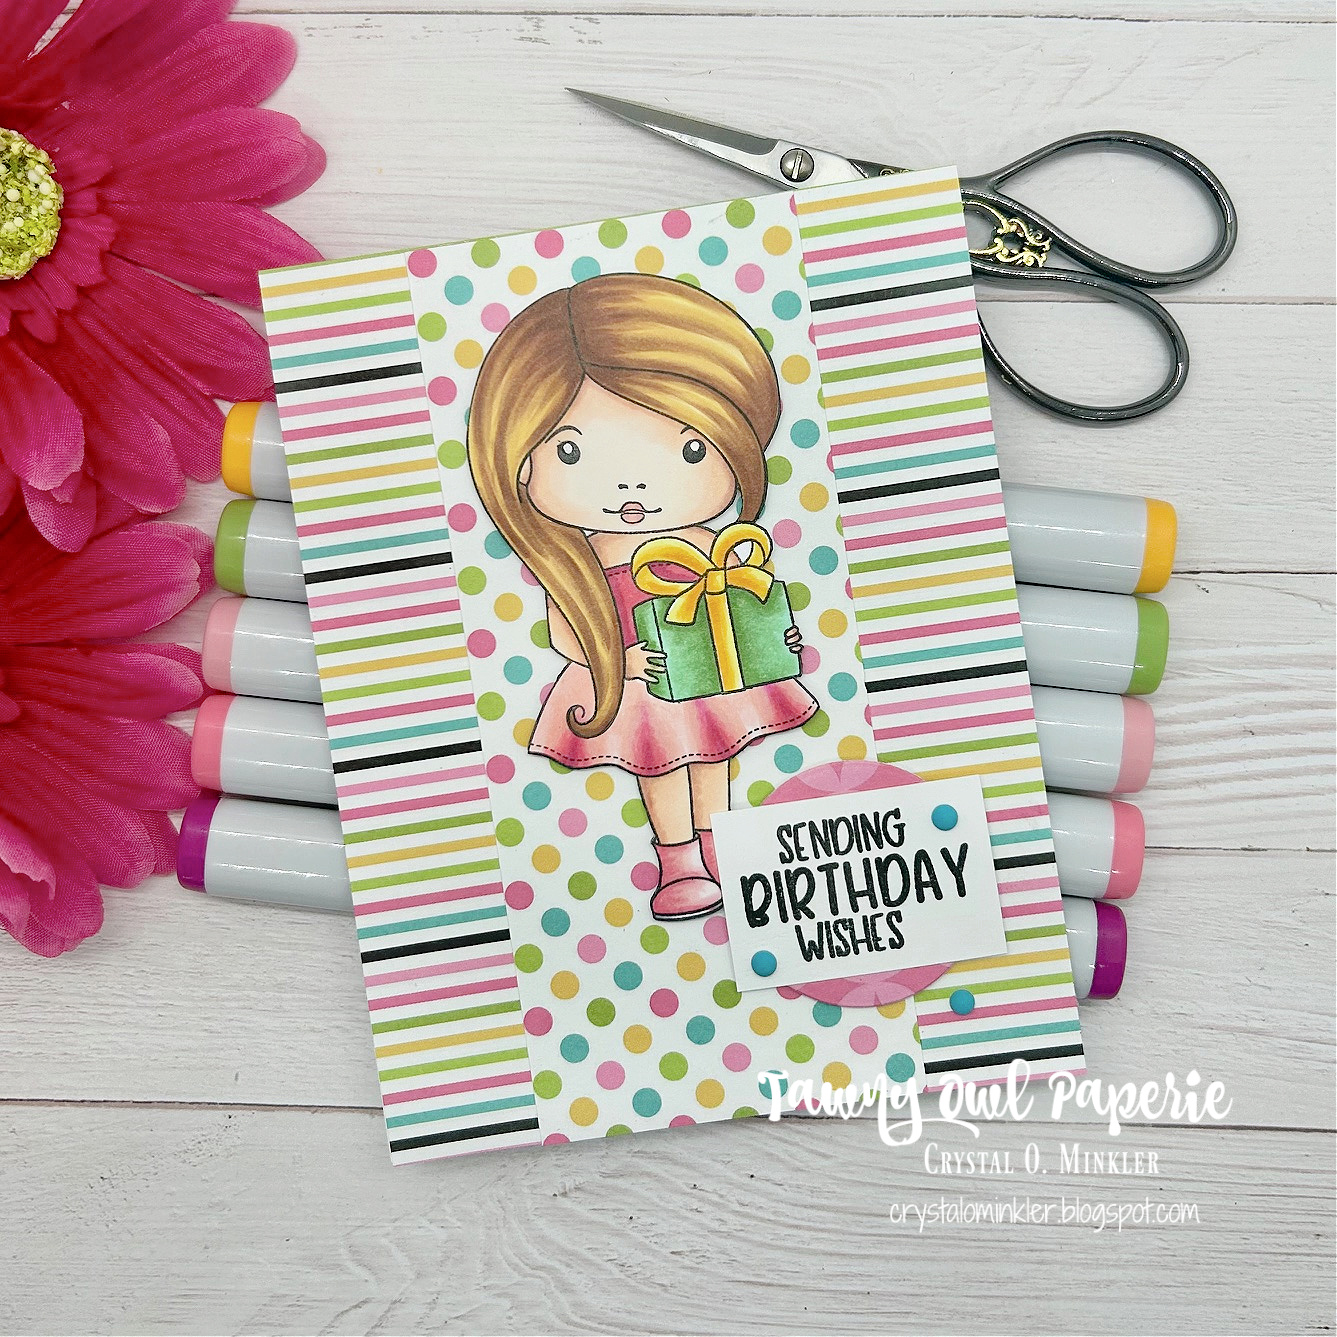
Tawny Owl Paperie Inky Inspiration Sketch 20 ~ Birthday Present Marci ~ La-La Land Crafts

 Hello there crafty friend!
I am back with inspiration for the Tawny Owl Paperie Inky Inspiration Sketch Challenge 20. I have picked out another paper pack leftover from my Scrapping for Less days. I absolutely love the colors in these papers!! I, again, don't know who made these papers or if they are still available. Sorry about that! I'm just so excited to be finishing up another paper pack!


Not only am I finishing up papers... I am also inking up stamps that haven't seen ink! A few years ago I was getting the La-La Land Crafts monthly kit and I haven't touched one of these kits. So I thought, why not grab one of those kits and see what we can make. Of course, I decided to go with a birthday themed kit because I'm still trying to build my birthday stash. But want to hear a secret?! I've been sending birthday cards!! For realz! So while I'm building my stash of birthday cards I'm also sending them out. So I need more!


Here's a look at the scraps I'm working with this time. I'm not sure if I'll officially include the tags as part of the leftovers. But I did use a few of the enamel dots from the leftover kit I opened up.


There was some fun products in this La-La Land Crafts monthly kit from August 2019... a couple sentiment dies and more stamps, but I chose this adorable girl and sentiment to play with. Trying to keep the cards I'm sending simple so the postage stays to the minimum. Of course, those enamel dots may call for extra postage, but we'll see. So for this card, I used the largest scrap {a 6x6" piece that I had already cut before taking the photo} for my background layer. I love the contrast of the stripes with the polka dots and the enamel dots play off of the dots in the paper.


I stamped the girl and sentiment using Black Amalgam ink from Gina K. Designs. I then colored up the girl using a bunch of Copic markers. I actually messed up the skirt while coloring. Did not like how it turned out! So I stamped the skirt on a scrap of white card stock and colored it up again. I fussy cut the skirt on the line and paper pieced it onto the girl. Easy peasy fix. Then I fussy cut the girl on the line and colored the edge of the fussy cutting using a Memento Tuxedo black marker {I also did that to the paper pieced skirt}. This makes the fussy cutting look much nicer! I trimmed up the sentiment and adhered it to the pink circle that I die cut using a 1-1/4" circle die from the Nesting Circles Die from Waffle Flower. I then adhered the sentiment to the girl and added foam tape to the back of both. Popped them up on the card and added those three enamel dots. I really like how this one turned out!

Here's a list of the Copic markers I used:

Skin: E000, E00, E11, E04
Hair: Y11, Y21, E23, E25
Lips: R20, RV11
Top: R20, RV11, RV14, RV06, RV19
Skirt: RV0000, R20, RV11, RV14, RV06, RV19 
Shoes: RV0000, R20, RV11, RV14, RV06, C00, C3
Present: Y11, Y15, Y35, G000, G12, G24


Here's a look at the fun new sketch for Tawny Owl Paperie Inky Inspiration Sketch 20. This sketch does call for larger pieces so if you have a fun paper pad you've been wanting to cut into... now's the time! The sketch, as always, is meant to inspire not require. So let the sketch lead in your design, but don't feel limited by it. My card is another good example of altering the sketch but still keeping within the sketch.


I'm so happy with how this card turned out! I hope you're inspired to play along with the sketch... and maybe even pull out some papers and stamps that you haven't played with yet! Have a wonderful week!

Thanks so much for stopping by!
See ya next time.

Inky Hugs,
Crystal


{Please note that comment moderation is on. Your lovely comment will appear once approved.}

Monday, April 15, 2024

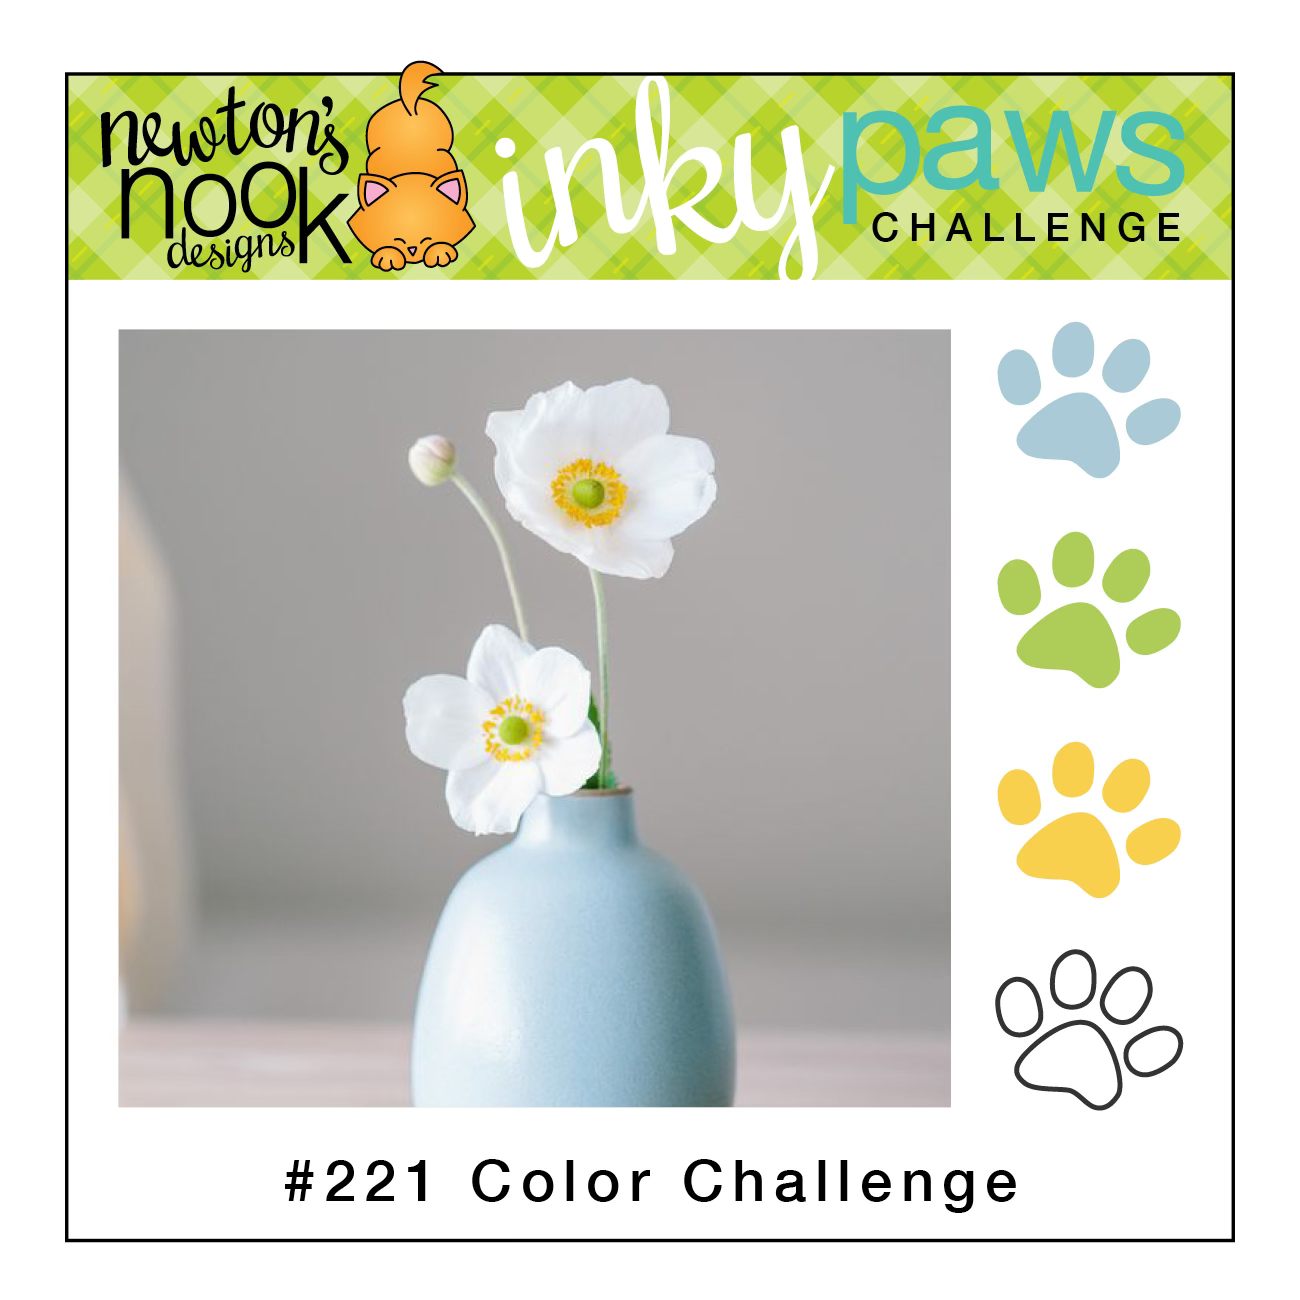
Inky Paws Challenge #221 ~ Color Challenge

Hello there crafty friend!
It's time for a new Inky Paws Challenge... a beautiful Color Challenge! 
I sure hope that you'll join in the fun and play along with us with your Newton's Nook Designs products! You have until Friday, April 26th to get your entries in for the #221 Color Challenge and a chance to win a $20 store credit to Newton's Nook Designs!


Lovely Spring colors... Dusty Blue, Moss Green, Golden Yellow, and White!! So soft and pretty!


I started by die cutting a few larger scrap pieces of Stamper's Select White card stock from Papertrey Ink using the Sky Borders Die Set. I also die cut a few single clouds using a couple cloud dies from the Sky Scene Builder Die Set. And I just had to add a sun peeking through the clouds so I die cut the sun from Crushed Curry and Daffodil Delight card stock from Stampin' Up using the sun die from the Sky Scene Builder Die Set. I tucked the other sun back in with my dies... now I have a sun ready to go for next time I use these dies.


I paired up the adorable Newton's Umbrella Stamp Set with the super cute A Cat's Life 6x6 Paper Pad. These papers had just the right colors for my scene and for the color challenge! I trimmed the striped blue paper down to 4 x 5-1/4". I die cut the green polka dot paper using the grass die from the Land Borders Die Set. I die cut the same piece a couple of times so that I could make a nice layer of grass for my scene.


I stamped the sweet kitty and the sentiment from the Newton's Umbrella Stamp Set using Memento Tuxedo Black ink and colored up the kitty with my Copic markers. I die cut the kitty using the coordinating Newton's Umbrella Die Set. I also trimmed up the sentiment and adhered it directly to the card. I adhered all of my layers to the striped blue pattern paper and then trimmed off the excess from the edges. I added foam tape behind the kitty and popped him up on the card.

Here's a quick list of the Copic markers I used:

Kitty: R00, R20, C00, C1, C3, 0
Umbrella: Y11, Y15, Y35, YG11, YG03, C3


Now it's your turn to get your paws inky with your Newton's Nook Designs products and create a project using the color combo of Dusty Blue, Moss Green, Golden Yellow, and White. Be sure to link up to the Inky Paws Challenge! Can't wait to see your projects!


Thanks so much for stopping by!
See ya next time.

Inky Hugs,
Crystal


{Please note that comment moderation is on. Your lovely comment will appear once approved.}

Friday, April 12, 2024

{BYSHC} Sketch Challenge 44 ~ Holiday Birds ~ RAM Stamps

Hello there crafty friend!
I'm back with another sweet holiday card for the {BYSHC} Sketch Challenge 44 over in the Build Your Stash Holiday Cardmakers Facebook group! Today I'm sharing a card featuring the Holiday Birds Digital Stamp from this month's fabulous sponsor, RAM Stamps! 


Aren't these birdies just TOO cute! I adore them so! I resized them in a Word Document and printed them off. Paired these cuties up with the Miss Mary Christmas Paper Pad from Hobby Lobby. I had no idea that Hobby Lobby was making their own pattern papers. Is that a recent thing or have I just been hidden under a rock?! 


I trimmed the printed panel down and then die cut the birdies using a die from the Wonky Stitched Mini Slimline die from Gina Marie Designs. I've been in a groove making simple cards and this month's sketch is as simple as can be! Since I wanted this card simple too, I chose papers that have a sentiment. No need to add another sentiment!


This is a mini slimline card measuring 6 x 3". So I cut a 6 x 6" piece of Stampers Select White card stock from Papertrey Ink and scored it at 3". To add a bit of dimension to the card, I added foam tape to the back of the birdie panel and popped it up on the card. 


Here's a look at {BYSHC} Sketch Challenge 44 for the month of April. Loving this simple sketch! I can't wait to see what everyone does with it. I hope you'll join us and play along with the sketch! If you're interested in seeing a bit more inspiration for this sketch, check out the amazing inspiration from the design team over on the {BYSH} Cardmakers blog! Lots of sweet inspiration this month from the design team.


Thanks so much for stopping by!
See ya next time.

Inky hugs,
Crystal


{Please note that comment moderation is ON. Your lovely comment will appear shortly.}