Tuesday, May 14, 2024

Tawny Owl Paperie Inky Inspiration Sketch 21 ~ Sea-Prise ~ Avery Elle

 Hello there crafty friend!
I am back with inspiration for the Tawny Owl Paperie Inky Inspiration Sketch Challenge 21. And why not add another birthday card to my stash! All the white open space was fun to play with on this one.


I'm back to using those leftovers papers I picked out a few weeks ago. You can see the a photo of the papers here. This sketch doesn't use a lot of papers so I have quite a few left. I have a feeling I'll be finishing up these papers next month. I found four scraps in my papers that were all cut down to 1/2" width. I cut a fifth piece to balance out the space since they were so thin. 


I stamped the puffer fish, horn, and sentiment from the Sea-Prise stamp set from Avery Elle using Memento Tuxedo Black ink. I then colored up the fish and horn using a bunch of Copic markers. I fussy cut the fish and horn using my EK Cutter Bee Scissors leaving a skinny white border around the images. I stamped the sentiment on a long scrap of white card stock and then stamped the cute fish using Kitsch Flamingo and then Picked Raspberry Distress Inks. Kitsch Flamingo wasn't quite right... I wanted them a bit darker. I adhered the sentiment to another long strip of pattern paper and adhered it to the bottom of a 4 x 5-1/4" piece of Stampers Select White Card Stock from Papertrey Ink. I also adhered the other paper strips. I trimmed off all the excess papers off of the edges and then adhered the panel to a 4-1/4 x 5-1/2" piece of Melon Mambo Card Stock from Stampin' Up.

Here's a list of the Copic markers I used: 

Puffer Fish: BG000, BG02, BG05
Party Hat: Y11, Y15, YG11, YG23, RV10, RV02, RV14, BG000, BG02
Horn: BG000, BG02, Y11, Y15, YG11, YG23, RV10, RV02, RV14


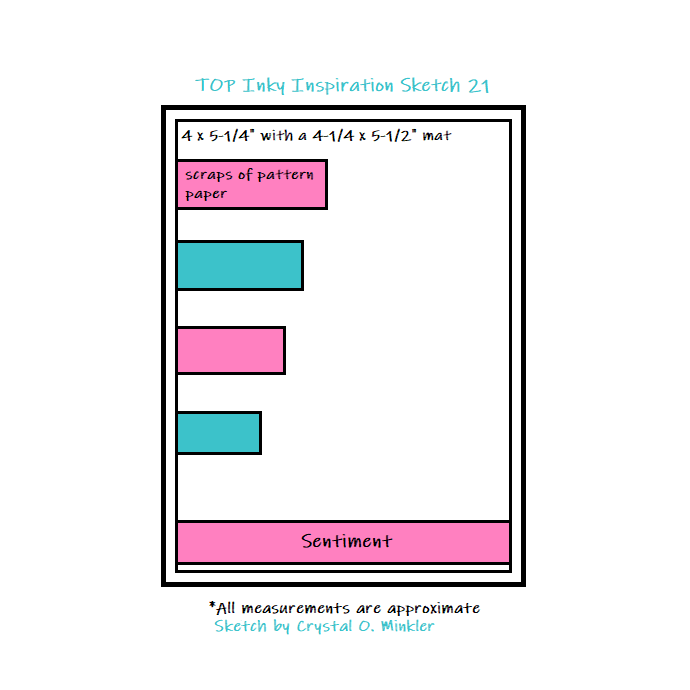
Here's a look at the fun sketch for Tawny Owl Paperie Inky Inspiration Sketch Challenge 21. Lots of open space that can be kept white like my card or use pattern paper like I did for my car card. The sketch, as always, is meant to inspire not require. So let the sketch lead in your design, but don't feel limited by it. My card is another good example of altering the sketch but still keeping within the sketch since my skinny scraps required a fifth scrap to balance out the space.


The very light waves in the background were created using the Make Waves Stencil from My Favorite Things along with Tumbled Glass Distress Ink and a blender brush I got off of Amazon. I used a very light touch blending over the stencil as I shifted the edge of the stencil from side to side to give some variation to the waves. I added foam tape to the back of the horn and fish and then popped them up on the card. I'm so happy with how this card turned out! I hope you're inspired to play along with the sketch... and maybe even make a birthday card. I don't know about you, but I'm always in need of more birthday cards. Have an ink-tastic week!

Thanks so much for stopping by!
See ya next time.

Inky Hugs,
Crystal


{Please note that comment moderation is on. Your lovely comment will appear once approved.}

Monday, May 13, 2024

Inky Paws Challenge #223 ~ Friendship Theme Challenge

Hello there crafty friend!
It's time for a new Inky Paws Challenge... a super fun Friendship Theme Challenge! I sure hope that you'll play along with us using your Newton's Nook Designs products! You have until Friday, May 24th to get your entries in for the #223 Friendship Theme Challenge and a chance to win a $20 store credit to Newton's Nook Designs!


Such a broad theme! I'm excited to see the entries for this one! So fun!


I thought the Newton's Movie Night Stamp Set was perfect for the Friendship theme! I stamped the adorable kitties with Memento Tuxedo Black Ink and colored them up with my Copic markers. I then die cut the kitties using the coordinating Newton's Movie Night Die Set

Here's a quick list of the Copic markers I used:

Tortoise Shell Kitty: R00, R20, YR21, YR15, N0, N1, N3, N5
White Kitty: R00, R20, C00, C1, C3
Orange Tabby Kitty: R00, R20, YR21, YR15
Chairs: N0, N1, N3, N5
Drink: C00, C1, B000, B00, B02
Candy Box: YG11, YG13, Y11, Y15
Popcorn: Y11, YR21, R20, R14, R46, C00, C1
Die Cut Popcorn: Y11, YR21


I die cut a half sheet of cheap card stock using the largest stitched oval die from the Oval Frames Die Set to create an oval stencil. I placed the die over a white A2 top fold card base and then placed the oval stencil over top. This way I was able to figure out placement for the oval stencil. I secured the oval stencil with purple tape. I then placed the Popcorn Stencil over top and secured it in place with some purple tape. I blended Mustard Seed and Spiced Marmalade Distress Oxide inks over the cool Popcorn Stencil using a light touch around the outer edge of the oval stencil. I love the way the popcorn just fades out into the white edges of the card base.


I die cut three popcorn pieces using the dies from the coordinating Newton's Movie Night Die Set. I colored them very simply with just two Copic markers - Y11 and YR21. I adhered the popcorn pieces to the kitties and added foam tape to the back of them. Before I popped them up on the card, I stamped the sentiment on the card base using my Mini Misti. It took me a couple times to ink it up just right over the oxide ink.


Now it's your turn to get your paws inky with your Newton's Nook Designs products and create a project with a Friendship theme. Be sure to link up to the Inky Paws Challenge! Can't wait to see your projects!


Thanks so much for stopping by!
See ya next time.

Inky Hugs,
Crystal


{Please note that comment moderation is on. Your lovely comment will appear once approved.}

Friday, May 10, 2024

You're the Bee's Knees ~ Unity Stamp Co.

Hello there crafty friend! 
Sharing one more card using new goodies from Unity's 16th birthday celebration!! I am a huge fan of the background stamps at Unity. The new You're the Bee's Knees is a fabulous new addition to the line!


I stamped the background and sentiment using Black Amalgam ink from Gina K Designs. I'm not sure what kind of flowers these are so I had fun mixing colors when I colored them up using my Copic markers. This one actually took me a few days in between other projects, homeschool lessons and well, life. Haha... it was very relaxing and I enjoyed every second of it.

Here's a quick list of the Copic markers I used:

Pink & Yellow Flowers: RV0000, RV10, RV02, Y11, Y15, Y35
Pink & Purple Flowers: RV0000, RV10, RV02, V000, V12, V15
Flower Centers: Y11, Y15, Y35, YR14
Leaves / Stems: YG11, YG23, YG05
Background: B0000, B00, Colorless Blender


Once my coloring was completely dry, I used a Sakura White Gelly Roll pen to color in the little dots in the center of the flowers. I die cut the background using the largest die from the Deckle & Stitches Nesting Die Set.


I debated using a card front of yellow or purple or even kraft, but decided to go with just a white A2 top fold card base. Not only does it make for less layers so it's easy and cheaper to mail, the white background also helps the white dots pop on the flowers. I absolutely love how this turned out! Hope you have an ink-tastic day! And Happy Mother's Day weekend everyone!

Thanks so much for stopping by!
See ya next time.

Inky hugs,
Crystal

{Please note that comment moderation is on. Your lovely comment will appear shortly.}

Thursday, May 9, 2024

Pink Magnolias ~ Special Place ~ Unity Stamp Co.

Hello there crafty friend! 
Popping in with a pretty quick floral card I created using new goodies from Unity's 16th birthday celebration!! Woot woot! Happy Birthday, Unity! 


The gorgeous magnolias reminded me our past home in California where we had several magnolia trees in front of our home. They were so beautiful! They were also white... but I wanted to color some pink magnolias so here we are! LOL! I stamped the beautiful magnolias from the Special Place stamps on Stampers Select White card stock using Black Amalgam ink. I then colored the flowers with Copic markers {yes, I forgot to color the flower centers}.

Here's a quick list of the Copic markers I used:

Pink: RV0000, RV10, RV02
Green: G43, G99, G85


I die cut the magnolias using the largest die from the Postage Stamp {nesting dies}. And then I grabbed my Love Kitties {paper pack}. I remembered the lovely pink brick papers in this pack and just knew I had to use it. I cut down a full sheet of pattern paper for my background to 4-1/4 x 5-1/2". I didn't want to cover up the pretty pink brick paper so I tore the magnolia panel and adhered it to the brick pattern paper. I trimmed some {Ivory} May Arts Burlap String into three strand and then tied a triple bow. Using liquid glue I adhered the panel to a white A2 top fold card base that I turned on it's side for a landscape card. 


I fussy cut the sentiment and adhered it to the card. I finished off the card with three Translucent Enamel Dots from Gina Marie Designs. A simple and quick card for someone special! This turned out prettier than I had thought! Have an ink-tastic day!

Thanks so much for stopping by!
See ya next time.

Inky hugs,
Crystal

{Please note that comment moderation is on. Your lovely comment will appear shortly.}

Wednesday, May 8, 2024

Membership Wednesday ~ May 2024 KOM Spring & Simply Joys ~ Unity Stamp Co.

  Hello there crafty friend!
Today I'm sharing a sweet fairy card featuring the cutest stamp from the May 2024 Kit of the Month membership from Unity. How perfect is that sentiment?! 'A little magic can take you a long way'... I love it!


I stamped the fairy and sentiment on a large scrap of Stampers Select White Card Stock from Papertrey Ink using Black Amalgam Ink from Gina K. Designs. I colored up the fairy using my Copic markers.
Here's a quick list of the Copic markers I used:

Skin: E000, E00, E11
Hair: E21, E23, E29
Dress: YR21, YR15, YR68
Wings: BG0000, BG11
Flowers: Y11, Y15, YR15, R05, R17
Stems / Leaves: YG63


Inspiration for my card today comes from the Tawny Owl Paperie Inky Inspiration Sketch 21. I saw a couple fabulous card by Amy Morris in the Tawny Owl Paperie Inky Inspiration Facebook group yesterday and thought these papers would look amazing with this sweet fairy. What do you think?


I paired up the pretty fairy with the absolutely gorgeous Bohemian Dream {paper pack}. I cut a 4 x 5-1/4" piece of pattern paper and adhered a few scraps of pattern paper from the pack to the side. Almost like steps but upside down. And then I adhered the panel to a Kraft A2 top fold card base. 


I die cut the fairy using a die from the Scallops & Arches {nesting dies} and then I die cut the sentiment using a die from the Scallops & Banners {nesting dies}. I distressed the edges of each using a blending brush but I didn't add any ink. I wanted the colors to coordinate with the pattern papers. I adhered the die cuts together and then added foam tape to the back and popped them up on the card. and then I finished off the card with a few orange enamel dots. These were out of their package in my stash so I'm not sure where they are from.
 

And here's a look at the awesome Kit of the Month membership! Such an amazing mix of stamps this month! Well, that's it for me today! I hope you've been inspired to play with your membership stamps!
Have an ink-tastic day!


Thanks so much for stopping by!
See ya next time.

Inky Hugs,
Crystal


{Please note that comment moderation is on. Your lovely comment will appear once approved.}

Tuesday, May 7, 2024

Tawny Owl Paperie Inky Inspiration Sketch 21 ~ Keepin It Classy ~ Unity Stamp Co.

 Hello there crafty friend!
I am back with inspiration for the Tawny Owl Paperie Inky Inspiration Sketch Challenge 21. On the heels of the Friends of the Unity blog hop this past weekend, I still had a couple masculine stamp sets on my desk. So... I thought why not make another masculine card! Next week I'll try to find the leftover scraps that I've made my mission to finish off this month. I'm afraid they are lost under the piles of papers and stuff from my mad-dash card making last week. 


Speaking of the piles of stuff on my desk, not only did I have the Keepin It Classy stamp but I still had the Classic Garage DSP from Stampin' Up on my desk. Naturally they needed to go together! I looked through my paper pack and picked out the scraps. I do wish I had found wider pieces of pattern paper, but I like the flags of papers.


I stamped the cool car and sentiment using Black Amalgam ink from Gina K. Designs. I then colored up the car using a bunch of Copic markers. Here's a list of the Copic markers I used: R00, R21, R05, R17, N0, N1, Y11, Y15. I die cut the car using the coordinating Keepin It Classy die. Added some foam tape to the back of the car and popped it up on the card.


Here's a look at the fun new sketch for Tawny Owl Paperie Inky Inspiration Sketch Challenge 21. Lots of open space that can be kept white or use pattern paper like I did for my car card. The sketch, as always, is meant to inspire not require. So let the sketch lead in your design, but don't feel limited by it. My card is another good example of altering the sketch but still keeping within the sketch since I turned the sketch on it's side.


I'm so happy with how this card turned out! I hope you're inspired to play along with the sketch... and maybe even make a masculine card! I know Mother's Day is just days away but Father's Day will be here before we know it. Have a wonderful week!

Thanks so much for stopping by!
See ya next time.

Inky Hugs,
Crystal


{Please note that comment moderation is on. Your lovely comment will appear once approved.}

Monday, May 6, 2024

Inky Paws Challenge #222 ~ Sketch Challenge Reminder

 Hello there crafty friend!
 There's still time to play along with the Inky Paws Challenge 222 - Sketch Challenge! You have until this coming Friday, May 10th to get your entries in for this fun challenge and a chance to win a $20 store credit to Newton's Nook Designs!


I am seriously loving this sketch! And something else I seriously love is cherry blossoms. It reminds me of my grandparents and their home. They had a gorgeous cherry tree in the front yard. I loved to visit when it bloomed! So gorgeous!


It was only natural that I played with the new Cherry Blossoms Stamp Set. It's so beautiful! And a must have for my collection. I stamped the cherry blossom sprig and a few of the extra blossom on a scrap of Stampers Select White Card Stock from Papertrey Ink. I colored them up with Copic markers and then die cut them with the coordinating Cherry Blossom Die Set.

Here's a quick list of the Copic markers I used:

Blossoms / Buds: RV0000, RV10, RV02, RV14
Stem: E21, E23, E27


I set aside the pretty cherry blossoms and grabbed a card front of Stampers Select White card stock measuring 4-1/4 x 5-1/2". I wanted to stick with pink for a monochromatic card so I grabbed Kitsch Flamingo and Picked Raspberry Distress Oxide inks and ink smooshed them on my glass table. I spritzed the ink a bit with water and then dabbed my card stock into the pools of ink leaving some white until I was happy with the background.


I die cut the ink smooshed background using the largest die from the Frames & Tags Die Set. I have to say I think this die set has become my new favorite! Of course, it works perfectly with this sketch but also I love all the components of the set. Anywho, I adhered the background to my white A2 top fold card base that I turned on it's side for a landscape card. I die cut a white frame using the frame die from the same die set. I die cut the cute little tag and stamped the 'hello'. I wrapped a bit of ivory twine around the inside of the frame and thread it through the hole of the tag and then tied a bow. I adhered the frame to the card and added foam tape to the back of the tag to pop it up. I also added foam tape to the back of all of the cherry blossoms and popped them up on the card. 


Now it's your turn to get your paws inky with your Newton's Nook Designs products and create a project using the sketch. Be sure to link up to the Inky Paws Challenge! Can't wait to see your projects!


Thanks so much for stopping by!
See ya next time.

Inky Hugs,
Crystal


{Please note that comment moderation is on. Your lovely comment will appear once approved.}