Monday, November 13, 2023

Inky Paws Challenge #211 ~ Meowy Christmas Theme Challenge

Hello there crafty friend!
It's time for a new Inky Paws Challenge... a super fun Meowy Christmas Theme Challenge! How fun is that?! I sure hope that you'll join in the fun and play along with us using your Newton's Nook Designs products! You have until Friday, November 24th to get your entries in for the #211 Meowy Christmas Theme Challenge and a chance to win a $20 store credit to Newton's Nook Designs!


Oh my heart... that kitty is just TOO cute!


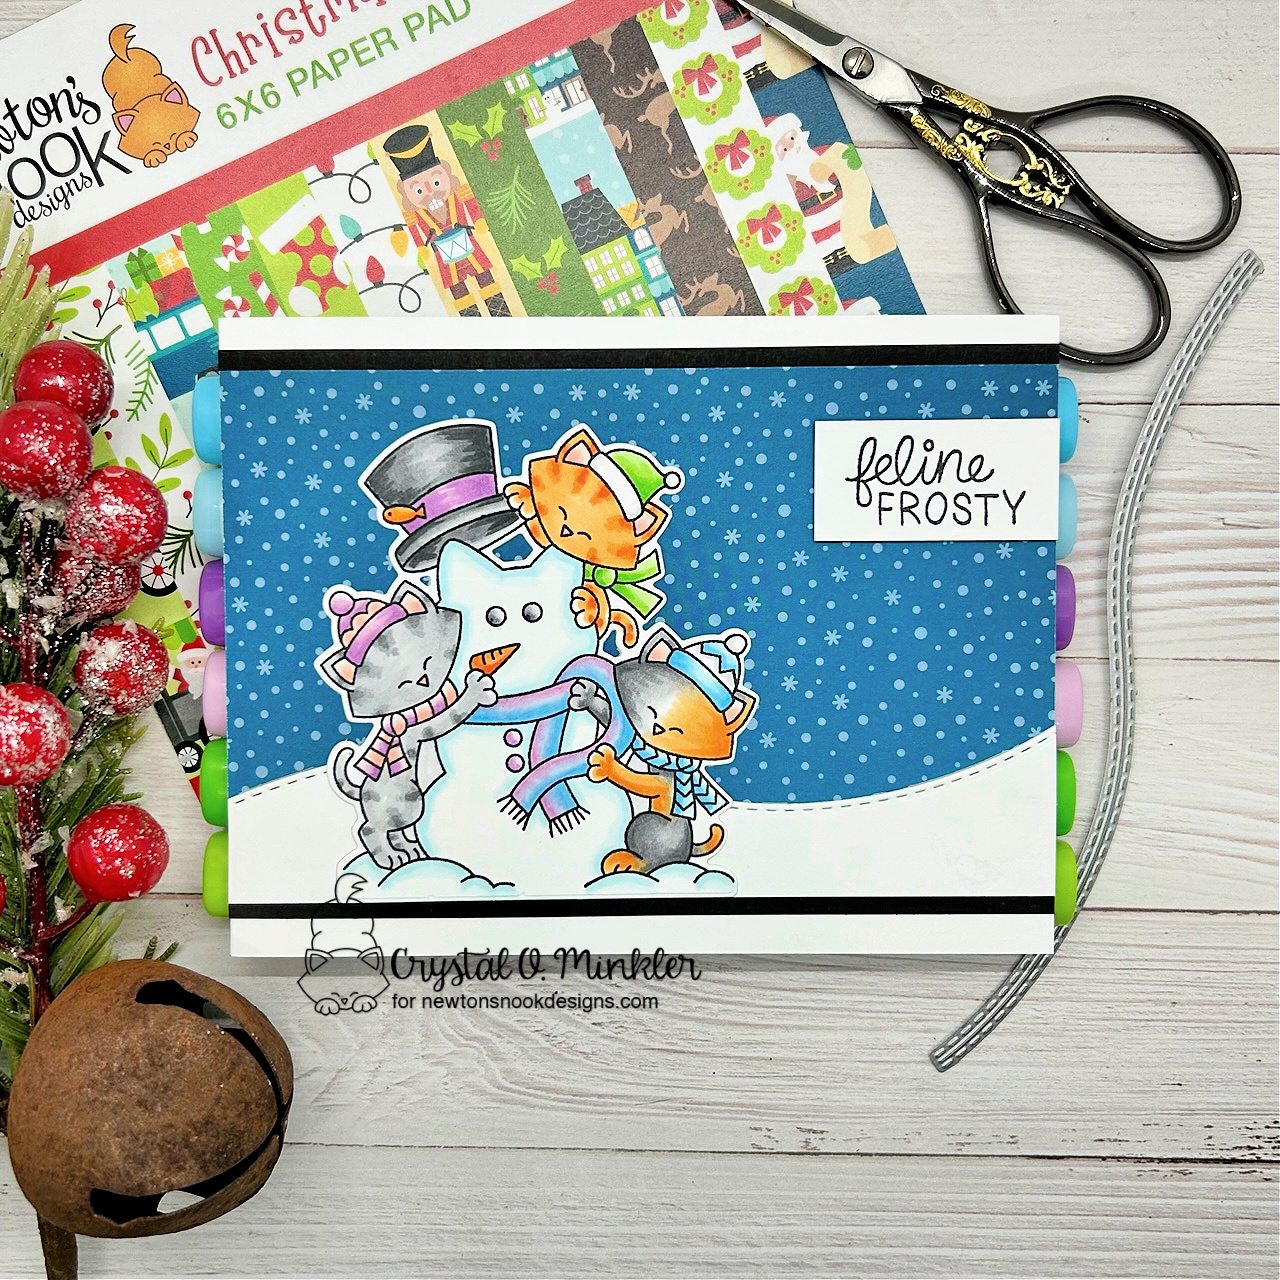
I added the sweet Newton's Snowman Stamp Set to my collection recently so I was excited to ink it up for this new challenge! I created a simple scene card using pretty papers from the Christmas Time 6x6 Paper Pad. I actually found this paper in my paper pad already cut and ready to go and it gave me the idea for this card design.


I adhered the snow paper from the Christmas Time 6x6 Paper Pad directly to my white A2 top fold card base that I turned on the side. I trimmed two 1/8" pieces of True Black card stock from Papertrey Ink. I adhered those on either side of the snow paper. A fun trick I like to do in lieu of a mat... less layers for mailing so I don't have to add postage. I found a scrap of white card stock and die cut it with the stitched hill die from the Land Border Die Set. I adhered it at the bottom of the snow paper.
Newton's Snowman Die Set


I stamped the sweet kitties and snowman from the Newton's Snowman Stamp Set using Memento Tuxedo Black ink. I also stamped the sentiment on another scrap of white card stock.  I colored up the kitties and snowman with a bunch of Copic markers. Once I was happy with my coloring, I die cut the panel using the coordinating Newton's Snowman Die Set. I adhered the kitties and snowman directly to the card. I trimmed the sentiment and popped it up on the card using foam tape. 
Here's a quick list of the Copic markers I used:

Snowman: B0000, B000
Goldfish / Nose: YR21, YR15, YR68
Snowman Hat: V12, V15, N0, N1, N3, N5, N7
Buttons: V12, V15
Snowman Scarf: B000, B02, V000, V12
Kitties Noses / Ears: R00, R20
Kitty #1: YR21, YR15, YR68
Kitty #1 Hat / Scarf: YG11, YG23, G14, C00, 
Kitty #2: N0, N1, N3, N5
Kitty #2 Hat / Scarf: R00, R20, V000, V12, V15
Kitty #3: N1, N3, N5, YR21, YR15, Colorless blender
Kitty #3 Hat / Scarf: B000, B02, C00, C1

I wasn't able to capture my entire process in creating this card but I did record the Copic Coloring for this one. You can check out my video here... Wintry Copic Coloring | Newton's Snowman | Inky Paws Challenge 211 | Newton's Nook Designs.


Now it's your turn to get your paws inky with your Newton's Nook Designs products and create a project with a Meowy Christmas theme. Be sure to link up to the Inky Paws Challenge! Can't wait to see your projects!


Thanks so much for stopping by!
See ya next time.

Inky Hugs,
Crystal


{Please note that comment moderation is on. Your lovely comment will appear once approved.}

Friday, November 10, 2023

{BYSHC} Sketch Challenge 39 ~ Rustic Winter Wishes Pattern Paper with Greetings of the Season Dies ~ Unity Stamp Co.

Hello there crafty friend!
I'm back with another Christmas card for the {BYSHC} Sketch Challenge 39 for the Build Your Stash Holiday Cardmakers Facebook group. Today I'm sharing a really quick card I made using the pretty Rustic Winter Wishes {paper pack} and the Greetings of the Season {die set} from Unity.


I trimmed my pattern paper to 4-1/8 x 5-3/8". I die cut a scrap piece of red card stock using the Ric Rac die from My Favorite Things. I did this twice. I adhered the ric rac pieces to my pattern paper using Bearly Art Precision Craft Glue. I trimmed up the excess off the edges and adhered the panel to a card front of Real Red card stock from Stampin' Up measuring 4-1/4 x 5-1/2".


I die cut the 'Merry Christmas' sentiment three times from the same red card stock. Using the Bearly Art liquid glue again, I adhered the layers of the sentiment. I am seriously loving the fine tip on this glue!! I die cut a piece of vellum card stock using the outline die and adhered the sentiment to it. I applied the liquid glue just behind the sentiment and then adhered the sentiment to the card.


I finish off the card with a few red enamel dots and then I adhered the panel to a white A2 top fold card base measuring 4-1/4 x 11"; scored at 5-1/2".


Here's another look at {BYSHC} Sketch Challenge 39 for the month of November. There's still lots of time to play along with this challenge! If you're interested in seeing a bit more inspiration for this sketch, check out the amazing inspiration from the design team over on the {BYSH} Cardmakers blog!


Thanks so much for stopping by!
See ya next time.

Inky hugs,
Crystal


{Please note that comment moderation is ON. Your lovely comment will appear shortly.}

Wednesday, November 8, 2023

Membership Wednesday ~ November 2023 KOM Festive Flair ~ Unity Stamp Co.

 Hello there crafty friend!
I'm back for another Membership Wednesday and today I'm sharing a CAS card using the sweet Christmas tree stamp in the November 2023 Kit of the Month called Festive Flair from Unity Stamp Co. I am LOVING all the fab holiday stamps in this month's KOM!! It was so hard to pick one to play with today.


I stamped the sweet tree and sentiment on a white card front measuring 4-1/4 x 5-1/2" using Black Amalgam ink. Die cut the pretty tree with the largest die from the Scallops & Rectangles {nesting dies}


Here's a quick list of the Copic markers I used:

Tree: YG11, G24, G46, E55
Yellow Star & Ornaments: Y06, Y15
Red Ornaments: R20, R14, R46
Blue Ornaments: B000, B02
Pot: R20, R14, R46, white gel pen {polka dots}
Sled: E53, E55, E57, R14 {handle}
Blue Gift: B000, B02, R20, R14, R46
Red Gift: R20, R14, R46, Y06, Y15
Ground: C00, C1

You can check out my Copic coloring and assembling of my card here... Simple Copic Coloring | November 2023 KOM Festive Flair | Unity Stamp Co.


I trimmed a piece of Real Red card stock from Stampin' Up. Adhered the CAS panel to the red card front and then I adhered the panel to a white A2 top fold card base.


Here's a look at the whole Kit of the Month for November!! So amazing! Can you believe that you get this full sheet of rubber for only $44.99? That includes shipping! You also get a $6.95 discount on every order from Unity over $45. And you can purchase any past kits for only $34 plus shipping. Such a great value!


I'll be back for another Membership Wednesday blog post next week. Not sure what I'll play with yet but I'm leaning towards the awesome new November 2023 Whit Kit. Have you seen it?! You have to go check it out!


Thanks so much for stopping by!
See ya next time.

Inky Hugs,
Crystal


{Please note that comment moderation is on. Your lovely comment will appear once approved.}

Monday, November 6, 2023

Cute Scene Card ~ Anya Reboot with Fairyland~ The Greeting Farm

 Hello there crafty friend!
I am super excited and honored to be guest designing for The Greeting Farm for the month of November!! I have a few fun projects to share with you all this month... starting with an adorable scene card featuring the super cute fairy Anya from the big Anya Reboot stamps! 


I created a fun scene for fairy Anya by combining and resizing a few different digi stamps from the Fairyland Digi Set into a Word Document. I included the snail on the document but kept him separate so I could pop him up on the card.


I stamped the sweet fairy Anya with Memento Tuxedo black ink and colored her up with Copic Markers. I also colored up my scene and the snail. Here's a quick list of the Copic markers I used:

Skin: E000, E00, E11
Hair: YR31, E43, E44
Dress: RV000, RV10, RV21, YG11, G14, G07
Wings: B0000, B00, B02, V000, V12, V15
Mushrooms: W00, W0, W1, W3
Red Mushroom {behind snail}: R20, R14, R46, W0, W1, W3
House: E53, E55, E57, E59, B0000, B000, B00, B02, B04, N0, N1, N3, N5, Y06, Y15
Snail: YG11, YG03, YG63, V000, V12, V15, W0, W1, W3
Grass: YG11, YG03, YG63
Sky: B0000, B000, B00


I trimmed up my panel just slightly smaller than the edging on my die cut panel. Adhered the pieces together and mat them with a purple card front that was adhered to a white card base. I fussy cut the snail and Anya on the line and the colored the edges with a black marker. A nice trick for making fussy cut images look nice and neat. 


I stamped the sentiment from the Lettered stamp set. Trimmed it up and cut a fishtail end. I popped up the snail, Anya, and the sentiment using foam tape. Love the dimension it gives to the card and the whole scene. I hope I've inspired you to get inky and mix up your stamps and digi stamps!

Thanks so much for stopping by!
See ya next time.

Inky Hugs,
Crystal


{Please note that comment moderation is on. Your lovely comment will appear once approved.}

Inky Paws Challenge #210 ~ Sketch Challenge Reminder

 Hello there crafty friend!
 There's still time to play along with the Inky Paws Challenge #210 - Sketch Challenge! You have until this coming Friday, November 10th to get your entries in for this fun challenge and a chance to win a $20 store credit to Newton's Nook Designs!


I am seriously loving this sketch! Have you given it a try? So many possibilities!


When I was putting away my goodies from my card last week, I noticed the Coffee House Stories 6x6 Paper Pad in my collection and I just HAD to make a coffee themed card for the sketch this week. I used a couple of scraps from the paper pad for the vertical and horizontal paper layers. I die cut the cute coffee cup papers using the largest scalloped die from the Frames & Flags Die Set


I stamped the adorable kitty and sentiment from the Newton Loves Coffee Stamp Set using Memento Tuxedo Black ink. I colored him up with my Copic markers and fussy cut him with my scissors. If fussy cutting isn't your thing, there's a fabulous coordinating Newton Loves Coffee Die Set! I just added it to my wishlist! I trimmed up the sentiment and adhered it directly to the card.

Quick list of the Copic Markers I used:
Kitty: W00, W1, W3, R00, R20
Collar: E23, E25, E27, BG0000, BG000, BG11, BG32
French Press: BG0000, BG000, BG11, BG32, E23, E25, E27, C00, C1


I pulled out my handy dandy vellum card stock and die cut a piece using the decorative square die from the Frames Squared Die Set. I just couldn't cover up these pretty layers of papers! I adhered Newton to the vellum and then applied liquid glue behind Newton and adhered the vellum decorative square. To finish off the card, I added a few enamel dots. Still trying to make a dent in my surplus of enamel dots!!


Newton's Nook Designs is a Sponsor of the Fall | Winter Coffee Lovers Blog Hop. So fun! I'm linking up my card to the hop. If you have time, join in the fun and link up too! 


Now it's your turn to get your paws inky with your Newton's Nook Designs products and create a project using the stripes theme. Be sure to link up to the Inky Paws Challenge! Can't wait to see your projects!


Thanks so much for stopping by!
See ya next time.

Inky Hugs,
Crystal


{Please note that comment moderation is on. Your lovely comment will appear once approved.}

Saturday, November 4, 2023

~ Friends of Unity November 2023 Blog Hop ~

Hello there crafty friend!
It's time for our Friends of Unity Blog Hop!! 
This month's cue is so much fun! I've been looking forward to it for some time. I hope you'll hop along with us and enjoy some wonderful inspiration from our friends!


Slimline is our cue this month! 
I've been making slimline cards for years and years... even before they became a huge trend. I love these big cards. There's just so much room to play.


So excited to play with the gorgeous new Poinsettia Poetry. I ink smooshed my 8-1/2 x 3-1/2" piece of Kraft card stock using Candied Apple and Lumberjack Plaid Distress Oxide inks. I didn't cover the whole panel so Kraft peeked out a bit here and there. I stamped the background several times with the postmark stamp. I also stamped the poinsettia in black on the panel.


I stamped the poinsettia three more times on Kraft card stock. I copic colored each of them using YG11, G24, and G46. I love the muted look of the green copics on the Kraft card stock. I fussy cut each of the poinsettias cutting different layers for each and then cleaned up the edges by coloring them with a Memento Tuxedo Black marker. I popped them up on each other using foam tape giving the poinsettia lots of dimension.


I adhered the poinsettia to the panel over top of the stamped poinsettia and did a bunch of white acrylic paint splatters. Trimmed the panel {approx. 1/8" off of each side} and mat it on a 8-1/2 x 3-1/2" piece of True Black card stock. And then adhered it to a Kraft card base measuring 8-1/2 x 7"; scored at 3-1/2". I stamped the sentiment, trimmed it and popped it up on the card with foam tape. Loving how this one turned out!


My second card is a mini slimline featuring the adorable Whisker Watch Silhouette. One of the adorable stamps just released for Brown Thursday!!! I stamped the sweet kitty silhouette on a 3-1/2 x 6-1/2" piece of white card stock using Black Amalgam ink. 


I blended a few fun Copic Markers on my background to create a pretty sunset. It looks kind of like a rainy sunset with the streaks I created with the colorless blender. I reminds me of our sweet Quinn watching the rain the other day. I used Y000, Y06, YR21, V0000, V000, V12, B0000, B02, BV34, BV17 {from bottom to top}.


The panel was die cut using the Wonky Stitched Mini Slimline die from Gina Marie Designs. The cute sentiment is from the awesome new Snarky Cat Thoughts. The sentiment was die cut using a die from the Scalloped & Stitched Sentiment Nesting Dies. I adhered the panel to a piece of True Black card stock measuring 3-1/4 x 6-1/4". The panel was then adhered to a white mini slimline card base measuring 7 x 6-1/2"; scored at 3-1/2". I finished off the card with a few black enamel dots.


I can't CAT even... LOL! These kitties crack me up!! Hahaha! I just love them so. This card didn't quite turn out how I imagined but the sentiment is just how I imagined and I LOVE IT!! LOL!! The sentiment is from the hilarious Snarky Cat Thoughts. I stamped out all the kitties from the Scaredy Cats using Black Amalgam ink {I didn't end up using one of the kitties}. I colored them pretty simply with my Copic Markers - W00, W1, W3, N0, N1, N3, C00, C1, C3, R00, and R20. I fussy cut them all and tidied up the edges by coloring them with my black marker.


This slimline is 8-1/2 x 3-1/2" so I decided to look through my 12 x 12" pattern papers. I never seem to use them and I have a TON so this was a great excuse to use some. This is the Tranquil Textures DSP from Stampin' Up. I also grabbed a slimline die called Slim Edgers from Pinkfresh. I die cut an edge in the pattern paper and in a piece of Tranquil Tide card stock. Adhered them together so the card stock peeked out of the top. I thought it would be a fun way to ground the kitties.


I adhered all the kitties like they're sitting on a couch cushion. I don't know. It didn't quite turn out how I envisioned but I think it's fun.

Now before we get to the hopping, I chose a lucky winner from the comments on last month's hop to win a fun prize and the lucky winner is...


... Denise Bryant!! Congratulations Denise!!
Please email me at crystalominkler@gmail.com to claim your prize. 
Please claim the prize before November 29th. 

Well, that's it for me this time! Please hop along and enjoy some more inspiration from the Friends of Unity! I'm so excited to hop and check out the slimline cards that our friends created. I will be doing another fun giveaway this month!! Be sure to hop along and comment for a chance to win. {When you comment please leave your name just in case it posts as anonymous.} I'll announce the winner next month! 


Let's get to the hopping...

Crystal <--- you're here

up next ---> Jane


Thanks so very much for supporting our little hop!
We appreciate you!!

See ya next time.

Inky Hugs,
Crystal


{Please note that comment moderation is ON. Your comment will appear shortly.}


Friday, November 3, 2023

Brown Thursday IG Hop ~ Christmas Crew ~ Unity Stamp Co.

Hello there crafty friend! 
Have you seen the awesome Brown Thursday Sale over at Unity Stamp Co.!?! What's Brown Thursday, you ask? Well, it's Unity's version of Black Friday and it's filled with a HUGE new release and a fabulous sale! I shared a sweet card yesterday featuring two new releases. Today I'm sharing a cute card for the Brown Thursday Instagram Hop that the Unity Design Team is having in celebration of Brown Thursday! Head over to IG and check it out... there's prizes!!


A super fun and cute card featuring the adorable new Christmas Crew stamps!! I love this cute crew! I stamped them on a piece of white card stock along with the sentiment and then I die cut the panel using the second largest die from the Scallops & Rectangles {nesting dies}. I also stamped the Christmas Crew on a scrap of white card stock.


I also die cut the watercolor tree pattern paper from the Watercolor Winter {paper pack} and adhered it over the first stamped image. I trimmed the striped pattern paper to 4-1/4 x 5-1/2" and adhered it to a white A2 top fold card base. And then I adhered the main panel.


I used Tawny Owl Paperie Inky Inspiration Sketch 9 for my card today. When I'm stuck on a design it's so handy to just look through my stack of sketches to see what inspires me. This one hit the mark! I omitted the circle and replaced it with the Christmas Crew and sentiment. Easy peasy!


I colored up the Christmas Crew with my Copic markers and fussy cut them on the line. I colored the edges of each image using a Memento Tuxedo Black marker. I added tiny dots of liquid glue on the images on the main panel and paper pieced my colored crew. Here's a quick list of the Copic markers I used:

Elf: E000, E00, E11, YG11, G24, G46, R20, R14, R46, Y06, Y15
Santa: E000, E00, E11, C00, C1, C3, R20, R14, R46
Rudolph: E21, E23, E25, E27, R00, R20, R14, R46 


I adhered the main panel to the card base and called this one done! That's it for me today! Go check out the awesome new releases for Brown Thursday over at Unity! So many amazing new releases and an AMAZING sale!! 

Thanks so much for stopping by!
See ya next time.

Inky hugs,
Crystal

{Please note that comment moderation is on. Your lovely comment will appear shortly.}