Saturday, October 15, 2016

PCC214 Paisley Birthday

Today I'm playing along with the challenge over at Paper Craft Crew. I've been itching to use the Paisleys & Posies set for Stampin' Up! Why not use it for this challenge!


This was a very fun sketch to play with and thankfully it's a two week challenge because I haven't had much time to play. I just recently got my hands on some distress inks and was able to incorporate those into this card. I like the way this turned out and I hope you do too. There's still time to check out the sketch challenge over at papercraftcrew.com and join in on the fun!


 Paper Craft Crew 214


Here are the products I used for this card:

Thanks for stopping by!

See ya next time.
~ Crystal


Friday, October 14, 2016

Shaving Cream Marbled Christmas

I made this pretty Christmas card for a challenge in a stamping group. The technique for this is called the Shaving Cream Marbled Technique


I wanted this to be subtle background so I went with Pool Party ink and Sweet Sugarplum ink. I kept with those colors throughout the card. Hope you like it!

Here are the products I used for this card:
Stamps: Holly Jolly Greetings (SU!)
Card Stock: Pool Party (SU!), Sweet Sugarplum (SU!), White (PTI)
Inks: Pool Party, Sweet Sugarplum
Tools: Scallop Stitched Frame (GMD), Sleigh Ride Edgelits (retired SU!)
Miscellaneous: Uni-Ball Signo White gel pen, Sakura Gelly Roll pen, Pretty Flakes Accents (FSJ)

Thanks for stopping by!

See ya next time.
~ Crystal


Sunday, October 9, 2016

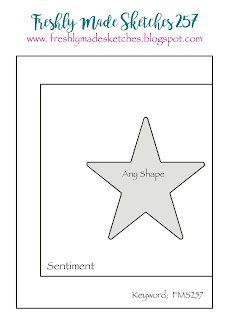
Freshly Made Sketches #257 - Thankful Leaves


I'm playing along with a sketch challenge over at Freshly Made Sketches! Love this sketch!


 Freshly Made Sketches

Here are the products I used for this card:
Stamps: Artsy Leaves (FSJ), Holiday Best (retired SU!)
Card Stock: Kraft (PTI), Chocolate Chip (SU!), Watercolor paper, Autumn Prints (FSJ)
Inks: Black Craft (retired SU!), Pumpkin Pie, Chocolate Chip (SU!); Cranberry Bliss, Gold, Dark Roast silks
Tools: Heat tool, black detail ep (retired SU!)
Miscellaneous: Twinkle Trim (FSJ), Rustic Jute Twine (PTI)

Thanks for stopping by!

See ya next time.
~ Crystal

Thursday, October 6, 2016

Happy Birthday Cuppa

I have a couple cards to share today. I started designing these a couple weeks ago. Actually, I started designing the first card a couple weeks ago... the second card was just a bonus since I like the first one so much!


I was very excited when my SOTW (stamp of the week) arrived from my weekly subscription with Unity. I just love any kind of stamp that has to do with coffee or tea! I was also needing some birthday cards... so, these were perfect!


Here are the products I used for these cards:
Stamps: Our Talks (Unity), Endless Birthday Wishes (SU!)
Card Stock: Vintage Cream (PTI), Mint Macaron (SU!), Vellum (SU!)
Inks: Mint Macaron, Pretty in Pink (retired SU!), Blushing Bride markers
Tools: Paper Crimper (retired)
Miscellaneous: Artisan Embellishment Kit (retired SU!), pink ribbon (retired SU!)

Thanks for stopping by!

See ya next time.
~ Crystal

Sunday, October 2, 2016

Butterflies and Roses

When I originally wrote this blog post I was super excited about posting my card. I absolutely love this sketch! But now I'm sad. Unfortunately, the owner/coordinator has decided to discontinue the challenges at Can You Case It?. I truly enjoyed my time with the CYCI Design Team. I'm still very honored to have been asked by my crafty friend, Eva, to join her team. I wish all the members of the team all the best in their crafty adventures.

In order to keep up with my busy busy life as a SAHM to four kids that I also homeschool, my plan to keep on track with the design team was to stay ahead on the challenges. So, I do have a card to share that would have been the next challenge. I absolutely love this sketch! I had a blast designing and creating this card!


I don't know if you've noticed but I tend to go with clean and simple designs. Now, sometimes I'll step out of that and really layer up a card. But typically, it's the pretty simple designs that I create. This grouping sketch is a mix of the two and it just made me happy!!


I stamped the butterfly image from Unity's Butterfly Endearment kit in Scarlet Jewel ink on Very Vanilla card stock and then fussy cut it out. I decided that the butterfly needed a little something so I grabbed my new Gold PanPastels from Fun Stampers Journey and applied some lovely gold shimmer to the butterfly. Sadly, it's not very visible in the picture. I stamped the large butterfly again in Crumb Cake ink on Very Vanilla card stock. I stamped over that image with the splatter stamp from the Touches of Texture set using Baked Brown Sugar ink (retired SU!). I die cut that image using the scallop circle die from the Circle Card Thinlits set (retired SU!) and adhered it to a circle piece I cut out of the Baked Brown Sugar card stock. I rounded out the wings on the larger scarlet butterfly using a bone folder. I adhered the scarlet butterfly to the crumb cake butterfly just adding glue to the thorax of the butterfly and then I lifted the wings.


I decided to stick with the butterfly theme so I stamped the three butterfly image directly on the Crumb Cake card base in Baked Brown Sugar ink. You're probably wondering where the three butterflies are... two are hidden behind the larger butterfly image. Poor butterflies!
I stamped the "hello darling" sentiment in Baked Brown Sugar ink on Crumb Cake card stock. I used the Hexagon punch (retired SU!) to cut the edge of the banner piece and then adhered it to a piece of Scarlet Jewel card stock, also cutting the edge with the hexagon punch. Now it was time to assemble all the pieces. I put a strip of gold glitter washi tape (SU! from Sale-A-Bration) just under the butterfly trio. I popped up the circle image and the sentiment using stampin' dimensionals. The white rose was also popped up with stampin' dimensionals, however, I had to double them so it didn't squish the banner or circle. I adhered the two pink roses with glue dots and called it done!

Thanks for stopping by!

See ya next time.
~ Crystal

Sunday, September 25, 2016

CYCI#139 Rainbow of Color Challenge

The challenge this week at Can You Case It? is a color challenge... CYCI#139 a Rainbow of Color challenge!! How fun is that?!? I had a whole bunch of ideas swirling through the noggin' but I knew I wanted to try out the Rubber Cement resist technique. It's been on my 'to do' list for a while.


I decided to use the mini raindrops stencil from The Crafter's Workshop. I taped the stencil down over my 5 x 3-1/4 piece of watercolor paper and painted a thin layer of the rubber cement glue over the entire stencil. (My stencil wasn't completely flat which is why some of the rain drops aren't as defined but I still liked the way it turned out.) It didn't take very long for the glue to dry since I did a thin layer. Once it was dry, I watercolored the background colors using Ken Oliver's Caribbean Brights Color Burst. The background was a bit brighter than I had wanted so I grabbed a piece of vellum card stock to make a layer over it. I added the sentiment from Unity's Your Own Rainbow kit using black craft ink and black embossing powder. I ran the whole vellum piece through my Xyron sticker maker and adhered it to the watercolor background. I wrapped black licorice twine around the panel a few times and then tied a bow. I popped up the panel using stampin' dimensionals and called it done!


 canyoucaseit.com


I would love to have you join us for the color challenge this week. Head on over to canyoucaseit.com to see all the other Rainbow of Color creations from the Can You Case It? Design Team!

Thank for stopping by!

See ya next time.
~ Crystal

Thursday, September 22, 2016

A Fun Birthday Card for a Stamping Friend

I love to send birthday cards! I just love it! Sometimes, I will make several cards that are the same or at least similar. Other times, I will make a card just for a particular person. In this case, I made this card for a stamping friend that some of you know, Ginger! Happy Birthday!


This card was pretty quick to put together once I decided what I wanted to do with it. I stamped the Hardwood background stamp from Stampin' Up! using Baked Brown Sugar ink (retired SU!) on Whisper White card stock. I sponged all over the background with the same ink. I didn't want it to be too dark. I added the flower outline from an older My Paper Pumpkin kit and then I decided I wanted to add the inner pieces for the flower. I colored them using a copic marker - YR09. I added a few more flowers, also coloring them a bit in the center with BG72 and BG75. I decided that I just had to add some sparkle so I used the clear Wink of Stella to make the whole flower shine. I placed the iced rhinestone (retired SU!) in the center of the flower. All that was left was the sentiment... I stamped the sentiment from the Endless Wishes set in Tangerine Tango ink on a pre-cut piece of white card stock from the paper pumpkin kit. I popped the sentiment up using stampin' dimensionals. To finish the card, I popped up the entire panel using stampin' dimensionals and adhered it to a White card base.

Thanks for stopping by!

See ya next time.
~ Crystal