Friday, September 9, 2022

{BYSHC} Sketch Challenge 26 ~ Let it Snow ~ Doodlebug Design

 Hello there crafty friend!
I'm back with my weekly Christmas card using the {BYSHC} Sketch 26 from the Build Your Stash Holiday Cardmakers Facebook group. It seems to be each month I use the adorable Let it Snow collection from Doodlebug Design! I've been working hard to use up all the scraps I have left in my Let it Snow paper pad... well, I found another paper pad!! LOL... I guess I had bought two. So, I'm basically starting over with this goal! But it's actually ok because I have a whole bunch of Let it Snow Doodle Pops and a couple packs of the Ephemera with a lot of die cut pieces so I could use more papers with those for cards. Today I'm sharing a couple cards using the adorable Doodlebug Doodle Pops.


Please forgive the quality of this photo... the acetate on the little Snow Wonder Shaker Pop made it difficult to get a nice photo in my photo box. It almost looks blurred. :( It's so cute in person though!!


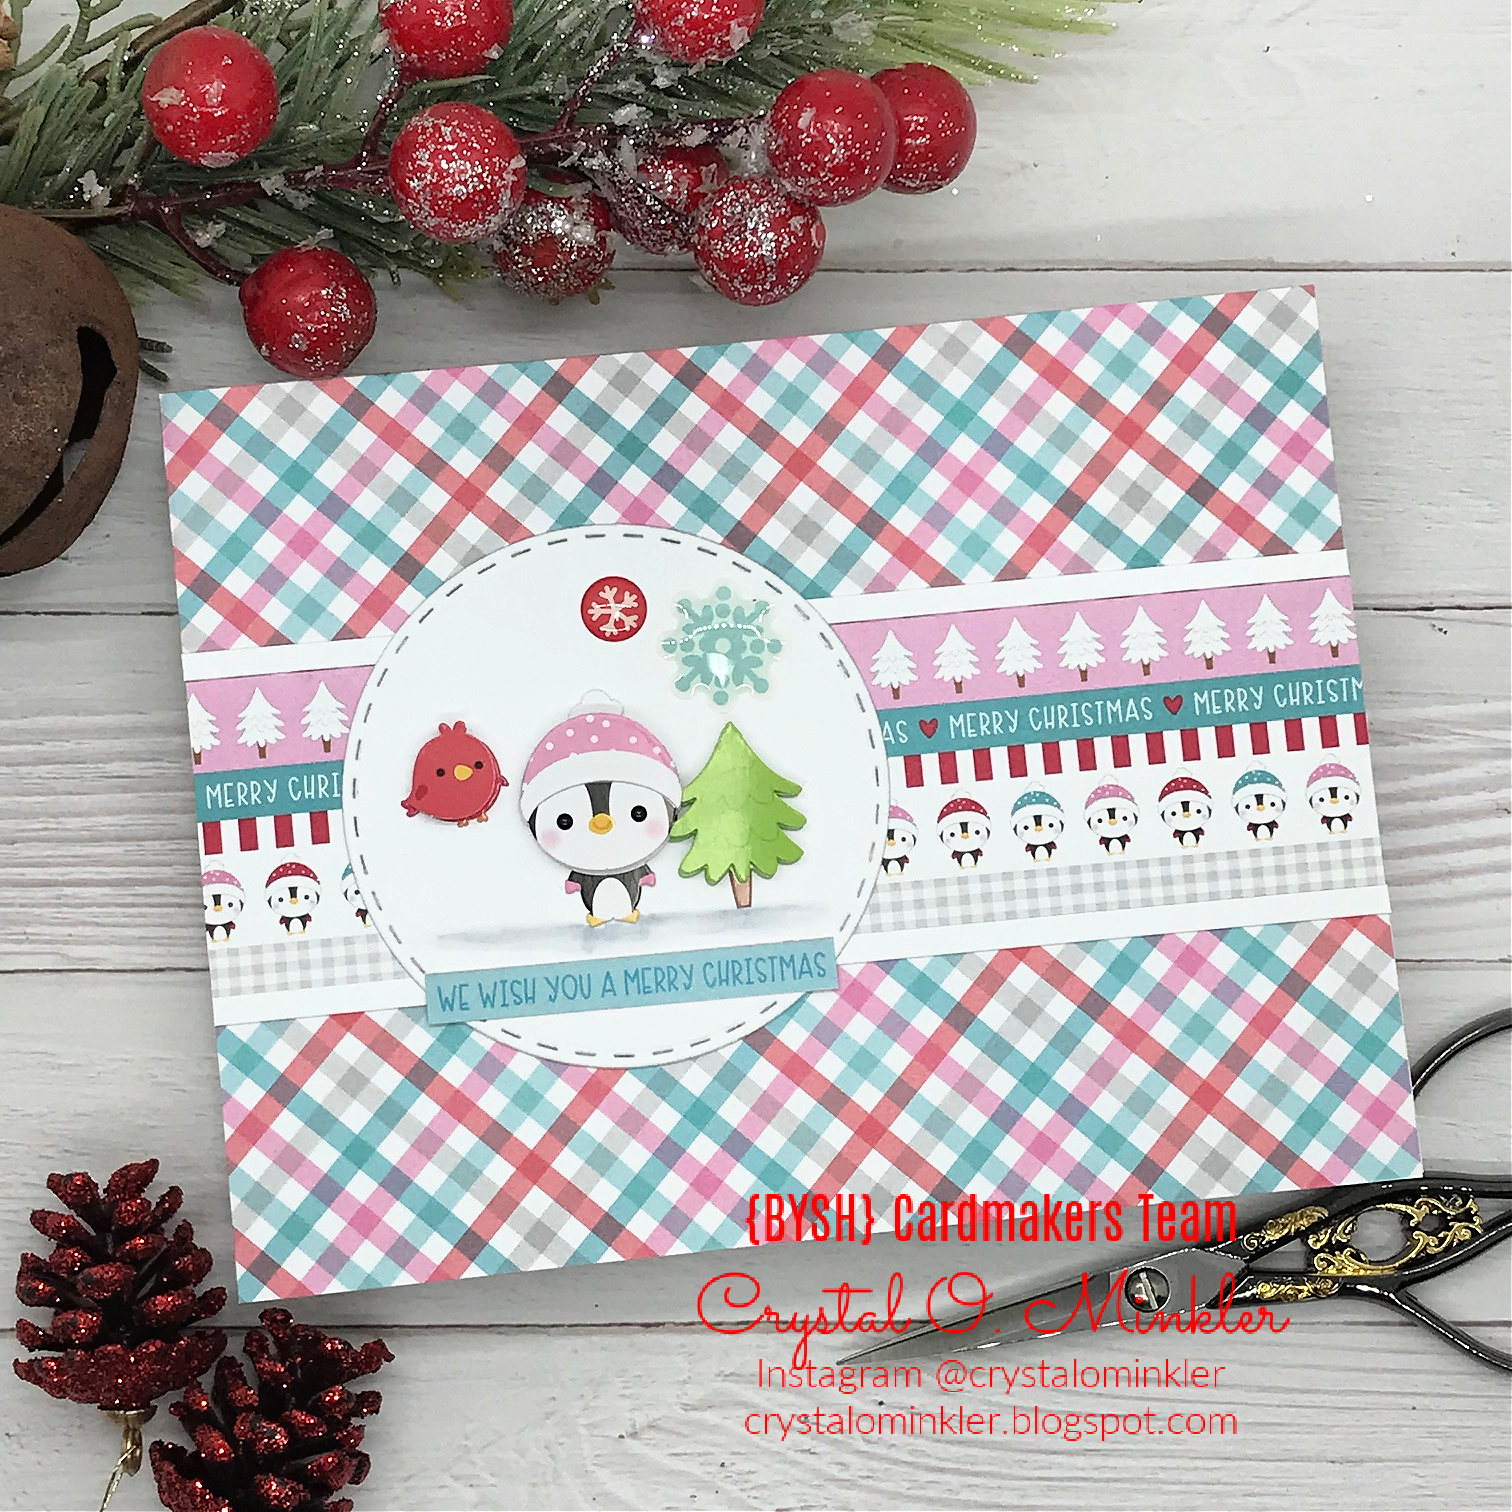
I used a scrap of paper from my first paper pad and the card front piece is from the new paper pad. I adhered them together and instead of matting the diagonal stripes paper I cut 1/8" strips of white card stock and adhered that along the edge. This is a really good trick for a faux mat without adding more bulk to the card. 


The sentiment is one of the cut apart sentiments from the paper pad. It's mat on a piece of white card stock. Such a cute and easy card... no stamping just cutting and gluing!


My second card using another scrap from my old paper pad and a card front from the new paper pad. I also added the white card stock strips - my faux mat.


The cute little scene here features a few different Doodle Pops - the penguin is from the Playful Penguins Doodle Pop, the tree is from the Special Delivery Doodle Pop, and the bird is from the Polar Pals Doodle Pop. I grounded the little scene using C00 and C2 Copic Markers.


The little snow stickers are from the Let it Snow Shape Sprinkles stickers pack. And the sentiment is another cut apart sentiment from the paper pad.


Here's a look at {BYSHC} Sketch 26 for the month of September!
I hope you'll join us and play along with the sketch!


Two more cards for my Holiday card stash!! Woohoo! I hope that my cards today have inspired you to pull out those Christmas goodies and make some cards! This year is flying by and the holidays will be here before we know it! If you're interested in seeing more inspiration for this sketch, head over to the {BYSH} Cardmakers blog... the design team is sharing some really cute cards this week! 


Thanks so much for stopping by!
See ya next time.

Inky Hugs,
Crystal


{Please note that comment moderation is on. Your lovely comment will appear shortly.}

Wednesday, September 7, 2022

Fall is in the Air ~ September Collab with Fresh and Renewed with Teresa ~ Fall Sunshine ~ Not 2 Shabby

 Hello there crafty friend!
I'm so excited! Today I'm starting a fun Collab with my sweet friend Teresa from Fresh and Renewed with Teresa. We will be sharing a Fall card or cards each Wednesday in September. 


I actually have two cards to share today using the beautiful Fall Sunshine paper pad and ephemera from Not 2 Shabby.


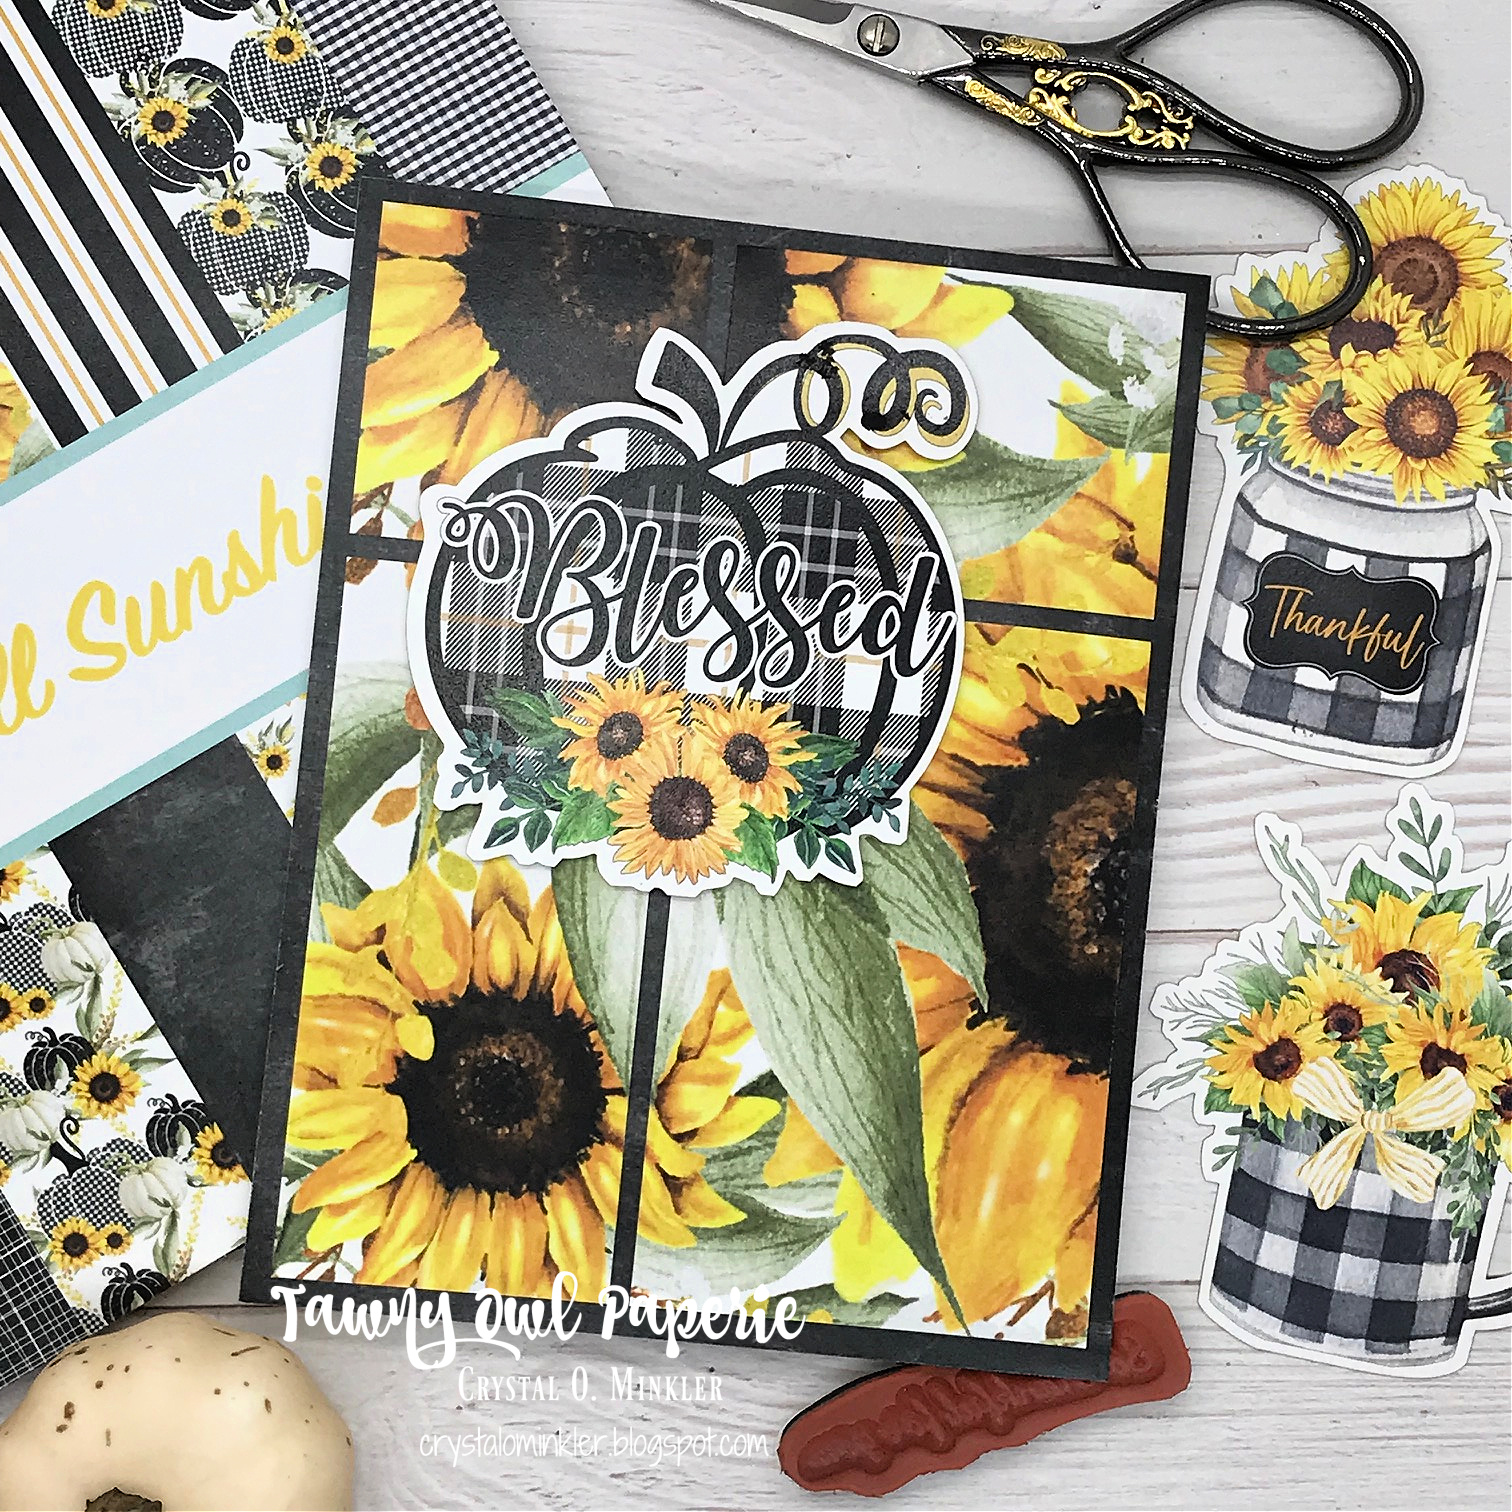
Here's a look at my first card! Aren't those sunflower papers just gorgeous?! I love them so much!


Each month I share a fun card sketch in my Tawny Owl Paperie Inky Inspiration Facebook group. My cards today use Sketch 3. 


I just love that sweet pumpkin, too! 


I changed up the background on this one by flipping two of the pattern papers so the opposite design would show. I think it gives the card nice contrast.


This ephemera piece didn't have a sentiment so I heat embossed a cute sentiment from the Acorn Greetings stamps from Unity. I stamped it with Sugar Cube pigment ink from Taylored Expressions on a scrap of black pattern paper and then melted the Alabaster White embossing powder that I had applied to the white ink. Trimmed it up and popped it up on the card along with the focal piece. Here's a link to my process video... Fall is in the Air | September Collab | Fall Sunshine from Not 2 Shabby


I sure hope you've enjoyed the cards I shared today. I hope you'll give my YouTube channel a visit and then stop by Teresa's YouTube channel, too! We're each having a giveaway this month for the Fall is in the Air series on our YouTube channels. I share a peek at my prize in my video {link above}. To be eligible you must comment on each video we share during the whole Fall is in the Air Series all month!


Thanks so much for stopping by!
See ya next time.

Inky Hugs,
Crystal


{Please note that comment moderation is on. Your comment will appear shortly.}

Saturday, September 3, 2022

~ Friends of Unity September 2022 Blog Hop ~

 Hello there crafty friend!
It's one of my favorite times of the month... time for the Friends of Unity Blog Hop!! Our cue this month is right up my alley and one of my favorite themes for cards. Any guesses?! Well, you can probably see the graphic below. LOL...  Before we get to the cue I want to wish my sweet friend, Dawn F. a very Happy Birthday! I hope that your day is filled with love, laughter and lots of yummy cake!! 
Now, let's get to the cue...


... Coffee, Tea & Cocoa!!! Yummy! I love all three but I tend to make coffee cards the most. I think my cards today could have any of the three yummy beverages in it.


My first card features a few stamps from the new  September 2022 Kit of the Month called Fa La La La La. I was very excited to see this month's new kit! The September kit is always one of my most favorites each year! Usually filled with seasonal favorites... and this kit did not disappoint! The trees and pumpkins are so beautiful and the new Angie girl... love love love!!!


I stamped the girl and the sentiment with Black Amalgam ink from Gina K. Design and colored the girl with my Copic Markers. I die cut the panel with the Loopy Rectangle dies from Gina Marie Designs. I had chosen the beautiful Autumn Dream {paper pad} but my die cut panel covered most of it up so I scored the corner of the panel and folded it over on itself letting some of the paper show. I found a pretty black button and laid it over the folded over corner. I punched a couple 1/8" holes where the button holes would go and then I threaded some {Ivory} May Arts Burlap String tying a pretty bow. The whole die cut panel is popped up with foam tape on the pattern paper and then adhered to a white A2 top fold card base.


Here's a list of the Copic Markers I used to color up this pretty girl:

Skin ~ E000, E00, E11, E04
Hair ~ E71, E74, E77, E79
Hat / Boots / Dress ~ YR0000, YR30, E81, R00, R11, R81, R85
Cup ~ C00, C2, BG10, BG23, BG72
Chair ~ BG10, BG23, BG72, E71, E74, E77, E79
Heart ~ R81, R85
Ground ~ E71, E74


I wanted to use one of the pumpkins from the kit and for a little extra fun I foiled it! I stamped the pumpkin with Deco Foil Transfer Gel and once dry I laid a piece of Pink Melon Deco Foil over top and ran it through my laminator. I fussy cut the pumpkin leaving a skinny white border around it and popped it up on the card.


My second card is a cute mini slimline card using some fun Fall papers and the beautiful Pumpkin Spice Please Itty Bitty stamp. It's been awhile since I've Copic colored on Kraft card stock... one of my favorite techniques! And it's also really lovely for Fall cards. 


I paired this pretty stamp with the Simple Vintage Autumn Splendor 6x8 paper pad from Simple Stories. It has such beautiful colors in these papers... perfect for this beautiful stamp! I trimmed the orange papers to 6-1/4 x 3-1/4" and the teal paper was die cut with the Scalloped Stitched Mini Slimline dies from Gina Marie Designs. I adhered those together and then adhered them to a 7 x 6-1/2" Kraft mini slimline card base scored at 3-1/2".


I stamped the sentiment and pumpkin image with Black Amalgam ink. I colored up the pumpkin image with some Copic Markers and then I die cut it with one of the dies from the Wonky Stitched Circle dies from Gina Marie Designs. I popped up the pumpkin image with foam tape and finished off the card with a few orange clear enamel dots from the Sunflower Clear with Color Enamel Dots from Gina Marie Designs. 


I love the muted look of Copic on Kraft! Here's a quick list of the Copic Markers I used:

Pumpkin ~ YR21, YR15, YR68, YR27, E53, E55, E57
Leaves ~ YG23, YG67, Y15, Y38, R14
Cup ~ BG10, BG23, BG72, BG75, W00, W2, W3
Ground ~ E53, E55


For my last card I wanted to make a CAS Halloween card and the A Real Witch stamp was perfect for this card. Ink smooshing is my go-to technique for a pretty CAS card and I went with just ink smooshing Villainous Potion and Black Soot Distress Oxide inks. I didn't want to waste the extra ink on my glass table so I actually ink smooshed two card fronts.


I hadn't intended to use both of them for this card, but when I die cut the one layer using the largest stitched rectangle die from the Scallops & Rectangles {nesting dies} and laid it on my white A2 top fold card base there was just too much white space. LOL... I know that's crazy when talking about a CAS card but I happened to put the die cut panel on top of the other ink smooshed card front just to see how it looked... wow, I just loved it!


I fussy cut the witch on the black line and colored the edge with a Memento Tuxedo black marker - a trick I like to do to clean up that fussy cut edge and make it all nice and tidy. I stamped the witch on the ink smooshed background as a guide for where to adhere the fussy cut witch. My last tip for this technique is to add the glue to 'guide' image rather than the fussy cut one. Sometimes the fussy cut images are small to handle so it's easier {and less messy} to handle it without all the messy glue. 
Here's a quick list of the Copic Markers I used to color up this brew-tiful witch:

Skin ~ E000, E00, E11
Hair ~ C00, C3, C5
Hat ~ N0, N3, N5, YG21, YG11, YG23, V000, V12, V15, V17
Mug ~ V000, V12, V15, V17
Dress ~ YG21, YG11, YG23

Now before we get to the hopping, I chose a lucky winner from the comments on last month's hop to win a fun prize package and that lucky winner is...


... Vannessa Osbourn!! Congratulations, Vannessa!!
Please email me at crystalominkler@gmail.com to claim your prize. 
Prize must be claimed within two weeks. 

Well, that's it for me this time! Please hop along and enjoy some more inspiration from the Friends of Unity! I'm so excited to see all the creations from our friends this month! I will be doing another fun giveaway this month!! Be sure to hop along and comment for a chance to win! {When you comment please leave your name just in case it posts as anonymous.} I'll announce the winner next month! 


Let's get to the hopping...


Crystal <--- you're here


Thanks so very much for supporting our little hop!
We appreciate you!!

See ya next time.

Inky Hugs,
Crystal


{Please note that comment moderation is ON. Your comment will appear shortly.}


Thursday, September 1, 2022

{BYSHC} Sketch Challenge 26 ~ Perfect Girl ~ Unity Stamp Co.

 Hello there crafty friend!
It's time for a new sketch challenge over at Build Your Stash Holiday Cardmakers and I have a warm and cozy Christmas card to share using a beautiful Angie Girl from Unity Stamp Co. called Perfect Girl. I am a huge fan of Angie Blom's girls... this coffee girl is a fave! I started coloring her up a couple months ago at the Missouri/Kansas Unity Get-Together and just recently finished her up. I thought she'd be perfect for this month's sketch.


I paired up this beauty with some really pretty papers from Authentique called Snowfall that I have had in my stash for a long time but I just haven't been able to coordinate well with a stamp. I think they work really well with Perfect Girl and thankfully the colors work well, too. 


I thought I had written down the list of Copic markers I used to color up this image but I only have a few written down so I'll list those and then I'll list what I think I used for the other:

Skin ~ E000, E00, E11, E04
Hair ~ E70, E71, E77, E79
Hat ~ R20, R14, R27, R37
Mug/Saucer ~ BG000, BG10, BG23
Coffee ~ E21, E23, E25, C00

Not sure about these...
Sweater ~ BG70, BG72, BG75, R20, R14, R27
Table ~ E51, E55, E57, E59


I adhered my papers together and wrapped them with {Natural} May Arts Burlap string. I strung a pretty snowflake charm from Tim Holtz Idea-ology Adornments - Snowflakes on the string. The sentiment is from the cute Warm & Cozy Itty Bitty stamp. I added some foam tape to the bottom of the sentiment that was stamped with Sugar Cube Pigment ink from Taylored Expressions on Dark Chocolate card stock from Papertrey Ink. I used a glue dot to adhere the snowflake just beside the sentiment. I adhered the card front to a white A2 top fold card base.


Here's a look at {BYSHC} Sketch 26 for the month of September!
I hope you'll join us and play along with the sketch! If you're interested in seeing a bit more inspiration for this sketch, check out the amazing inspiration from the design team over on the  {BYSH} Cardmakers blog! I'll be back next week with my weekly Christmas card using this fun new sketch!


Thanks so much for stopping by!
See ya next time.

Inky hugs,
Crystal


{Please note that comment moderation is ON. Your lovely comment will appear shortly.}

Wednesday, August 31, 2022

CAS Mixed Media Cards ~ August 2022 WK Grow Untamed ~ Unity Stamp Co.

 Hello there crafty friend!
I got inky with the latest Whit Kit for August 2022 from Unity Stamp Co. and boy was it fun! Have you played with the Distress Archival inks before? I haven't really. I've just stamped with them. But I wanted to try something different so I watched Tim Holtz's video when he introduced the latest Distress Archival inks and it inspired me to make a couple of fun cards. I probably would have gotten a different result on a glossy paper but I used the paper that came in this months kit just to see what it would do and I do love the CAS mixed media design I came up with.


I masked the card fronts with some iCraft Pixie Tape and stamped a few of the Grow Untamed stamps in the space with all four of the Distress Archival inks included in this months kit. And then I lightly ink blended Vintage Photo Distress ink over the stamped area.


On the Kraft card stock it's a little hard to see the flowers in the background. I did a bit of water splatters and then blended some more ink along the edge of my masks. I did have a bit of a heavier hand with my Vintage Photo Distress Ink blending for this card. 


I do love the rich brown ink on this Kraft card stock! The water splatters are very striking in person too. Definitely a fun technique to try again!


On the white card stock you can see more of the stamps in the background. They didn't quite resist like they would on the glossy paper so I'm eager to give that technique a try but I do love how these turned out.


I stamped the one wildflower for my focal piece with the Evergreen Bough Distress Archival ink and die cut it with a Wonky Stitched Oval die from Gina Marie Designs. I kinda wish I'd stamped it on vellum or maybe used a smaller die and not cover up as much of the background, but it is what it is now. 


I popped up the ovals with foam tape. Stamped the sentiments with the same ink on the scrap card stock. Trimmed them up and distressed the edges a bit with the Vintage Photo Distress ink. 


What do you think? I definitely like the white one better... but I think this technique is fun and I encourage you to check out Tim's video. It's a long one... lol... but the part about the Distress Archival inks is very interesting. And I'm excited to try this technique again with a different paper.


Here's a look at the August 2022 Whit Kit... I may have another card to share later this afternoon. I didn't quite get it finished and then life got in the way. But it's a card showcasing some of the gorgeous papers in this kit. Be sure to check out this fab kit over at Unity! I love getting this wonderful kit each month... the stamps and papers are always beautiful and I love trying out the new products that are included with it like the Archival inks this time. Anywho, have a wonderful day!


Thanks so much for stopping by!
See ya next time.

Inky Hugs,
Crystal


{Please note that comment moderation is on. Your lovely comment will appear shortly.}

Tuesday, August 30, 2022

Tawny Owl Paperie Inky Inspiration Sketch 4 ~ Ever So Thankful ~ Unity Stamp Co.

 Hello there crafty friend!
It's the last Tuesday of August and that means I have a new Tawny Owl Paper Inky Inspiration Sketch to share... we're on Sketch 4 now! I hope that you've found some inspiration from the sketches I've been sharing. I know that they have come in handy for me! 


The beautiful Ever So Thankful stamp from Unity was just delivered to my house and I've been itching to ink it up and color so I thought it would be fun to play with it for Sketch 4. I paired it up with the Fall Y'all {paper pack} from Unity.


Here's a quick list of the Copic markers I used to color up this beautiful image:

Acorn ~ E51, E55, E57, E59
Leaf ~ YG11, YG03, YG63, Y11, Y15, YR15, YR21, YR24, YR27, E55, E57


And a look at TOPII Sketch 4... I love the possibilities with that big white background! It would be great with ink smooshing or blending... not just pattern papers like I've used today.


I adhered all my layers together and then adhered them to an A2 card base of Kraft card stock from Papertrey Ink. I also used Kraft card stock to heat emboss the sentiment. I stamped it with Sugar Cube White Pigment ink from Taylored Expressions and then applied Alabaster White Embossing Powder from Brutus Monroe. I melted the EP with a Precision Wagner Heat Tool. I popped up the focal piece with some foam tape.


My card today is also a sneak peek of a fun collaboration that I'm doing with my sweet friend, Teresa. For more information check out my video... Ever So Thankful Card & A Sneak Peek!!


Did you check out my video?! What do you think about the sneak peek? I sure hope you like it and will follow along with us for the Fall is in the Air Collab! And if you're liking the fun new sketch I shared, I sure hope you'll join us in the Tawny Owl Paperie Inky Inspiration Facebook group. I would love to see what you create with this sketch!


Thanks so much for stopping by!
See ya next time.

Inky Hugs,
Crystal


{Please note that comment moderation is on. Your lovely comment will appear shortly.}

Monday, August 29, 2022

Halloween Memory Dex Cards ~ New Halloween Stamps from Unity Stamp Co.

 Hello there crafty friend!
I'm a bit behind on projects... I'm afraid my Membership Monday posts have been hit and miss this month but I did get to play with some of the awesome new Halloween stamps that Unity just released!!! I love making Halloween cards... and Memory Dex cards are so fun to make! I couldn't resist making a bunch! I used the Smell My Feet Background stamp, Winnie the Pooh: Trick or Treat, and 31!!


I used the Ink Swipe Technique for the oxide backgrounds with Carved Pumpkin, Wilted Violet, and Villainous Potion Distress Oxide inks. Basically this technique is just swiping the ink pad directly on the card stock. It's a fun technique that I was reminded of during the Unity get-together I went to back in June. I stamped the inked swiped backgrounds with the Smell My Feet background using Jet Black Archival ink.


I die cut the backgrounds along with some black card stock with a memory dex die in my stash {sadly, it's no longer available}. I also used some Spider Web Doilies from Stampin' Up! that I've had in my stash forever. This cute haunted house is in the 31 stamp kit along with the '31'. The sentiment on this card is from the Winnie the Pooh: Trick or Treat stamps. I used the following Copic Markers to color up the Haunted House:

House ~ N0, N3, N5
Windows ~ Y11, YG11
Door / Window Frames ~ E55, E59
Pot ~ Y06, YR15, YR68
Tombstones ~ YG11, N0, N3, N5


I just love this Mummy Winnie the Pooh stamp... so darn cute! I used the other half of the Spider Web doily for this card and added some {Black} May Arts Burlap String underneath Pooh bear. I used the following Copic Markers to color up Pooh bear:

Pooh ~ Y11, Y15
Mummy Costume ~ YG11, C00, C3
Honey Pot ~ Y11, Y06, Y15, Y38, R20, R14, R27


For the Piglet card I used a Spider Web Embossing Folder from Cuddlebug. I swiped it with a Sugar Cube White Pigment ink pad from Taylored Expressions. The green enamel dots are from my stash. I used the following Copic Markers to color up Piglet:

Piglet ~ RV10, RV21
Ghost Costume ~ YG11, C00, C3
Pumpin ~ YR21, YR15, YR68, Colorless Blender


For the last Memory Dex Card, I used the same Spider Web Embossing Folder for the background and added a few of the same green enamel dots. Rather than adding another layer to the sentiment I used a marker and colored it... a fun alternative. I colored up the cute kitty and cupcake with the following Copic Markers:

Black Cat ~ RV10, R20, N0, N3, N5
Cupcake ~ E30, E31
Wrapper ~ YG11, YG23, YR15, YR68, Y06
Frosting ~ V000, V12, V15, V17
Bat ~ N0, N3, N5
Pumpkin ~ YR21, YR15, YR68, E55
Candy Corn ~ Y11, Y06, Y15, YR15, YR68, C00, C3


All of this fun took me just over 2 hours of recording (not including all the prep - stamping, die cutting, the ink swiping, etc). I was able to edit my video down to about 23 minutes. Of course, the editing took several hours. I hope that you'll check it out! If you enjoy it or the cards, I'd love to hear what you liked. You can check out the video here... Halloween Memory Dex Cards | New Halloween Stamps from Unity Stamp Co.


Be sure to stop by Unity and check out all the amazing new releases!! So many awesome Halloween goodies and another cute Winnie the Pooh set too!


Thanks so much for stopping by!
See ya next time.

Inky Hugs,
Crystal


{Please note that comment moderation is on. Your lovely comment will appear shortly.}