Pages

Wednesday, August 30, 2023

Membership Wednesday ~ August 2023 Kit of the Month Phases ~ Unity Stamp Co.

 Hello there crafty friend!
I'm back for another Membership Wednesday and today I'm sharing a card using the beautiful pumpkin stamp in the August 2023 Kit of the Month called Phases from Unity Stamp Co. I love coloring pumpkins! It's one of the first things I worked hard to learn how to color when I started using Copic markers.


I paired up the pretty pumpkin with the gorgeous Autumn Dreams {paper pack}. These are my go-to papers for Fall cards! So gorgeous! And the flowers in the papers work so well with the flowers on the pumpkin.


I stamped the pretty pumpkin and sentiment on white card stock with Black Amalgam ink and colored the pumpkin and flowers up with the following Copic markers:

Pumpkin ~ Y11, YR21, YR15
Flowers ~ R000, R81, R83, R85, RV91, RV93, RV99, Y11, YR15
Stem ~ E51, E53, E55, E57
Leaves ~ YG93, YG95, YG97
Ground ~ N0, N1, N3


I die cut the main panel using a die from the Deckle & Stitches Nesting Dies and trimmed the sentiment. I adhered them together and then added a bunch of foam tape to the back of both. I popped up the panel and sentiment on to the pattern paper layers I had adhered to a white A2 top fold card base that I turned on it's side.


Here's a look at the whole Kit of the Month for August!! So perfectly Fall! Can you believe that you get this full sheet of rubber for only $44.99. That includes shipping! You also get a $6.95 discount on every order from Unity over $45. And you can purchase any past kits for only $34 plus shipping. Such a great value!


I'll be back for another Membership Wednesday blog post in two weeks. Next week, I'll be sharing inspiration for the amazing new September 2023 Kit of the Month on my Instagram. The new September KOM releases on Friday!! And it's AMAZING!!


Thanks so much for stopping by!
See ya next time.

Inky Hugs,
Crystal


{Please note that comment moderation is on. Your lovely comment will appear once approved.}

Monday, August 28, 2023

Inky Paws Challenge #205 ~ Use Stripes Challenge Reminder

 Hello there crafty friend!
 There's still time to play along with the Inky Paws Challenge #205 - Use Stripes Challenge!! You have until this coming Friday, September 1st to get your entries in for this fun challenge and a chance to win a $20 store credit to Newton's Nook Designs!


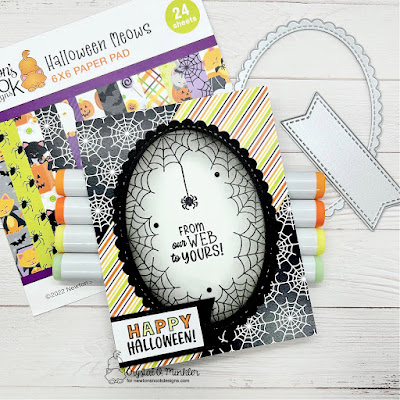
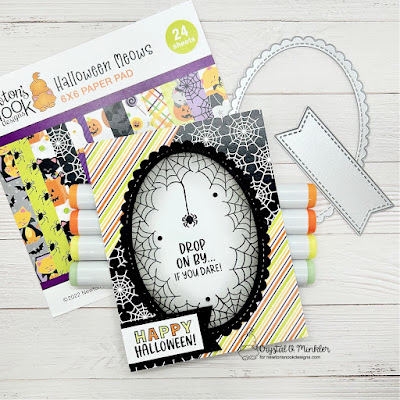
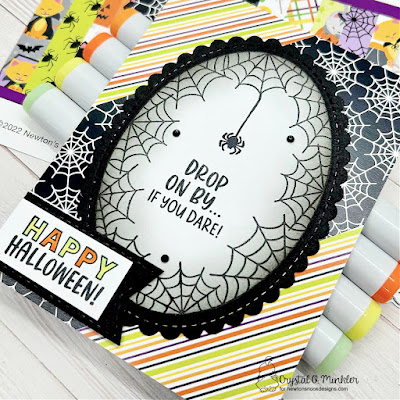
I am seriously loving this challenge!! I love to use stripe papers in my cards so I was excited to find some pretty striped papers in the Halloween Meows 6x6 Paper Pad.


I've also been wanting to play with the fun Spiderweb Oval Stamp Set. This stamp set was a must have for my Halloween collection! 


I stamped it with Memento Tuxedo Black ink and mat it with a black scalloped and stitched oval I die cut from True Black card stock from Papertrey Ink using a large die from the Oval Frames Die Set


As I mentioned above, I used the wonderful Halloween Meows 6x6 Paper Pad. I cut my papers to 4-1/4 x 5-1/2" and then I cut the triangles off of the top and bottom. Which gave me enough paper pieces to make two cards!


My second card shows how I used the other pieces of pattern papers. This card is actually the one that inspired my design.


I wanted to use stripe papers for the strips in the TOP Inky Inspiration Sketch 14. This has been such a fun sketch. August has been such a busy month. I wish I had more time to play with this one but the challenge ends today. 


The fun sentiment, also from the Spiderweb Oval Stamp Set, was stamped with Memento Tuxedo Black ink and I colored up the Happy letters with the following Copic markers: YG21, YG11, YR15, YR16. I finished off both cards by adding a few black rhinestones from the Rainbow Rhinestones from Gina Marie Designs.


Now it's your turn to get your paws inky with your Newton's Nook Designs products and create a project using the stripes theme. Be sure to link up to the Inky Paws Challenge! Can't wait to see your projects!


Thanks so much for stopping by!
See ya next time.

Inky Hugs,
Crystal


{Please note that comment moderation is on. Your lovely comment will appear once approved.}

Friday, August 25, 2023

{BYSHC} Sketch Challenge 36 ~ Christmas Magic ~ Echo Park Paper Co.

 Hello there crafty friend!
I'm sharing one last Christmas card for the {BYSHC} Sketch Challenge 36 for the Build Your Stash Holiday Cardmakers Facebook group. This month's sketch is really great for the paper packs that have cut-aparts in them. I made four pretty quick cards using the Echo Park Paper 6x6 Paper Pad called Christmas Magic.


I cut down two pattern papers to 4-1/4 x 5-1/2" - for my first two cards that's the plaid and the green pattern papers. I cut them both again at the two inch mark and adhered them to two white A2 top fold card bases.


I then cut a couple little strips of pattern paper to adhere across the card base and trimmed off the excess. I adhered the cut apart directly on the card for the first card with the gifts. For the reindeer card I added foam tape to the back of this cut apart and popped it up on the card.


Just like the first two cards, I used two pattern papers for my last two cards. I cut them down to 4-1/4 x 5-1/2" and then cut off 2" from both. I then adhered them to card bases.


And this time I adhered Santa directly to the card and the house cut-apart was popped up using a bunch of foam tape.


Four really quick cards!! I'll definitely be using this sketch again with the cut-aparts in my paper packs. Loving it!


Here's a look at {BYSHC} Sketch 36 for the month of August!
There's still a few days to play along with the sketch! The challenge ends on August 31st. I hope you'll join in the fun and start building your stash of holiday cards. If you're interested in seeing a bit more inspiration for this sketch, check out the amazing inspiration from the design team over on the {BYSH} Cardmakers blog!


Thanks so much for stopping by!
See ya next time.

Inky hugs,
Crystal


{Please note that comment moderation is ON. Your lovely comment will appear shortly.}

Thursday, August 24, 2023

Colorful Balloon Card ~ Balloon Layering Stencils ~ Unity Stamp Co.

 Hello there crafty friend!
Today I have one more card featuring the new Balloon Layering Stencil and Cheers & Confetti stamps from Unity! So many possibilities with this fun new stencil!


I've been on a bit of a CAS card kick {Clean & Simple Card, for those not familiar}. They are quick and easy and I just LOVE all the white space. I partially stenciled some of the balloons using both of the balloon stencils in the stencil set... just focusing on the top portion of the card.


I've been trying to mix up my color choices. I seem to always grab the same colors so I challenged myself to grab a few colors I wouldn't normally. I already had Kitsch Flamingo on my desk from my No Layer Cards I shared the other day. I also grabbed Mustard Seed, Cracked Pistachio, and Abandoned Coral Distress Oxide inks.


I stamped the birthday sentiment using Black Amalgam ink. I die cut the panel using the Deckle & Stitches Nesting Dies... these dies are quickly becoming my favorite! I adhered the panel to a white A2 top fold card base. 

You can check out my short process video here... Colorful Balloons Card | Balloon Layering Stencil | Unity Stamp Co.


  Unity Stamp Co. has so many wonderful new releases but I think the new Bevy of Balloons Bundle is amazing! I haven't even played with the awesome new Bevy of Balloons Background stamp. I hope to this week if I have time. Stop by Unity to check out all the amazing new releases for the month of August! You won't regret it!

Thanks so much for stopping by!
See ya next time.

Inky hugs,
Crystal


{Please note that comment moderation is on. Your lovely comment will appear once approved.}

Wednesday, August 23, 2023

Membership Wednesday ~ August 2023 Whit Kit Vintage Blooms & Botany ~ Unity Stamp Co.

 Hello there crafty friend!
I had lots of fun playing with the August 2023 Whit Kit from Unity Stamp Co. I made three cards featuring this fabulous kit. Three VERY different cards.


First up is a card featuring a beautiful pattern paper from the Vintage Blooms & Botany {paper pack}. This piece of pattern paper is my absolute fave from the pack! I love that beautiful yellow flower. I cut the pattern paper to 4 x 5-1/4" and then cut away a couple of strips. I adhered the pattern paper to an A2 top fold card base of Kraft Card Stock from Papertrey Ink.


Stamped the sentiment with Sugar Cube Pigment Ink from Taylored Expressions. I added some Alabaster White Embossing Powder to the wet ink and then melted it with my Wagner Precision Heat Tool. Next, I die cut it with a stitched banner die from the Banner Nesting Dies {sadly, these may be retired}. I popped it up on the card with Scotch 3M Double Sided 1" Foam Tape. Card one done!


My second card... are you surprised I used that beautiful yellow flower again?! Hahaha! This card had a mind of it's own. Not at all what I was planning for this one, but I sure do love how it turned out. I cut the pattern paper in strips and added it to a piece of Kraft Card Stock. Next, I die cut it with a die from the Make a Tag Die Set. I stamped and heat embossed the sentiment like I did for the previous card. I laid it on the tag piece and then secured the tag die to the sentiment with washi tape. I ran it through my Big Shot and adhered it to the tag.


I used the Woven 3D Embossing Folder from Tim Holtz for my bottom layer. I also die cut it with the largest die from the Deckle & Stitches Nesting Dies from Unity. I blended or distressed the edges of the tag, card base, and the die cut woven layer using Vintage Photo Distress Ink. I adhered the woven layer to a Kraft A2 top fold card base. And then I popped up the tag using Scotch 3M Double Sided 1" Foam Tape. Love how this turned out!


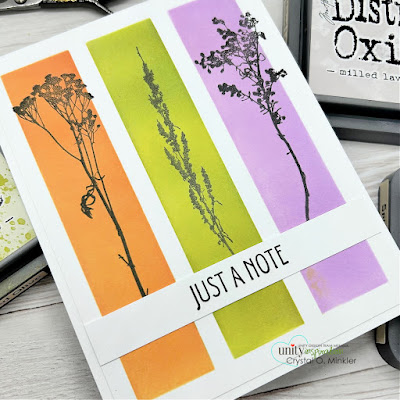
And my last card... I just HAD to play with the cool stencil in this month's kit. I also wanted to ink up more of the stamps. I secured the stencil over a card front of Stampers Select Card Stock from Papertrey Ink using iCraft Purple Tape. I masked the two left rectangles and blended Milled Lavender Distress Oxide Ink. I think there's some other purples mixed in there though. I need to clean my blending brushes! Anywho, I moved the mask to cover the right and left side rectangles. I then blended Crushed Olive Distress Oxide Ink. I moved the mask to cover the green rectangle and blended Spiced Marmalade Distress Oxide Ink. Still using colors I normally wouldn't grab. And I love how it turned out!


I stamped three of the Vintage Blooms & Botany stamps over the rectangles using Black Amalgam Ink from Gina K. Designs. I also stamped the sentiment on a long piece of white card stock. I trimmed up the panel cutting 1/8" off of each side. I then adhered the sentiment to the panel and trimmed off the excess. All that was left was to adhere it to the white A2 top fold card base.


Here's a look at the wonderful Whit Kit for August!! Such a lovely card kit! This wonderful card kit is available for only $42.99. That includes shipping! Members get a $6.95 discount on every order from Unity over $45. Members are also able to purchase past Whit Kit stamp sets for just $14 and past Whit Kit paper packs for $2 off!! So awesome!!! 

That's it for me today! I'll be back next week with inspiration for the Kit of the Month membership... I hope you'll stop by again and check it out. Have an ink-tastic day!

Thanks so much for stopping by!
See ya next time.

Inky Hugs,
Crystal


{Please note that comment moderation is on. Your lovely comment will appear once approved.}

Tuesday, August 22, 2023

No Layer Cards with Stencils ~ Balloon Layering Stencil ~ Unity Stamp Co.

 Hello there crafty friend!
Today I'm sharing two fun and quick CAS cards with NO layers using the new Balloon Layering Stencil along with the Star Confetti Stencil and the Heart Confetti Stencil... all from Unity! Unfortunately, the Star Confetti and Heart Confetti Stencils are out of stock but the Falling Confetti Layering Stencil would be awesome with this technique!


As I mentioned above these CAS cards have NO layers. I blended over the stencils directly onto the front of the white A2 card bases. Easy peasy AND quick!


I blended Kitsch Flamingo Distress Oxide ink over the largest balloon in the Balloon Layering Stencil. And then I placed the Heart Confetti Stencil over the balloon stencil and blended Picked Raspberry Distress Oxide ink. 


I finished off the card by stamping the sentiment from the awesome new Cheers & Confetti stamps and adding a string for the balloon with a black Copic Multiliner Brush Small Marker.


For my second card, I blended Salvaged Patina Distress Oxide ink over the largest balloon in the Balloon Layering Stencil. I then blended Peacock Feathers over the Star Confetti Stencil.


And finished off this card in the same way by stamping a sentiment from the Cheers & Confetti stamps and drawing a string using a Copic Multiliner Brush Small Marker.


You can check out my short process video here... No Layer Cards with 2 Stencils | Balloon Layering Stencil | Unity Stamp Co.


 Stop by Unity Stamp Co. and check out all the amazing new releases for the month of August!

Thanks so much for stopping by!
See ya next time.

Inky hugs,
Crystal


{Please note that comment moderation is on. Your lovely comment will appear once approved.}

Monday, August 21, 2023

Inky Paws Challenge #205 ~ Use Stripes Challenge

Hello there crafty friend!
It's time for a new Inky Paws Challenge... a super fun Use Stripes Challenge! 
I sure hope that you'll join in the fun and play along with us using your Newton's Nook Designs products! You have until Friday, September 1st to get your entries in for the #205 Use Stripes Challenge and a chance to win a $20 store credit to Newton's Nook Designs!


Inky Paws Challenge #205 - Use Stripes Challenge
Such a fun challenge this time!! I'll admit I went a little rogue and my use of stripes in my card is a bit outside the box... definitely a loose interpretation of the challenge cue.


My stripes in my card are the beautiful birch trees all lined up in a row... like stripes. I love how this turned out! Just how I envisioned. The birch tree dies are from the Forest Scene Builder Die Set. I die cut three of each tree but only ended up using five trees for my background. The snowy hill was die cut using the stitched hill die from the Land Border Die Set


I created the background by ink smooshing Stormy Sky, Chipped Sapphire and Black Soot Distress Oxide inks on a piece of Stampers Select White Card Stock from Papertrey Ink that was cut down to a 4-1/4 x 5-1/2" card front. I dried the background and added some white acrylic paint splatters. I die cut the background using the large postage stamp die from the Framework Die Set. I then blended some Black Soot Distress Oxide ink around the edges. Adhered the background to a white A2 card base and adhered the trees and the snowy hill to the background.


I stamped the sentiment on the snowy hill using Memento Tuxedo Black ink. I also stamped the sweet snowman and pup from the Holiday Heights Stamp Set  using Memento Tuxedo Black ink. I colored up the snowman and pup with some Copic Markers.  Here's a quick list of the Copic Markers I used:

Snowman ~ C00, C1, C3
Snowman's Nose ~ YR21, YR15, YR27
Snowman's Buttons ~ N0, N3, N5
Snowman's Hat ~ R20, R14, R27, N0, N1, N3, N5
Snowman's Scarf ~ YG11, G14, R20, R14, R27
Dog ~ E51, E55, E57
Dog's Scarf ~ B000, B91, B93, B97, B99
Birch Trees ~ N3


Once I was done coloring, I die cut the snowman and pup using the coordinating dies from the Holiday Heights Die Set. To finish off the card, I popped up the snowman and pup with lots of foam tape.


Now it's your turn to get your paws inky with your Newton's Nook Designs products and create a project Using Stripes as the theme. Be sure to link up to the Inky Paws Challenge! Can't wait to see your projects!


Thanks so much for stopping by!
See ya next time.

Inky Hugs,
Crystal


{Please note that comment moderation is on. Your lovely comment will appear once approved.}
Saturday, August 19, 2023

Torn Pattern Paper ~ Eternal Midnight Weave ~ Unity Stamp Co.

 Hello there crafty friend!
Sharing a super fun and quick Halloween card today using the new Eternal Midnight Weave {paper pack} along with the recently released Ghostly Bat Ensemble, both from Unity Stamp Co. Absolutely no coloring on this card! It was so quick!


The new Eternal Midnight Weave {paper pack} is filled with wonderful Halloween papers. I love the spiderwebs in this one. I made a quick background for this card by simply trimming my pattern papers to 4-1/4 x 6" and tearing towards me holding the right side of the paper. I got 6 paper strips but I've only used 4 of them for this card so the black card stock in the background will show through. 


I really wanted to make a card with the new ghost, too. I haven't played with him until now and man... he is TOO cute! I stamped him with Black Amalgam ink and fussy cut him with my Cutter Bee scissors.


I also stamped the sentiment with Black Amalgam ink and die cut it with a die from the Scallops & Squares Nesting Dies. I added foam tape to the back of the ghost and the sentiment and then I popped them both up on the card. SO easy peasy!!

You can check out my process video here... Torn Pattern Paper | Eternal Midnight Weave | Unity Stamp Co. 


 Stop by Unity Stamp Co. and check out all the amazing new releases for the month of August!

Thanks so much for stopping by!
See ya next time.

Inky hugs,
Crystal


{Please note that comment moderation is on. Your lovely comment will appear once approved.}

Friday, August 18, 2023

{BYSHC} Sketch Challenge 36 ~ Christmas Peace ~ RAM Stamps

  Hello there crafty friend!
I'm sharing another Christmas card for the {BYSHC} Sketch Challenge 36 for the Build Your Stash Holiday Cardmakers Facebook group. This time I played with a fun digi stamp from RAM Stamps called Christmas Peace Digital Stamp. Also available in the Christmas Sentiments Digital Stamp Set along with three other adorable digital stamps.


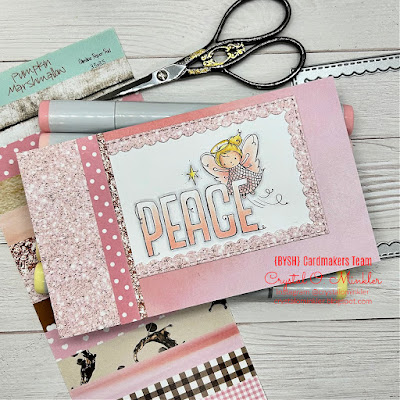
I paired up the sweet Christmas Peace Digital Stamp with the Pumpkin Marshmallow Slimline Paper Pad from Not 2 Shabby. I just love pink for Christmas! I remembered there were some really pretty pink papers in this paper pad which also gave me the idea to go with a mini slimline design using this month's sketch.


The digi stamp was inserted into a Microsoft Word Document where I adjusted the size of the image to make it small enough to work for this sketch. I printed it off and colored it up with my Copic markers. Here's a quick list of the Copic markers I used to color up the digi stamp:

Skin ~ E000, E00, E11
Hair ~ Y11, Y21, Y26
Wings / Dress ~ R000, R11, R21
Star ~ Y11, Y15
PEACE ~ R00, R11, R21
Outline ~ C00, C1


I die cut my pattern papers and adhered them all on the mini slimline card front of pink pattern paper. I die cut the pink glitter pattern paper with the scalloped frame die in the Framework Die Set from Newton's Nook Designs. Adhered it over the colored panel and then trimmed away the excess paper from the edges. I then trimmed off the left side because it just didn't look right with the scallops on that side. 


Here's another look at the {BYSHC} Sketch 36 for this month's challenge. It sure was fun to alter the sketch to work with a mini slimline card design. I sure hope you'll join us and play along with the sketch challenge... there's still lots of time to play!


Thanks so much for stopping by!
See ya next time.

Inky hugs,
Crystal


{Please note that comment moderation is on. Your lovely comment will appear once approved.}
Monday, August 14, 2023

Inky Paws Challenge #204 ~ Sketch Challenge Reminder

 Hello there crafty friend!
 There's still time to play along with the Inky Paws Challenge #204!! You have until this coming Friday, August 18th to get your entries in for this fun sketch challenge and a chance to win a $20 store credit to Newton's Nook Designs!


Today I'm sharing a fun Halloween card using the sketch for the current challenge. I love making Halloween cards! Do you like to make them? 


I have had the Newton's Perfect Pumpkin Stamp Set in my stash for a looonnng time! I made a cute shaker card 6 years ago with it. I've had it that long! I stamped the sweet kitty and pumpkins with Memento Tuxedo Black ink and colored them up with my Copic markers. I fussy cut the pumpkins and Newton on the black line. I cleaned up the edges and made them look nice by coloring them with a Memento Tuxedo Black marker using the side of the marker.

Here's a quick list of the Copic Markers I used:

Kitty ~ C00, C1, C3, R00, R20
Hat ~ N0, N1, N3, N5, YG11, G14
Pumpkins ~ YR21, YR15, YR68, E51, E55, E57


I paired up these cute stamps with the super sweet Halloween Meows 6x6 Paper Pad. The stripes in the green paper draw the eye across the card. They also work with the strips in the sketch. I die cut the jack-o-lantern paper using the large scalloped rectangle die from the Frames & Flags Die Set. Adhered it to a True Black card front measuring 5-1/2 x 4-1/4" that I also adhered to a white A2 top fold card base.


I used the smaller circle die from the Circle Frames Die Set... I didn't want to overcrowd the kitty. I just die cut some black card stock and adhered the pumpkins directly to them and then popped them up on the card. I omitted the middle circle and put the kitty in it's place. I also popped up the kitty using foam tape. The sentiment was super easy... just stamped on white card stock with Memento Tuxedo black ink and I trimmed it with my guillotine trimmer. I popped it up on the card, as well. It also kinda grounds the kitty and pumpkin.


Now it's your turn to get your paws inky with your Newton's Nook Designs products and create a project using the sketch. Be sure to link up to the Inky Paws Challenge! Can't wait to see your projects!


Thanks so much for stopping by!
See ya next time.

Inky Hugs,
Crystal


{Please note that comment moderation is on. Your lovely comment will appear once approved.}