Pages

Friday, June 30, 2023

{BYSHC} Sketch Challenge 34 ~ Let it Snow Collection ~ Doodlebug Designs Inc.

Hello there crafty friend!
I'm sharing one last Christmas card for the {BYSHC} Sketch Challenge 34 for the Build Your Stash Holiday Cardmakers Facebook group. Today is the last day to get your entries in for this month's challenge. My card today features papers and ephemera from Doodlebug Designs... yup, the Let it Snow Collection again!


I shared a card using the Let it Snow Collection for this month's sketch at the beginning of the month and I just couldn't help but make another. I love these papers and the ephemera (die cut pieces) are just too cute! They also make for really quick cards which is such a bonus right now while we're on Summer break.


I created a little background by combining two pattern papers from the Let it Snow 6x6 paper pad. I combined a couple ephemera pieces from the Let it Snow Odds & Ends pack for a little scene and grounded my scene with a sentiment die cut piece from the Let it Snow Chit Chat pack that I popped up with foam tape.  


I finished off the card by adding a few snowflake stickers but I can't seem to find the packaging to share which pack they are from. So sorry about that! I know it's from Doodlebug Designs as well... just not sure which collection.


Here's one last look at {BYSHC} Sketch Challenge #34 for the month of June. If you have a little time today maybe you can play along but remember to get your entry into the album before 11:59pm PST to count towards the challenge. If you're interested in seeing a bit more inspiration for this sketch, check out the amazing inspiration from the design team over on the {BYSH} Cardmakers blog!


Thanks so much for stopping by!
See ya next time.

Inky hugs,
Crystal


{Please note that comment moderation is ON. Your lovely comment will appear shortly.}

Wednesday, June 28, 2023

Membership Wednesday ~ June 2023 Whit Kit Sending Smiles ~ Unity Stamp Co.

 Hello there crafty friend!
I had a bit of fun playing with the June 2023 Whit Kit from Unity Stamp Co. I made two mini slimline cards and two A2 sized cards. I really love this month's kit!! I have a bunch of photos to share so let's get to them... 


My first mini slimline... I actually made both of the mini slimline cards at the same time. It was so easy just cutting the 6x6" pattern paper from the paper pack in half. I just HAD to make two cards!


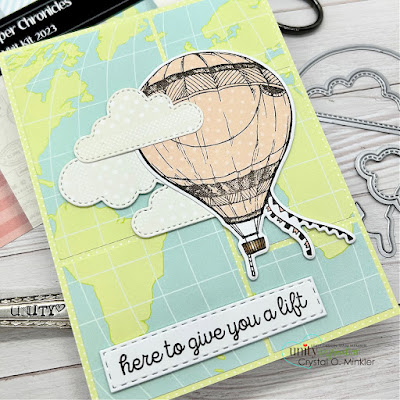
I used the pretty hot air balloon paper and the travel insignia {not sure if that's the right term to use, but I'm going with it} paper for my layers on the mini slimline white card front measuring 6 x 6", scored at 3".


The clouds are die cut from another pattern paper from the paper pack using the adorable stitched cloud dies from the kit. Love this paper pack! The soft colors are so beautiful. The photos really don't do them justice.


Here's the second mini slimline card using the other half of the pattern papers. I also added a few clouds to this one.


The sentiment is from the Sending Smiles stamps. I stamped it with Black Amalgam ink, trimmed it and adhered it to the card.


These were really quick cards to make and the only stamping was for the sentiment.


Love how these turned out!


My third card and the first of my two A2 cards... for this one I used the TOP Inky Inspiration Sketch 13 that I shared yesterday. When I saw the world map papers it just made sense to use this sketch.

Here's another look at the sketch. So fun!


For this card I stamped that hot air balloon on white card stock and colored the basket and little flags. I also stamped the hot air balloon onto one of the pattern papers. I fussy cut it and colored the edges of the balloon with a Memento Tuxedo black marker and then I adhered it to the colored hot air balloon essentially paper piecing the balloon. I die cut a few more clouds with the same pattern paper and adhered them to the balloon and then I popped the whole piece up with foam tape.


I stamped the sentiment from the Sending Smiles stamps and die cut it using one of the dies from the Scalloped & Stitched Sentiment Nesting Die Set, also from Unity. I popped it up on the card with foam tape. I think this one turned out so fun!


My fourth and last card using the same sketch again but I used different pattern papers from the Cloud Hopper Chronicles paper pack. These papers are just the cutest and filled with the prettiest colors! Love them!


This time I stamped the hot air balloon on white card stock with Black Amalgam ink and I colored it up with some Copic markers. And yup. I die cut more clouds from the same papers. I couldn't help myself. They are just too cute! Here's a quick list of the Copic markers I used ~ R00, R02, YG11, B0000, B000, E55, E57.


I didn't pop anything up on the card. I kind of wish I had because it's missing that bit of dimension you can see in the third card. I do still love how this turned out though using a mix of papers from the kit.


Here's a look at the wonderful Whit Kit for June!! So beautiful! This wonderful card kit is available for only $42.99. That includes shipping! Members get a $6.95 discount on every order from Unity over $45. Members are also able to purchase past Whit Kit stamp sets for just $14 and past Whit Kit paper packs for $2 off!! So awesome!!! 

That's it for me today! I'll be back in two weeks with inspiration for one of the new July memberships!! Have an ink-tastic day!

Thanks so much for stopping by!
See ya next time.

Inky Hugs,
Crystal


{Please note that comment moderation is on. Your lovely comment will appear once approved.}

Tuesday, June 27, 2023

Tawny Owl Paperie Inky Inspiration Sketch 13 ~ Tuscan Tile with Darling Menagerie ~ Unity Stamp Co.

 Hello there crafty friend!
Today I'm sharing a new sketch and a cute card that I created using the sketch. I just couldn't wait to ink up the gorgeous new Tuscan Tile background stamp that was recently released by Unity in collaboration with Brutus Monroe! It just arrived in my order and I actually inked it up right away! I know I'm not the only one with uninked stamps laying around. It felt so good to ink this one up so soon after it arriving!!


Here's my sweet card using the sketch. I also inked up the adorable Darling Menagerie for the first time. I'm on a roll friends!! And it feels SO good! Haha!


Here's a look at the fun new sketch for Tawny Owl Paperie Inky Inspiration Sketch 13. I saw a fun card on Pinterest not too long ago with a similar background and thought it would be fun to give this a try. Now you can see I added an element for my focal image and placed it over the background panels. The sketch, as always, is meant to inspire not require so let the sketch lead in your design, but don't feel limited by it. I have a few fun ideas for this sketch and I hope to play some more with it during the next few weeks.


To create the background I ink smooshed Shaded Lilac and Seedless Preserves Distress Oxide inks. I placed the Tuscan Tile background stamp in my Stamp Platform and inked it up with Villainous Potion Distress Oxide ink but I didn't ink it up fully. I dabbed the ink pad here and there leaving some of the stamp blank. And then I spritzed it with a bit of water... just a couple spritzes here and there. Not a ton of water because my white card stock is the Stampers Select card stock from Papertrey Ink that I always use. It holds up really well with a bit of water, but nothing crazy like a watercolor paper would. I just love how this background turned out!


I then cut my panels using the measurements from the sketch and adhered them to a white A2 top fold card base measuring 4-1/4 x 11"; scored at 5-1/2". I trimmed the cut apart sentiment strip that I think I received either in a Whit Kit or maybe it was a freebie... I can't remember. I thought it was perfect to pair up with this sweet cow from the Darling Menagerie though. I stamped the sweet cow with a mix of Seedless Preserves and Villainous Potion Distress Oxide inks. And then using a watercolor pen with minimal water, I colored the white portions of the cow with a bit of Shaded Lilac Distress Oxide ink. Isn't she just the sassiest but cutest little cow in purple!! I love her!


Since I used the same colors to stamp the cow that I used for my background, I needed something to place behind her for a bit of contrast. I found a die cut circle of True Black card stock {Papertrey Ink} in my stash. It was a little too plain so I splattered some Liquid Pixie Dust from Inkon3 that I diluted with a bit of water. Kinda makes it look like a sparkly moon. And it was perfect for a little background behind the cow. Such a fun card to make! I hope you're inspired to play along with the sketch... and maybe even ink up some stamps that haven't been inked up yet! 

Thanks so much for stopping by!
See ya next time.

Inky Hugs,
Crystal


{Please note that comment moderation is on. Your lovely comment will appear once approved.}

Monday, June 26, 2023

Inky Paws Challenge #201 ~ Sketch Challenge

 Hello there crafty friend!
Who's up for a new challenge?! It's time to get our paws inky with a fun sketch challenge! I sure do love a good sketch! I hope you have a blast with this one. I sure did! You have until Friday, July 7th to get your entries in for the #201 Sketch Challenge and a chance to win a $20 store credit to Newton's Nook Designs!


I wanted to play with a stamp that I hadn't played with yet. And since I tend to play more with my kitty stamps I thought it was time to ink up one of the pup stamps.


I just love this cute doxie stamp from the Rainy Day Doxie Stamp Set. So cute!! I had so much fun coloring it up with my Copic markers. I stamped it with Memento Tuxedo Black ink on Stampers Select White card stock from Papertrey Ink. I also stamped the pup on a post it note and fussy cut just the bottom portion for a mask. I masked my pup and stamped the puddle. I also stamped a couple splashes coming off of the puddle, but the mask wasn't necessary for that part. Now if you don't like fussy cutting you could stamp the puddle on a die cut oval panel and stamp the pup on a scrap of card stock. Die cut the pup using the Rainy Day Doxie Die Set and then just adhere it on the puddle creating your scene that way.


I paired up the cute Rainy Day Doxie Stamp Set with the Springtime 6x6 Paper Pad. I just had to use the rain drop papers for this card. My bottom polka dot layer measures 4-1/4 x 5-1/2". The rain drop layer measures 3-7/8 x 5-1/8". The flower papers measure 3-7/8 x 2" and the purple polka dot paper measures 3-7/8 x 3/4". I adhered the purple polka dot paper to the bottom portion of the flower paper and then adhered all of my layers to a white A2 top fold card base measuring 4-1/4 x 11"; scored at 5-1/2".


Once the pup was colored up I die cut him with the third largest oval die from the Oval Frames Die Set. I also stamped the sentiment with Memento Tuxedo Black ink and die cut it using the smallest circle from the Circle Frames Die Set. I adhered the sentiment to the oval and then added a bunch of foam tape to the back of the oval and circle and popped up my focal piece on the card. 
Here's a quick list of the Copic Markers I used for this stamp:

Doxie Pup ~ E21, E23, E27, N2, N3, N6
Raincoat ~ BG0000, BG10, BG15, Y06, Y35
Umbrella ~ V000, V12, V15, RV000, RV10, RV21, RV13
Puddle ~ B000, B00, B02, B04
Grass ~ YG11, YG03


Now it's your turn to get your paws inky with your Newton's Nook Designs products and create a project using the sketch. Be sure to link up to the Inky Paws Challenge! Can't wait to see your projects!


Thanks so much for stopping by!
See ya next time.

Inky Hugs,
Crystal


{Please note that comment moderation is on. Your lovely comment will appear once approved.}

Friday, June 23, 2023

{BYSHC} Sketch Challenge 34 ~ Lovely Legs Hugging Elves ~ Colorado Craft Company

  Hello there crafty friend!
I'm sharing another Christmas card for the {BYSHC} Sketch Challenge 34 for the Build Your Stash Holiday Cardmakers Facebook group. This time I played with a fun digi stamp from Colorado Craft Company called Lovely Legs Hugging Elves. Did you know that Colorado Craft Company started selling digi stamps?! I was super excited to get couple of their digi stamps during one of their Buy One Get One sales... such a fab sale!


I paired up this sweet Lovely Legs Hugging Elves digi stamp with the Santa Claus Lane 6x6 paper pad from Echo Park Paper Co. These fun plaid papers have stitches on some of the plaid which reminds me of the stitched ribbons I used to hoard from Stampin' Up. I thought it was a fun plaid paper and the perfect colors for my focal panel.


The digi stamp was inserted into a Microsoft Word Document where I adjusted the size of the image. I kept it kind of big because I wanted it to be a large focal panel. I love how the line of the snow works so well with the line of the focal panel in the sketch. This digi stamp is so perfect for this sketch! Here's a quick list of the Copic markers I used to color up the digi stamp:

Skin ~ E000, E00, E11, E04
Dress / Red Shoes ~ C00, C1, C3, R20, R17, R27
Pants ~ Y06, Y15
Jacket ~ YG11, G24, G46, Y15
Belts ~ N0, N2, N4, N6, Y06, Y28
Black Shoes ~ N0, N2, N4, N6
Snow ~ C00, C1, C3
Sky ~ B000


I die cut a piece of white card stock with a die from the Double Roped Rectangle dies from Gina Marie Designs. I trimmed the copic colored digi stamp to fit inside of the die cut rectangle. I covered the back of the die cut with lots of foam tape and popped it up on the card. The sentiment is a sticker from the Christmas Clippings Stickers from Tim Holtz and Idea-ology. I trimmed the ends with my scissors and just stuck it on the card. I love these sentiment stickers! They have been so handy!


Here's another look at the {BYSHC} Sketch 34 for this month's challenge. Did you know that Colorado Craft Company is sponsoring this month's challenge? The winner of this month's challenge will receive a fun prize package of Colorado Craft Company goodies!! I sure hope you'll join us and play along... there's still a whole week left to enter the challenge!


Thanks so much for stopping by!
See ya next time.

Inky hugs,
Crystal


{Please note that comment moderation is on. Your lovely comment will appear once approved.}

Wednesday, June 21, 2023

Membership Wednesday ~ June 2023 Uniquely Unity A Tapestry of Stories ~ Unity Stamp Co.

  Hello there crafty friend!
Today I'm sharing a pretty simple vintage style card using the lovely stamp from the wonderful June 2023 Uniquely Unity membership from Unity called A Tapestry of Stories. I just love this stamp!! My dad had a red bug when I was kid and I've always had a fondness for them. I couldn't wait to color up this one!


So, I had a color scheme in mind for coloring the bug and luggage but I didn't pick out my papers until afterwards... phew! That was a bit of a task looking through my papers after coloring, but I found my stash of Basic Grey papers and Oh. My. Gosh. Not only did I fall in love with these papers once again, I found the perfect papers to pair up with my coloring of the bug!! Woohoo! I used the Blush paper pad which has a bit of a vintage vibe to it. But really don't they all?!


I went with a classic card design with two pattern papers for my background. The stripes and the flower dots contrast each other so nicely and the colors are so perfect. Here's a quick list of the Copic markers that I used to color up the bug and luggage:

VW Bug ~ R20, R17, R27, C00, C1, N0, N2, N4
Luggage ~ BG70, BG72, V20, V22, V28, E70, E74, E77
Ground ~ N0, N2


I die cut the colored panel with the largest stitched die from the Scallops & Rectangle {nesting dies}. It was a very bright white which looked okay but doesn't really go with a vintage card so I distressed the edges just a bit with Vintage Photo and Antique Linen Distress Oxide inks. A mix of both of those colors gave me just the right tone of brown to work with the pattern paper. I wanted to add a little something to the empty corners so I wrapped them with a couple scraps of {Natural} May Arts Burlap String and secured them behind the panel with some scotch tape. I then covered the back of the panel with foam tape and popped up the panel on my pattern paper card front. The card front was then adhered to a white A2 top fold card base measuring 4-1/4 x 11", scored at 5-1/2".


That's it for me today! I'll be back next week with inspiration for the June 2023 Whit Kit! I know I say this just about every month, but have you seen this month's card kit?! I LOVE it!! I'm so excited to play! I hope you'll give me a visit and check out what I share! Until then have an ink-tastic day!


Thanks so much for stopping by!
See ya next time.

Inky Hugs,
Crystal


{Please note that comment moderation is on. Your lovely comment will appear once approved.}

Tuesday, June 13, 2023

Joseph's Coat Technique with a Twist ~ Technique Tuesday ~ Unity Stamp Co.

 Hello there crafty friend!
I'm back with another Technique Tuesday! On the 2nd Tuesday of each month I'll be sharing a bit of inspiration and a video featuring a fun technique. I hope that you'll be inspired to get inky and play along with some of the techniques that I share.


Today's technique is a fun little twist on the Joseph's Coat Technique. I shared a masculine card a few days ago using this technique but this time I've changed it up a bit.


I created a colorful background by blending Squeezed Lemonade, Wild Honey, and Ripe Persimmon on a white card front. Next, I stamped the beautiful stamps from the Hive and Herb stamps using an embossing ink and I heat embossed each stamped image with a clear embossing powder. I then stamped the wonderful Honeycomb Chaos background stamp in the lower right side and heat embossed it, too.


Now for my little twist... I blended Ground Espresso Distress Oxide ink over the background. Usually this technique uses a black ink. I know that's not super crazy or anything but it sure is fun! And I just love how the colors pop!


Another twist on this technique... since I used distress oxide ink I was able to do some water splatter on the card and look at that added dimension. Loving it! 


To finish off the card, I die cut the panel with the Postage Stamp {nesting dies}. I wrapped it with some copper metallic thread securing it on the back of the panel with tape. Adhered it to a yellow mat and then a dark brown card front. I then adhered the entire piece to a white A2 top fold card base. Stamped the sentiment with white pigment ink and heat embossed a white embossing powder. Trimmed up the sentiment and adhered it directly to the card.


Such a fun technique and so many possibilities depending on what colors you use for your base and for the pop! If you give this fun technique a try, I'd love to see what you create so please share your cards in the Unity Show & Tell group and tag me. Have an ink-tastic day!

Thanks so much for stopping by!
See ya next time.

Inky Hugs,
Crystal


{Please note that comment moderation is on. Your lovely comment will appear once approved.}

Monday, June 12, 2023

Love the Story ~ Wrinkle & Our Blooming Story ~ Unity Stamp Co.

 Hello there crafty friend!
Sharing my last card from the fun Instagram Hop for Unity and Brutus Monroe's awesome collaboration of background stamps. This time I'm featuring the Wrinkle background stamp... I've played with this stamp a few times now and can't get enough of it!!


This time I stamped the Wrinkle background very simply using Vintage Photo and Ground Espresso Distress Oxide inks on Kraft card stock from Papertrey Ink. I die cut it with the awesome Deckle & Stitches Nesting dies and adhered it to an Early Espresso card front measuring 4-1/4 x 5-1/2". I then adhered my card front to a white A2 top fold card base measuring 4-1/4 x 11"; scored at 5-1/2".


The gorgeous typewriter stamp from Our Blooming Story was stamped with Black Amalgam ink from Gina K Designs. I colored it up with the following Copic Markers:

Flowers ~ RV10, RV13, RV14, BG11, BG23
Typewriter ~ BG70, BG72, BG75
Typewriter Ribbon ~ C00, C1, C3
Background {behind the flowers} ~ E30, E31 

I fussy cut the typewriter on the line and neatened up the edges by coloring it with a Memento Tuxedo Black marker. 


I stamped and trimmed the sentiment. Colored the heart in a bit with the same Copic Markers I used for the flowers. I then adhered it over the typewriter. I added a bunch of thin foam tape to the back of the typewriter and sentiment and popped it up on the card.


You can see some of the dimension in this photo. I love how this card turned out! And I'm really loving the Wrinkle background stamp. Head over to Unity to check out all the new background stamps and the other fun releases, too!!


Thanks so much for stopping by!
See ya next time.

Inky hugs, Crystal


{Please note that comment moderation is on. Your lovely comment will appear once approved.}

Sunday, June 11, 2023

Masculine Birthday ~ Shatter & Keepin it Classy ~ Unity Stamp Co.

 Hello there crafty friend!
Sharing a fun masculine card today using the amazing new Shatter background stamp and Keepin it Classy stamps that just released over at Unity Stamp Co. I had a fun idea using the Joseph's Coat Technique and I think it turned out pretty cool.


The background was ink smooshed with Tumbled Glass and Salty Ocean Distress Oxide inks. I left a lot of white on the background too. I then stamped the cool Shatter background stamp using a Wow Clear Embossing ink. I applied Crystal Clear Embossing powder to the inked background and melted it with my heat tool. 


I wanted the embossing nice and thick and I meant to restamp the background in my stamp platform but I forgot to replace my corner magnet and pulled out my card stock. SO... I heated up the embossed background and dabbed it in the embossing powder and then melted it again. I did this a few times all over the card front so the embossed area was well embossed. And then I blended over the entire background with Black Soot Distress Oxide ink. The black ink covered the background that wasn't heat embossed giving this wonderful dimension to the card!


Love how the background turned out! I trimmed it up and adhered it to a black card front. I then stamped the car from the Keepin it Classy stamps and colored it up with my Copic markers. Here's a quick list of the Copic markers that I used: YR000, YR15, YR68, Y02, Y15, N0, N2, N4, C00, C1, C3


I fussy cut the car on the line. Made the edges look all nice and neat with a Memento Tuxedo Black marker. I added a bunch of foam tape to the back of the car and popped it up on the card. To finish off the card, I trimmed the sentiment and adhered it to the card and trimmed off the excess that was hanging off the edge.


 If you haven't already, you really should stop by Unity Stamp Co. and check out all the amazing new background stamps that were released along with a few new ones!! 

Thanks so much for stopping by!
See ya next time.

Inky hugs,
Crystal


{Please note that comment moderation is on. Your lovely comment will appear once approved.}