Pages

Monday, February 27, 2023

Inky Paws Challenge #192 ~ Sketch Challenge Reminder

 Hello there crafty friend!
 There's still time to play along with the Inky Paws Challenge #192 Sketch Challenge!! You have until Friday, March 3rd to get your entries in for this fun challenge and a chance to win a $20 store credit to Newton's Nook Designs!


I used the super sweet kitty in a mug from the Newton's Mug stamp set along with the coordinating Newton's Mug die set for my card today. I also used the little heart die from the Circle Frames die set. I die cut the heart and colored it up with my Copic markers.


My background is a fun mix of papers from the Coffee House Stories 6x6 paper pad. The bottom coffee bean layer measures 4-1/4 x 5-1/2". My strips of paper each measure 3-1/2 x 1-1/2" and are adhered to a coordinating mat that measures 3-3/4 x 5". My focal panel measures 2-1/2 x 3-1/2". My two little banners are 1/2" and 3/4" wide.


I colored up my mug to be similar to the the little aqua cup in the cute papers but I wanted my kitty to stand out a bit so I colored him up with gray Copic markers. I die cut the cute kitty and used a fun Action Wobble Spring to turn this card into a fun interactive card. Before adding my kitty though, I blended a bit of Vintage Photo Distress ink over a scrap piece of card stock so I could 'ground' my kitty cup. I also stamped the sentiment using the same ink. I adhered the banners together and then adhered them to my focal panel. Trimmed off the excess paper hanging off and then adhered the main panel to my card. Here's a quick list of the Copic markers I used to color up my images:

Kitty ~ N0, N2, N3, Colorless Blender
Mug ~ BG10, BG32
Heart ~ RV10, RV21, Colorless Blender


Here's a super quick little video to see the wobble in action.

You can check out my video process here... Kit Tea Cat | Inky Paws Challenge #192 | Newton's Nook Design.


Now it's your turn to get your paws inky with your Newton's Nook Designs products and create a project using the fun sketch. Be sure to link up to the Inky Paws Challenge! Can't wait to see your projects!


Thanks so much for stopping by!
See ya next time.

Inky Hugs,
Crystal


{Please note that comment moderation is on. Your lovely comment will appear once approved.}

Sunday, February 26, 2023

Clean & Simple Vintage ~ February 2023 Whit Kit ~ Unity Stamp Co.

 Hello there crafty friend!
A quick blog post to share one last card using the gorgeous goodies from the February 2023 Whit Kit. I just can't get enough of the Newsprint Greetings {paper pack} that's included in this month's card kit. I love it so much!! It makes for a quick and easy background for a card.


I kept this card very simple. Letting the pattern paper be my background... all I did was die cut it with the largest die from the Scallops & Rectangles {nesting dies} from Unity. I adhered it to a kraft A2 top fold card base measuring 4-1/4 x 11"; scored at 5-1/2".


I stamped the pretty flowers on white card stock and die cut them with a circle die from the Scallops & Circles {nesting dies} also from Unity. I colored them up with the following Copic markers: 

Daffodils ~ RV000, RV10, RV21
Iris ~ RV10, RV21, RV34
Tulip ~ RV000, RV91, RV93, RV32
Leaves / Stems ~ YG11, YG03


I stamped the sentiment with Sugar Cube Pigment ink from Taylored Expressions on Kraft card stock from Papertrey Ink. Applied some Alabaster White embossing powder from Brutus Monroe and melted the ep with a Wagner heat tool. I trimmed the sentiment and adhered it to the card. To finish off the card I added one of the Wax Seal Stickers from the Whit Kit. The pink in the sticker was also my color inspiration. It's not totally a CAS card because of the layers but it's a pretty clean style, I think. 


Inspiration for my last card is the Tawny Owl Paperie Inky Inspiration Sketch 8. I've had some fun with this sketch this month. If you're interested in seeing more of my sketches, join my Tawny Owl Paperie | Inky Inspiration Facebook Group. I'd love to have you join and play along with my sketches!


Here's a look at the wonderful Whit Kit for February!! So beautiful and lots of fun, too! This wonderful card kit is available for only $42.99. That includes shipping! You also get a $6.95 discount on every order from Unity over $45. Members are also able to purchase past Whit Kit stamp sets for just $14 and past Whit Kit paper packs for $2 off!! So awesome!!! 

I'll be back on Wednesday with inspiration for one of the Memberships at Unity! Still not sure what I want to play with first! There are SO many amazing new goodies coming!


Thanks so much for stopping by!
See ya next time.

Inky Hugs,
Crystal


{Please note that comment moderation is on. Your lovely comment will appear once approved.}

Saturday, February 25, 2023

Watercolors on Pattern Paper ~ February 2023 Whit Kit ~ Unity Stamp Co.

  Hello there crafty friend!
A quick blog post today to share one more card using the wonderful February 2023 Whit Kit from Unity. A super simple card! Stamping directly on pattern paper from the fantastic Newsprint Greetings {paper pack} for a quick background. 


I die cut the stamped background with the largest postage stamp die from the Postage Stamp {nesting dies} before I watercolored the flowers with ZIG Clean Color Real Brush markers. Normally I would have Copic colored the flowers BUT I'm really trying to use my ZIGs more and I did make this card right after the first one I shared on Wednesday. {If you missed that card, you can check it out here... Ink Smooshed Card}. So I didn't want to Copic color them again in the same colors. Had to change things up a bit!


I lightly distressed the edges of the die cut panel with some Vintage Photo Distress ink. And then I adhered the background to a Kraft A2 top fold card base measuring 4-1/4 x 11"; scored at 5-1/2".


I cut apart one of the sentiments from the cut apart sheet included in the kit. I cut the one end at an angle and adhered it to the card. And then I trimmed the excess from the side of the card.

You can check out my process video here...Watercolors on Pattern Paper | February 2023 Whit Kit 


Here's a look at the wonderful Whit Kit for February!! So beautiful and I really enjoyed watercoloring the flowers! This wonderful card kit is available for only $42.99. That includes shipping! You also get a $6.95 discount on every order from Unity over $45. Members are also able to purchase past Whit Kit stamp sets for just $14 and past Whit Kit paper packs for $2 off!! So awesome!!! 

I'll be back tomorrow with one more card I made using the February 2023 Whit Kit.


Thanks so much for stopping by!
See ya next time.

Inky Hugs,
Crystal


{Please note that comment moderation is on. Your lovely comment will appear once approved.}

Friday, February 24, 2023

{BYSHC} Sketch Challenge 30 ~ Santa's Trip ~ Unity Stamp Co.

Hello there crafty friend!
I'm sharing one last Christmas card for the {BYSHC} Sketch Challenge 30 for the Build Your Stash Holiday Cardmakers Facebook group. I've had the idea for this card in my mind since I saw the beautiful Santa's Trip stamps from Unity Stamp Co. I've been wanting a pretty ink smooshed night sky background to showcase the stamp. I'm glad I finally gave it a try.


Now, in person the main circle panel isn't as bright. I ink smooshed Uncharted Mariner, Chipped Sapphire and Black Soot Distress Oxide inks on two card front of Stampers Select White card stock from Papertrey Ink. I also blended a bit of Black Soot oxide around the edges. I found it was too dark though so I went over those blended edges with Uncharted Mariner oxide and it really brought the colors all together. 


I used the same three oxide inks to stamp the beautiful Santa's Trip. I first stamped it with Uncharted Mariner. And then I just added some Chipped Sapphire ink around the edges of the stamp and stamped it again. And for the Black Soot I did even less ink around the edges. I do wish I had added a bit more Chipped Sapphire and Black Soot oxides to the Santa's Trip stamp. But, again, in person it's not this bright. 


Here's a look at {BYSHC} Sketch 30 for the month of February!
There's still time to play along with the sketch! You have until Tuesday, February 28th to enter. If you're interested in seeing a bit more inspiration for this sketch, check out the amazing inspiration from the design team over on the {BYSH} Cardmakers blog


Before I trimmed my night sky background I splattered it with white acrylic paint. I wanted fine splatters for my night sky so I didn't saturate my paint brush too much before doing my splatters. I really like how it turned out. I originally planned to just use the night sky background as a full card front. But all the white on the main circle panel looked out of place so I trimmed my card front to 5-3/8 x 4-1/8" and adhered it to a white A2 card base measuring 4-1/4 x 11"; scored at 5-1/2". I also added a skinny strip of white card stock measuring 5-3/8 x 1/8" across the top of my black card stock. The black card stock measures 5-3/8 x 1-1/8". Both of these additions of white help balance the card.


To finish off the card, I needed a sentiment so I grabbed my Tim Holtz/Idea-ology Holiday Talk Metallic stickers and picked a quick sentiment from there. So easy!! Well, that's my last card for {BYSHC} Sketch Challenge 30. A new challenge starts up on Wednesday, March 1st... I'll see you then with my first card for {BYSHC} Sketch Challenge 31.


Thanks so much for stopping by!
See ya next time.

Inky hugs,
Crystal


{Please note that comment moderation is ON. Your lovely comment will appear shortly.}

Thursday, February 23, 2023

Dreamin' Daze Watercolor ~ February Challenge ~ Unity Stamp Co.

Hello there crafty friend!
Today I'm sharing my last card for the Unity February Sketch Challenge that I'm hosting in the Unity Show & Tell Facebook group. I have had the gorgeous black eyed susans from the Dreamin' Daze stamps on my desk just screaming to get inky. So happy to finally play with these flowers. I did a bit of watercoloring which I'm trying to do more often. 


As I often do with a sketch, I started by picking my papers. I can't believe that I've gone this long without cutting into the gorgeous Fields of Summer {paper pack}. Have you seen these gorgeous papers? They are stunning!! Beautiful papers filled with sunflowers and lovely colors... I knew I had to use them but I chose papers that didn't have sunflowers since I was playing with a different kind of flower.


As I mentioned above, I've been trying to play a bit more with my ZIGs and do some watercoloring. Trying to at least do some watercoloring each month. So far so good! I used just a handful to color up these flowers: yellow, bright yellow, blue gray, blue, light gray, and black.


I used a slimline die to die cut the flowers. So perfect for this sketch! The main floral panel is popped up on the card with foam tape {which actually caused some havoc... you can see it in the video below}. I wrapped the main floral panel with a bit of {Ivory} May Arts Burlap string and tied a pretty bow. The card was finished with a few enamel dots.


Here's another look at the sketch! Please know that the sketch is meant to inspire and not require. Feel free to alter it to work for your creation and most importantly have some inky fun! I can't wait to see what you create! Be sure to share your cards in the Unity Show & Tell group and also add them to the sketch challenge album in the group to be entered for a prize!! But don't wait too long to play because this challenge ends on Tuesday, February 28th.


Thanks so much for stopping by!
See ya next time.

Inky Hugs,
Crystal


{Please note that comment moderation is on. Your lovely comment will appear once approved.}

Wednesday, February 22, 2023

Membership Wednesday ~ February 2023 Whit Kit ~ Unity Stamp Co.

  Hello there crafty friend!
Today I'm sharing a pretty card using the beautiful floral stamp from the wonderful February 2023 Whit Kit from Unity which includes the Hope Blooms stamps and the Newsprint Greetings paper pack. This card kit is packed full of wonderful goodies! I had so much fun playing with it I actually made three cards and recorded during my whole process but there was no way I could edit the whole video for today. So I'm just sharing the first card and I'll share the other two this weekend.


Started with the background for this card. I chose a pattern paper from the Newsprint Greetings paper pack. Did some ink smooshing with Frayed Burlap, Abandoned Coral, and Peacock Feathers Distress inks using the acrylic block included in the card kit. I also distressed the edges of the pattern paper with a bit of Frayed Burlap.


I stamped the beautiful flowers on white card stock with Black Amalgam ink from Gina K. Designs and colored them up with the following Copic Markers:

Iris ~ BG01, BG45, BG18, Y11
Daffodils ~ Y11, Y15, Y35, Y06
Tulips ~ YR21, YR15, YR18, R17
Stems & Leaves ~ YG03, YG63


I die cut the panel with a die from the Scallops & Rectangles {nesting dies}. I tied a pretty bow with four strands of {Ivory} May Arts Burlap string. I popped up the flower panel with foam tape on the top and bottom of the panel. And then I cut my sentiment from the cut apart sentiments, added some foam tape to the ends of the sentiment and adhered it to the card.


Here's a look at the wonderful Whit Kit for February!! So beautiful and lots of fun, too! This wonderful card kit is available for only $42.99. That includes shipping! You also get a $6.95 discount on every order from Unity over $45. Members are also able to purchase past Whit Kit stamp sets for just $14 and past Whit Kit paper packs for $2 off!! So awesome!!! 

I'll be back this weekend with more inspiration for the February 2023 Whit Kit. I hope you'll stop by next week... it's the beginning of a new month which means new Membership kits!! Not sure what I'll be sharing just yet.


Thanks so much for stopping by!
See ya next time.

Inky Hugs,
Crystal


{Please note that comment moderation is on. Your lovely comment will appear once approved.}

Monday, February 20, 2023

Inky Paws Challenge #192 ~ Sketch Challenge

 Hello there crafty friend!
Who's up for a new challenge?! It's time to get our paws inky with a fun sketch challenge! I love sketch challenges. They take the guess work out of designing a card. I really enjoyed this one and I hope you do too! You have until Friday, March 3rd to get your entries in for the #192 Sketch Challenge and a chance to win a $20 store credit to Newton's Nook Designs!

Pull out your pretty pattern papers!! This sketch is made for mixing them up!


I grabbed the paper pad I had on top of my pile which happened to be the Love & Woofs 6x6 paper pad. I knew that I wanted to play with the adorable Newton's Birthday Balloons and that really any papers would look nice with that adorable stamp.


A pretty striped paper is my card front layer measuring 4-1/4 x 5-1/2". To contrast that paper I chose three similar papers that each had solid backgrounds with a repetitive design. These contrast well with the stripes and compliment each other nicely. They each measure 3-1/2 x 1-1/2" and are adhered to a white mat measuring 3-3/4 x 5".


I stamped Newton and my sentiment on my 2-3/4 x 4" piece of white card stock. And colored him up with the following Copic markers:

Newton ~ YR0000, YR21, YR15, YR68, YR27
Red Balloon ~ R00, R20, R14, R27
Pink Balloon ~ RV000, RV10, RV21, RV34
Blue Balloon / Present ~ B000, B00, B02


Now it's your turn to get your paws inky with your Newton's Nook Designs products and create a project using the sketch. Be sure to link up to the Inky Paws Challenge! Can't wait to see your projects!


Thanks so much for stopping by!
See ya next time.

Inky Hugs,
Crystal


{Please note that comment moderation is on. Your lovely comment will appear once approved.}

Sunday, February 19, 2023

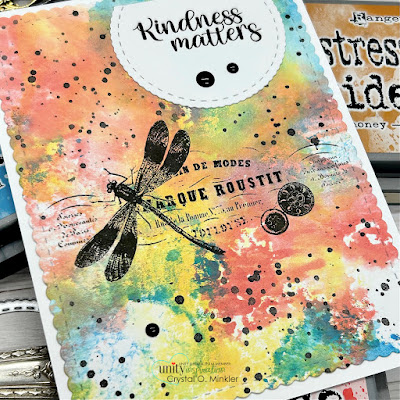
Ink Smooshed Background ~ Kindness Matters Dragonfly ~ Unity Stamp Co.

Hello there crafty friend!
I have one more card to share for Unity's new release. The Kindness Matters Dragonfly is SO gorgeous! I just had to do a bit of ink smooshing for this one.
 

I challenged myself to use a color combo that I wouldn't normally do... Mermaid Lagoon, Wild Honey, and Abandoned Coral Distress Oxide inks. These are so stunning together!


I ink smooshed my background first and then I stamped the beautiful dragonfly with Black Amalgam ink from Gina K Designs. I tore a post it note as a bit of a quick mask and then I splattered my background with black acrylic paint that I thinned out with a spritz of water.


Once my background was dry, I die cut it with the largest die from the Scallops & Rectangles {nesting dies}. Adhered it to a white A2 top fold card base measuring 4-1/4 x 11"; scored at 5-1/2". I stamped the sentiment with my Black Amalgam ink and then die cut it with a circle die from the Scallops & Circles {nesting dies}. I cut off the top so I could place it just under the stitching in the background. And to finish off the card I added two black enamel dots under the sentiment and then one on the background. Can you see it among the splatters?! LOL


Love this gorgeous stamp! Well, that's it for me! I sure hope you'll stop by Unity to check out all the new releases. The sale ends tomorrow!!

Thanks so much for stopping by!
See ya next time.

Inky Hugs,
Crystal


{Please note that comment moderation is on. Your lovely comment will appear once approved.}

Friday, February 17, 2023

Mini Slimline Card ~ Garden Gnomes ~ Unity Stamp Co.

 Hello there crafty friend!
A quick blog post today to share a cute mini slimline card I made using the super cute Garden Gnomes from Unity! So excited to have new gnomes release! Love these cuties!


I love them so much I made this cute card for my husband for Valentine's Day. Not a traditional Valentine's Day card at all! But he recently started growing hydroponic plants. So I thought this card was perfect! And the sentiments seriously made the card work for Valentine's Day!


I've compiled a list of the Copic markers I used to color up this cute scene. I know it looks really long but keep in mind that I repeat a bunch of the markers and use them for multiple images. 
Here's the list:

Skin ~ E000, E00, E11, E04
Pigtails ~ E53, E55, E57
Pink Hat ~ RV10, RV21
Green Dress ~ YG11, YG13, Y06, Y15
Polka Dot Boots ~ RV10, RV21, N2, N3, N5
Beard ~ C00, C1, C3
Green Hat ~ YG11, YG13, Y06, Y15, RV10, RV21, N2, N3, N5
Black Boots ~ N0, N2, N3, N5
Watering Can ~ Y000, Y06, Y13, Y15, RV10, RV21
Wheelbarrow ~ E52, E55, E57, N0, N2, N5, RV10, RV21
Daisies ~ Y000, Y06, Y13, YR15
Tulips ~ RV10, RV21
Pots ~ YR21, YR15, YR68
Leaves / Grass ~ YG11, YG13
Sky ~ B0000, B000, B00


I die cut my scene using a Wonky Stitched Slimline die from Gina Marie Designs. My pretty paper layers are the Spring Fling papers from Lawn Fawn. And they are all adhered to a 6 x 6" card base that was scored at 3".


Head on over to Unity to check out all the wonderful new releases and, of course, there's a fab sale!! Gotta love a sale! Woohoo!


Thanks so much for stopping by!
See ya next time.

Inky Hugs,
Crystal


{Please note that comment moderation is on. Your lovely comment will appear once approved.}

Thursday, February 16, 2023

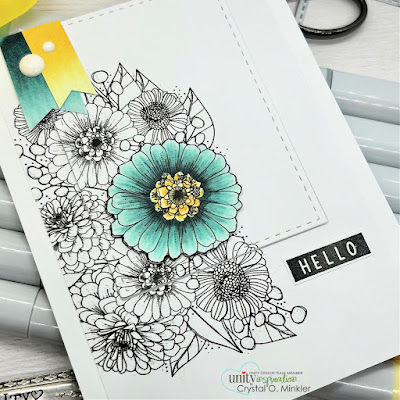
Zinnia CAS Card ~ February Challenge ~ Unity Stamp Co.

Hello there crafty friend!
Today I'm sharing more inspiration for the Unity February Sketch Challenge that I'm hosting in the Unity Show & Tell Facebook group. I was inspired by one of the entries into the challenge to play with more of a CAS design. Definitely a fun challenge for this sketch and I like how my card turned out.


I just had to play with the beautiful Zinnia stamp again! Love these beautiful flowers! I considered leaving all the flowers white and I really think it would look lovely, but I decided to add a pop of color. Love me some turquoise!!


I also colored up my little banners ombre style with the same markers. So fun! 
Here's a quick list of the Copic markers I used:

Zinnia ~ BG10, BG13, BG18, BG78, Y000, Y11, Y15, Y35
Turquoise Banner ~ BG10, BG13, BG18, BG78
Yellow Banner ~ Y000, Y11, Y15, Y35


I added a couple white enamel dots to my banners. And then to finish off the card I stamped my sentiment from the July 2022 Sentiment Kit called So Kind, So Caring, So You. I actually goofed up my sentiment on the card and had to stamp it again. Fussy cut and then covered up my mistake. Phew! Luckily that was an easy fix.

You can check out my process video here... Zinnia CAS Card | February Sketch Challenge |
 Unity Stamp Co.


Here's another look at the sketch! Please know that the sketch is meant to inspire and not require. Feel free to alter it to work for your creation and most importantly have some inky fun! I can't wait to see what you create! Be sure to share your cards in the Unity Show & Tell group and also add them to the sketch challenge album in the group to be entered for a prize!! I'll see you back here next Thursday with one last card for this month's sketch challenge.

Thanks so much for stopping by!
See ya next time.

Inky Hugs,
Crystal


{Please note that comment moderation is on. Your lovely comment will appear once approved.}

Wednesday, February 15, 2023

Membership Wednesday ~ February 2023 Kit of the Month Happy Soul ~ Unity Stamp Co.

 Hello there crafty friend!
Today I'm sharing a pretty birthday card using the flower stamp from the gorgeous February 2023 Kit of the Month from Unity called Happy Soul. This kit has the perfect name... it makes my soul so happy whenever I play with it.


I stamped the gorgeous flowers on one of the pretty pattern papers and then I colored them up with my Copic markers. I love the touch of texture in the flowers from the script in the pattern papers.


I paired up this gorgeous flower with the Tuscan Textures {paper pack} from Unity. This is a beautiful set of papers with cream and white colors throughout and lots of texture. I thought it would look lovely with a turquoise flower.


I fussy cut around the flowers leaving a skinny border of white. My paper layers are so pretty so I didn't want to cover them up. Vellum card stock to the rescue! I love this stuff when I need that extra layer but I don't want to completely cover my pretty papers. I die cut the vellum card stock with the Pleated Lace Oval die from Gina Marie Designs. Here's a quick list of the Copic markers I used to color up the flowers:

Leaves ~ YG63
Flowers ~ BG10, BG13, BG18, BG78
Flower Centers ~ Y000, Y11, Y15


Here's a look at the whole Kit of the Month for February!! So gorgeous! Can you believe that you get a full sheet of rubber for only $45. That includes shipping! You also get a $6.95 discount on every order from Unity over $45. And you can purchase any past kits for only $34 plus shipping. Such a great value! I really want to ink up the branch with the cute little birdies but that may have to wait for another time. 

I hope to see you next week for another Membership Wednesday blog post. I'll be back with inspiration for the February 2023 Whit Kit!


Thanks so much for stopping by!
See ya next time.

Inky Hugs,
Crystal


{Please note that comment moderation is on. Your lovely comment will appear once approved.}

Tuesday, February 14, 2023

Partial Stenciling with Chatty Hearts ~ Technique Tuesday ~ Unity Stamp Co.

  Hello there crafty friend!
I'm back with another Technique Tuesday! On the 2nd Tuesday of each month I'll be sharing a bit of inspiration and a video featuring a fun technique. I hope that you'll be inspired to get inky and play along with some of the techniques that I share.


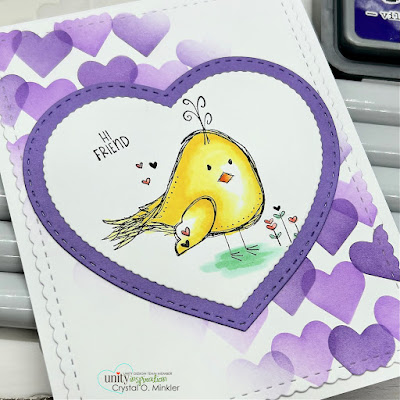
Today's technique is a simple one that's great for any occasion... Partial Stenciling! Partial Stenciling is simply blending inks over a stencil but only inking up part of the stencil rather than the whole background. Super easy! I'm using the recently released Chatty Hearts {Stamp & Stencil Duo} paired up with the adorable Old Chicks Itty Bitty stamp!


For my first card I've ink blended over a white card front using the Candy Hearts Stencil #1 with Evergreen Bough Distress Oxide inks. I then ink blended Peacock Feathers Distress Oxide over the Candy Hearts Stencil #2.


I ink blended on a diagonal concentrating my ink in the middle of my diagonal line and fading out towards the other two corners. I love the softness this gives to the background.


I stamped the sweet Old Chicks birdie with Black Amalgam ink on white card stock and colored it with the following Copic Markers:

Birdie ~ Y11, Y15, Colorless Blender
Beak ~ YR21, YR15, YR68
Hearts / Flowers ~ R20, R14
Leaves / Grass ~ G00, G02


For my second card I've ink blended Wilted Violet Distress Oxide inks over the Candy Hearts Stencil #1 and Villainous Potion Distress Oxide inks over the Candy Hearts Stencil #2.


I die cut my Old Chicks birdies with a scalloped heart die from the Dashes and Frills Hearts {die set}. Mat them with coordinating card stocks die cuts with the next largest die from the same die set.


The sentiment from the Chatty Hearts background stamp was stamped with Black Amalgam ink. I'm obsessed with this background stamp friends! 49 individually cut sentiments so you can use them separately or pop them back in the background to stamp them all together. Love it!

You can check out my process video here... Partial Stenciling | Technique Tuesday | Unity Stamp Co.


The Partial Stenciling Technique is super easy, right?! It makes for such a quick and easy card, too! Do you have a stencil in your stash that you've been wanting to play with? Maybe you even got the new Candy Hearts stencils... let's get inky with our stencils friends. If you give this fun technique a try, I'd love to see what you create so please share your cards in the Unity Show & Tell group and tag me.

Thanks so much for stopping by!
See ya next time.

Inky Hugs,
Crystal


{Please note that comment moderation is on. Your lovely comment will appear once approved.}