Pages

Sunday, August 27, 2017

Scrapping for Less ~ Flavor of the Month ~ Hello

Hello again! I'm here with another look at the August Flavor of the Month card kit. I have a few cards to share with you and a fun tag!  


I thought that it would be fun to make a couple shaker cards using the Pink & Main Hello dies from the Banana Split subscription. I was able to use just two pieces of The Story of Us paper from the fourth collection by alternating the papers for each card. I finished up the package of Kennedy Grace sequins and my last flower for this collection. I used a couple of scrap pieces of acetate and some other shaker elements in my stash to complete the card. I think they turned out pretty cute!


The shaker cards left me with these outlined 'hello' cuts, so naturally I just had to make a card (or two) using them, as well. Can I share a secret with you? Do you see the back layer of my cards? The stripes on one and the floral on the other. Those aren't full card front sheets. I cut out the middle of those sheets for another use. Just another way to stretch out every piece of paper in your stash.
I wanted to keep these cards pretty simple so I added a few strips of washi tape and popped up the hello die cuts and adhered that onto a white card base (with our outline of patterned paper ;) and there you have two more cards.


The Banana Split subscription also includes a couple fun natural canvas tags. I just had to pull out some stencils and my distress spray stains and get inky! Seriously, I had blue fingers all day after spraying the Mermaid Lagoon stain! Haha! I don't mind though. Anywho, once I had the tag sprayed using a few stencils, I thought... why not make a stencil using the Pink & Main Hello die in the kit?! So I did, but I only made a partial stencil... I only cut out the letter 'h'. I hot glued the flowers that I had set aside for this tag and found some fun buttons in my stash. I cut a hole in the top of the tag and secured the jumbo eyelet using my good ole' crop-a-dile. I found some ribbon and twill in my stash that I tied off with some twine and the last little touch came from a gift I received from my husband this week that included this sweet little fresh pearl on the gift packaging. I just love how this came together!! Oh, and I used some clear Wink of Stella on the letter 'h'... it's so shimmery and fun!

Have you signed up yet for the next Flavor of the Month card kit?! 
Go check out the details ---> here.

Thanks for stopping by!

See ya next time.
~ Crystal


Friday, August 25, 2017

Take a Walk on the Wild Side


Are you ready to walk on the wild side? 
Well, that is exactly the theme of our August Flavor of the Month card kit. Wild and Free with an exclusive stamp set by Pink and Main. We are so extremely happy about this kit. Come on and hop along and see what the amazing Design Team has provided this month as inspiration.
This amazing August kit has SOLD OUT! Prior to the blog hop!...WOW! 
If you missed out you will want to jump on the subscription wagon so you do not miss out on September's amazing kit. Check out this page for all the details about the kits. They just keep getting better and better! Thanks for hopping along with us today. Don't forget to enter the Rafflecopter for a chance to win a complete kit!


Oh my goodness... I just can't handle the cuteness of these little critters!! They are so much fun to color. I used each one of the critters for the four different sketches using the four different collections. So much fun and I still have a bunch of goodies left over so I know I'll be making more cute cards with all four of these critters. Let's take a closer look at each card... 


For Sketch #1 I used Collection #3 that includes Dino Friends & Jungle Safari papers by Echo Park. I also used elements from the Double Dip Sundae subscription that includes the Kennedy Grace sequins and the Loopy Leaf die. That little triceratops looked hungry to me so I used the leaf to give him a little snack. I also paper pieced his horns... isn't he the cutest?!? I love the way this card turned out!


For Sketch #2 I used Collection #2 that includes Camp Fire & Lakeside papers by Photoplay. This is such a cute collection! I just knew this little owl would have fun going camping. The elements from the Banana Split subscription made this card come together so quickly! I used the Mocha ink cube to stamp the owl and colored him in with Prismacolor pencils. I also cut out the Hello die twice in white card stock and adhered those layers. I cut out the Hello die again in the same color as my base and when I adhered it I offset it just a tad so the white layer is like a shadow. I popped on a couple of sequins and done! Such a quick and cute card!


For Sketch #3 I used Collection #1 that includes Natural Dots papers by Bo Bunny. Can I just say I love polka dots!? I love all the different colors in this collection. Once I saw the colors in the Family Tree Stickers that were included, I just knew this adorable little platypus was going to have to be colored to look like Perry the Platypus from my kids' favorite cartoon. He's so cute! I layered different colors of the papers and adhered them to the card base. I used Copics to color in the platypus and also to make the 'sky'. I tore the green papers for grass and colored the white parts with another copic marker. I adhered the 'grass' pieces and the platypus to the card and then I added the tree sticker. I stamped the sentiment using the the Mocha ink cube from the Banana Split subscription. I like the simplicity of this card just by using all the different polka dot papers.


For Sketch #4 I used Collection #4 that includes The Story of Us papers by Echo Park. After looking at the different papers in this collection, I just had to use this flower paper with almost a ledger kind of feel to it for this sketch. It was perfect! After adhering the piece I decided to use the floral paper and adhered a small rectangle piece. I die cut a circle of white card stock and I colored the top portion with a copic marker and adhered a piece of the floral paper trimming it around the circle. This sweet fox seemed like she would enjoy to be surrounded by some flowers so after I stamped and colored her in I adhered her to the circle. I popped on some sequins and a flower. I adhered some beads to the center of the flower. I stamped out the sentiment twice and made two banners out of it by masking the separate words with a post it note before stamping. I trimmed the banners by hand and popped them up on the card. I adhered this whole piece onto a white card base.

Now keep on hopping to see even more wonderful ideas for these card kits:


Crystal O. Minkler <--- you're here

next up ---> Tina Smith


Don’t forget to head on back to the Scrapping for Less Blog after you hop along to enter the Rafflecopter for a chance to win a complete kit!

Thanks for stopping by!

See ya next time.
~ Crystal


Saturday, August 19, 2017

~~~ Happy Blogiversary Winner! ~~~

Hello! Just a quick post today to say Thank You to all those that followed along with my Blogiversary Celebration! I'm so glad that you enjoyed the tutorials and I plan to do more in the future so be sure to click on the Follow button over there --->
so you don't miss out! :)

I also wanted to announce the winner of my Happy Blogiversary Prize...


Congratulations, Judy Kelly!! Please send an email to me at crystalominkler@gmail.com with your full name and address so I can send you your prize.

Thanks for stopping by!

See ya next time.
~ Crystal

Friday, August 18, 2017

It's a Blogiversary Celebration ~ Day 3 of Technique Tutorials

Hello, again! It's our third day of technique tutorials and today I'm going to show you how to make a Galaxy Background. I'm sure you've seen these beautiful backgrounds!! I love them! Let's get started!


First, I pulled out four distress inks for this technique - Black Soot, Dusty Concord, Seedless Preserves, and Picked Raspberry. I also grabbed two blending tools and a piece of white card stock from Papertrey Ink. You are also going to want to work on a surface that you can wipe clean or one that you can replace like my grid paper pictured.


I started with the lightest color, the Picked Raspberry. I got my blending tool nice and inky, but to avoid an obvious circle when I start blending I dab the sponge off once. Now with a circular motion I lightly blended some ink in the center of the card stock. 


Now onto the next color, Seedless Preserves... I got the blending tool nice and inky, and then with the same circular motion I blended this color around the first color. At this point in the blending it's okay that the color is lighter because we'll be adding more and we don't want it too dark.


Now we'll be basically repeating the last step again with the Dusty Concord ink. This time we'll blend ink all the way around to the outer edge.


Now, onto the Black Soot ink... with the same circular motion, I just blended the black ink around the outer edges. 


Now I did the same things again... I blended a bit of the pink in the middle and then added some of the lighter purple blending it a bit more with the pink. I went back over with the darker purple blending it into the lighter purple and into the outer black edges. I also did a little bit more blending with the black on the edges but it really didn't need much.


For some reason, this is my favorite part... haha!.. the water splatter!! I sprayed just a little bit of water in my hand and then clapped my hands over the paper. I let it set for just a few seconds and then laid the paper towel on the card stock to soak up any excess. Since I'm not using watercolor paper, I've found that it's important to use the paper towel to soak up that excess water. Otherwise, the card stock could warp and that would just be terrible after all that work blending the inks. 


Now, I grabbed my palette... it's well loved, but clean. Haha! I added just one little drop of white acrylic paint. That's it, just one tiny drop!


I then sprayed that little tiny drop of paint with a little bit of water. Not too much, just enough to make it easy to splatter.


For this technique I just use a cheap paint brush. One that my kids would use for their watercoloring. Nothing fancy at all... I used the brush to mix the paint with the water.


I love to splatter so I have a box just for this purpose. I keep a paper towel in the bottom of my splatter box to catch the extra wet stuff. It may be time to change out this paper towel. :) I placed my card stock in the box and grabbed the palette.


Now, the fun part... splatter!! I dipped my paint brush in the mixture and flicked it. You'll see that some of the splatter is bigger and some is teeny tiny... that all depends on how wet your paint brush is and/or how hard you flick the paint brush. You may want to practice this step on some scrap pieces before trying it on your background.


After doing the paint splatter, I set it aside and let it dry. I think in this picture you can see that after the paint dried, the white splatter is a bit brighter.


Now for the card I created using the Galaxy Background... I love it!! I die cut the background using the Blueprints 31 dies from My Favorite Things. I adhered that to a True Black card base and set it aside. I have just been itching to ink up this new owl stamp from Unity called Everyday Wonderful Owls. Isn't it the cutest!! I colored it in using Copic markers {0, N0, N1, N3, N4, E95, E99, V05, V06, V09, Y06, Y11, Y13, Y15, Y35} and then I fussy cut it out. I then stamped the sentiment from Unity's February 2017 Kit of the Month called Unexpected Places in VersaMark ink and heat embossed it in white. I die cut that piece using the Blueprints 14 die that just happens to be a part of my giveaway mentioned on my Happy Blogiversary post. I adhered the sentiment and the owls to the card and then decided to add a few drops of Violet Galaxy Nuvo Crystal Drops

And there you have the final technique tutorial for my Blogiversary Celebration!! Thank you so much for joining me for these tutorials. I've had a lot of fun doing them for you and I do intend on doing more in the future!


Please leave a comment letting me know what you thought and if you haven't already, click on the Follow button on the right hand side so you won't miss my next post... it just may be another technique tutorial!! 

 Did you comment on my Happy Blogiversary post for your chance to win a prize?!  Check out the details ---> here! Today is the last day to enter!!

If you missed the first technique tutorial, you can find that ---> here.
And the second technique tutorial can be found ---> here.

Thanks for stopping by!

See ya next time.
~ Crystal

Thursday, August 17, 2017

It's a Blogiversary Celebration ~ Day 2 of Technique Tutorials!!

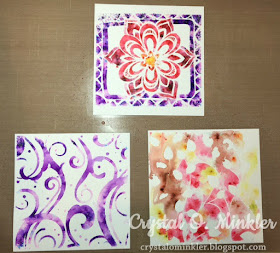
Hello, again! It's our second day of technique tutorials and I was thinking we'd give a new technique a try.... Stencil Painting with Color Burst!! I recently saw a video of Ken Oliver demonstrating this technique and I thought it would be so much fun to give it a try. Let's get started.


First, you'll need a stencil and watercolor paper. I'm using Canson XL watercolor paper... it's 140 lb weight paper. I cut mine down to fit the stencils that are 6x6 inches. Then place your stencils over the paper as shown above.


Now, you'll need your color burst. I grabbed a bunch of different colors... for the leaf stencil, I chose Orange, Sepia, Yellow Ochre, and Alizarin Crimson. Sprinkle the pigment powder in the open spots of your stencil.


For this big floral stencil, I chose Merlot, Fuchsia, Lemon Yellow, and Violet. I think I also sprinkled a bit of Orange in the center of the flower.


For this fun wintery swirls stencil, I chose just one color... Violet. I had wanted to go with a monochromatic theme for this one, but you'll see later that I changed my mind and a oopsie changed the whole project... ohhh, suspense! Ha!


Now, for the fun... it's time to mist the papers. Now it's important that you just mist the papers. The pigment will react and 'burst'... the intensity of the 'burst' depends on the intensity of the water being sprayed. I think my leaf stencil got spritzed rather than misted because some of the color leaked under the stencil. You can see in the picture above where the Sepia color went under the leaves.


Now, carefully lift the stencils up and see what you've created! How fun is this?! I love the intensity of the colors on the flower and in parts of the swirls! 


Here's a closer look at the violet swirls. The stencil for this one is actually by Echo Park and it's called Flurries.


Here's a closer look at the fall leaves. The stencil for this one is actually by The Crafters Workshop and it's called Mini Climbing Vine.


And, lastly, a close up of the beautiful flower. I love the mix of colors on this one! The stencil for this one is actually by The Crafters Workshop and it's called Mini Zen Flower.


I mentioned above that my plans for the wintery swirl didn't go as I had originally planned. A mishap with a die cutting wonky will change plans, for sure! I improvised and found a tag die that would salvage a big enough piece to work with. I added a bit of blue to the watercolor piece and smoothed out some of the lines with my water pen. I put that aside and stamped this adorable snowman from Unity Stamp Company's kit called Rolly Polly Winter Joy in VersaMark and heat embossed him in white on some vellum card stock. 


I colored him in with my Prismacolor pencils and then fussy cut him out and set him aside. I then stamped the sentiment using VersaMark and heat embossed it in white on a piece of vellum card stock that I cut out with the same tag die. I ran the vellum tag through my Xyron sticker maker and adhered it to the stencil painted tag so I wouldn't have an issue with adhesive showing through the vellum. I then adhered the snowman to the tag. I punched a hole in the top center and added a bit of sweater trim ribbon from my stash. Not my original plan, but I like how it turned out!


This stencil painted panel really made me start thinking of Thanksgiving and being grateful for so much. But why wait for Thanksgiving... start each day with a grateful heart... I love that! The sentiment is a sticker from the Tim Holtz Small Talk pack that I stuck onto a piece of kraft card stock and fussy cut out. I really wanted to showcase the stencil painting so I cut it out using a large die. I put it on a kraft mat die cut from the same set of dies - Blueprints 14, which by chance are also part of my giveaway pack mentioned on my Happy Blogiversary post. Aren't they awesome!?! I adhered the whole panel onto a 5x5 inch kraft card base. I added a few drops of gloss white Nuvo crystal drops and popped up the sentiment. I love how this one turned out!


Now, out of all three stencil painted pieces... this one is my most favorite! I did go over the flower a bit to wash some of the paint and cover the white space. I also painted some blue around the outside of the flower. I really love it! I definitely struggled with cutting this one down but I pulled out my trusty Blueprints 20 dies from My Favorite Things and cut out my stencil painted panel. I adhered that panel to a mat of Royal Velvet card stock and then I adhered that piece to a Hibiscus Burst scalloped rectangle from the same die set. The entire panel was then adhered to a white card base. The sentiment was another sticker from the Tim Holtz Small Talk pack that I stuck on a strip of Royal Velvet and fussy cut a banner end. Isn't it pretty?!


Here's a picture of all three together. I think if I did the snowman tag again I would emboss him in black. Sadly, he gets lost in the background. But overall, I love how they all turned out! I hope you do, too!! I had so much fun doing this stencil painting with color burst technique that I am definitely going to do it again!

That's the second technique tutorial for my Blogiversary celebration! 
Please leave a comment letting me know what you thought and if you haven't already, click on the Follow button on the right hand side so you won't miss the next technique tutorial!!

 Did you comment on my Happy Blogiversary post for your chance to win a prize?!  Check out the details ---> here!

And if you missed the first technique tutorial, you can find that ---> here.

Thanks for stopping by!

See ya next time.
~ Crystal

Tuesday, August 15, 2017

It's a Blogiversary Celebration ~ Day 1 of Technique Tutorials!!

Hello!! It's our first day of technique tutorials and I thought I'd start with a technique that is simple, but fun... the Baby Wipe Technique!! Have you tried this one? I like this one because you can mix up the colors to your liking. Let's get started!


First, we need a baby wipe. I folded one up and put it on a plate to keep my surface from getting damp. 


Next, you'll need 3 or 4 ink refills... for mine I chose Papertrey Ink's Aqua Mist, Limeade Ice, and Summer Sunrise. I love this color combo! I like to work with 3's... 3 ink colors and I added 3 drops of each color. You can adjust this to your liking by adding more color or less. I'm wanting a soft background for my card so I spread out the ink a bit too.


Next, we stamp! I'm using the beautiful distressed flower... or maybe it's a medallion... anyways, it's from the July Kit of the Month from Unity Stamp Company called It's Going To Be Beautiful. Press your stamp into the baby wipe as if it's your ink pad. You'll want to press a few times but try to keep the stamp in the same general area so you don't mix the inks and make it all muddy. I stamped mine on a scrap piece of paper to see if the coverage was right.


I stamped several times around the edge of the card stock until I liked the background. You can see the baby wipe is all inky now, but it's not muddy. The key is to always 'ink' your stamp in the same direction on the baby wipe.


Here's my finished card! I stamped a sentiment from Unity's So Glad You Were Born sentiment kit in the center. I then stamped the same background stamp in two corners with VersaMark ink and heat embossed it in white. I die cut the whole piece using my new favorite Blueprints 20 dies from My Favorite Things. It has the stitched rectangle and the scalloped rectangle in the die set. I love them! I added a bit of lime colored ribbon from my stash and adhered all the layers onto a white card base.


Here's a close up view of the background and the white heat embossed corner. So soft and pretty!


And addicting... ha! I was having so much fun I decided to try a few other color combos. For these cards I did Papertrey Ink's Aqua Mist, Winter Wisteria, and Summer Sunrise.


And I did another one with the original color combo, only I layered it with Aqua Mist card stock.


Here's the collection together... I actually made 10 cards all together. I couldn't help myself. It was so fun and easy! 


That's the first technique tutorial for my Blogiversary celebration! 
Please leave a comment letting me know what you thought and if you haven't already, click on the Follow button on the right hand side so you won't miss the next technique tutorial!!

 Did you comment on my Happy Blogiversary post for your chance to win a prize?!  Check out the details ---> here!

Thanks for stopping by!

See ya next time.
~ Crystal

Monday, August 14, 2017

~~ Happy Blogiversary!!! ~~

I am so excited!! Today is my One Year Blogiversary!! Yay!


Thank you to those that have checked out my blog!! I appreciate it so much!

Now, the best part... presents!! And here's the even better part... the presents are for you!! You read that right! All you have to do is leave a comment below and you're automatically entered to win these goodies...


{My Favorite Things Die-namics Blueprints 14, Cracked Pistachio Distress Oxide, and a Picket Fence Distress Crayon}


You have until 11:59pm EST, August 18 to leave your comment and be eligible to win. Only one comment per person please. One randomly selected winner will be announced on August 19 before noon EST. How exciting?!!?!?


Now before you leave, here's some more info... I'll be posting fun technique tutorials a few times throughout the week. Yay!! I'm so excited! I hope you are, too! You won't want to miss my posts so be sure to follow my blog if you haven't already. The Follow button is right over there --->


Now, I'm not going to leave you today without some crafty goodness to look at... but I thought we'd reminisce just a bit...


My very first blog post featuring this card for my son's birthday. Simple and quick... perfect for a teenage boy! Which reminds me... he has another birthday coming soon! I better get to work!


My first post as a new Can You Case It Design Team Member. I loved the background on this card!


This one is a favorite of mine. I made it for a CASology challenge. So CAS and coffee themed!! How could I not love it!


And this last one is my absolute favorite! I was stuck on the design until I decided to do a galaxy background and then the wheels started turning and I really love the way this one turned out!!

That's it for today, but remember to follow my blog so you don't miss my first technique tutorial!

Thanks for stopping by!

See ya next time.
~ Crystal