Showing posts with label Heffy Doodle. Show all posts

Friday, December 20, 2019

Scrapping for Less ~ Heffy Doodle ~ A Wintry New Year with the Prehistoric Pals

Hello there crafty friends! 
Today, I'm sharing an adorable wintry New Year's card!! I just adore these sweet stamps by Heffy Doodle called Prehistoric Pals... so much fun to create a card a little outside-the-box with these characters. I don't normally think of cavemen and mammoths in the snow, but this was such a fun card to make!


I started with a white piece of card stock that I ran through my big shot with a wonky stitched rectangle die. I set that aside and stamped all the stamps from the set because I wasn't quite sure which ones I was going to use. I stamped with memento tuxedo black ink and then colored the images in with the following Copic markers:

Mammoth ~ BG000, BG02, RV0000, C00, C1, C3
House / Rock ~ C00, C1, C3, W00, W2, W4
Cave Lady ~ E000, E00, E21 (skin), E23, E25, E27 (hair), E30, E31, E35 (clothes)
Cave Man ~ E000, E00, E11 (skin), E37, E95, E99 (hair), E21, E25, E27 (clothes)
Sky ~ BG000, BG53, B00, BV00, B60, Colorless Blender
Ground ~ C00, C1


I fussy cut all of the colored images and cleaned up the edges with the memento tuxedo black marker. When I was coloring the background for this card, I placed the images on the card seeing where I wanted to position every thing. I was then able to add the shadows on the snowy ground. I only used a little bit of shadows so I could keep the card looking more wintry with lots of white.


I adhered the fussy cut images to the card using liquid glue and then adhered the entire piece to a white card base. I added some snow using leftover sequins from a past card kit and also some varying sizes of dots of white gel pen here and there. Don't they just look so excited for the snow?! I love it!


To finish off the card, I stamped the sentiment which is a combination of two sentiment stamps... "Have a Mammoth Day" and "Another Year Boulder". I was able to mask the sentiments and stamp them pretty easily with my Stamp Platform. My paper shifted just slightly on the Year stamp but I was able to fix it with my memento tuxedo black  marker... it just looks a bit more bold ~ almost like it was intentional! This adorable stamp set isn't in stock anymore, unfortunately, but there are a bunch of other adorable Heffy Doodle stamps in the shop! Check them out here ---> Heffy Doodle stamps!

Thanks so much for stopping by! 
See ya next time.

Inky Hugs,
Crystal

Friday, December 6, 2019

Scrapping for Less ~ Heffy Doodle & Nuvo ~ Prehistoric Pals Meet Stone Drops

Hey there crafty friends!
Today, I'm sharing a cute card using the adorable Prehistoric Pals stamp set from Heffy Doodle along with the In the Desert papers by Scrapping for Less! I just love all the cute images in the set and the punny sentiments are amazing!


To start my card, I cut a half sheet of kraft card stock into two pieces measuring 4-1/4 x 5-1/2". I then die cut one of the pieces. I also die cut the patterned paper with the same stitched rectangle die. I trimmed the patterned paper and adhered it to the die cut kraft card stock. I then adhered that piece to the other kraft card front and then adhered the entire panel to a white card base.


I die cut the other patterned paper with a stitched banner die and adhered it to a scrap piece of kraft card stock and fussy cut a mat. I stamped the sentiment with VersaMark watermark ink and heat embossed a fine white embossing powder. I set the card aside and stamped the mammoth and cave girl with Memento tuxedo black ink.

I colored the images with the following Copic markers:
Cave Girl ~ Skin ~ E0000, E00, E11; Hair ~ E21, E23, E37; 
Clothes ~ E42, E44, E47, YR14, YR24, YR27
Mammoth ~ YR14, YR21, YR24, YR27, E44, E47, W00, W1, W3

I fussy cut the images and cleaned up the edges of the images with a Memento tuxedo black marker. I die cut a stitched circle from white card stock and colored it with a bit of N0 and N1 to ground the images. I popped up the images on the stitched circle using foam tape


To finish off the card, I added a bunch of Nuvo Chalk White Stone drops... once I started playing with these gritty drops I just couldn't stop adding them. I think they are perfect for this prehistoric card!! They look like tiny boulders... so fun!


Here's one more look at this cute card... I think this sentiment works for so many occasions!!
And I'm excited to play some more with the Nuvo Stone drops... I just may use them in my next post!

Thanks so much for stopping by!
See ya next time.

Inky Hugs,
Crystal

Friday, July 19, 2019

Scrapping for Less ~ Pink & Main ~ Happy Camper

Hello there crafty friends!
I'm here with another look at the Happy Camper stamp set by Pink & Main. I've paired this adorable set again with the wonderful Galaxy Foil papers also by Pink & Main.


I can't get enough of these Galaxy Foil papers!! They just make a card so quick and easy and those shiny stars are so much fun! Today, my design also includes a fun Campfire Sticker by Jolees... isn't that fun?! It's a pretty big sticker and I struggled a bit with what to do with it, but I think it makes for a fun card with this bear holding marshmallows getting ready to make some s'mores. It's hard to tell in the picture but his little marshmallow on top is actually on fire... which I imagine with this huge campfire it would be!! I used the following Copic markers for the bear ~ E000, E33, E35, E37, YR15, R20, BG11, BG13, B95, B97


You can see some of the glittery goodness in the fire with this picture. 
To finish off the card, I popped up the bear and the sentiment that was stamped with VersaMark watermark ink on black card stock and heat embossed an ultra fine white embossing powder.
Hope you enjoyed my card for today... but hold on, I have a bonus card!!


When I had created my card earlier this month using the Hootiful stamp set by Heffy Doodle... you can check out that card here ---> Hootiful For You-Hoo card...  I had stamped and colored a few extra images so I thought I'd use those for this super quick card. All I did for this card was blend some Chipped Sapphire distress ink directly on my white card base. I started blending in the center and worked my way out giving a nice fade to the color. Such a quick card and one that I can send a friend to wish them a hootiful day!!

Now that's all for me today! I sure hope you liked my cards!
Thanks so much for stopping by! See ya next time.

Inky Hugs,
Crystal


Friday, July 5, 2019

Scrapping for Less ~ Heffy Doodle ~ Hootiful

Hey there crafty friends!
I'm here with a super cute card using the most adorable owl stamp set I think I've seen in a long time!! This adorable set is from Heffy Doodle and it's called Hootiful... so cute! I love these cute owls and there are a bunch of wonderful sentiments in the stamp set too!!


So, normally I would have created my very own galaxy background but for this card I didn't have to! I used the fabulous Galaxy Foil papers from Pink & Main!! These papers are so beautiful and the colors are absolutely dreamy!! And it made for another quick card design which I am always looking for!! I knew I wanted to create a scene using the papers for my background so I die cut the papers with a large stitched oval die and set it aside.


I stamped a bunch of these adorable owls with Memento Tuxedo black ink and then colored them with the following Copic markers:

Owls ~ W00, W0, W1, W3, W6, W7, Y06, YR15, YR21
Branch/Leaves ~YG11, YG23, YG25, E34, E53, E57, E59
Moon ~ Y000, Y02, Y06

I colored around the edges of each of the fussy cut images with a Memento Tuxedo black marker. I set them all aside and then started building my card base. I die cut a piece of black card stock with a large stitched rectangle die and adhered it to a kraft card front measuring 4-1/4 x 5-1/2". I then adhered the entire card front to a white card base.


I just needed to build my scene... I adhered the oval die cut Galaxy Foil paper directly to the black card stock layer. I adhered the owl landing on the branch and then adhered the branch over top. I also adhered the moon... all of these were adhered with Multi Medium Matte directly to the galaxy background. I then popped up the flying owl and the owl near the bottom right side using foam squares. I then stamped the sentiment with VersaMark watermark ink and heat embossed a fine white embossing powder. I die cut the sentiment with a banner die, trimmed it down, and popped it up on the card. I really love how this turned out! I hope you do too!

Thanks for checking out my blog post!
See ya next time.

Inky Hugs,
Crystal

Friday, April 12, 2019

Scrapping for Less ~ Heffy Doodle ~ Gnome Matter What

Hello crafty peeps! 
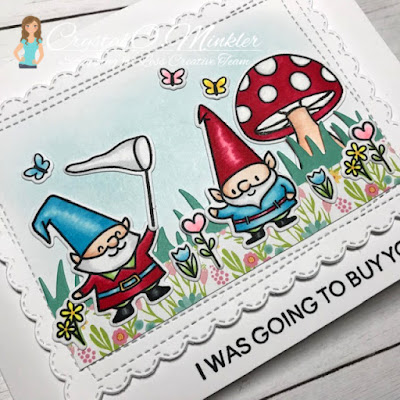
Today, I'm sharing an adorable card using Heffy Doodle's Gnome Matter What stamp set


How cute are these gnomes!?! 
I just adore them! I inked them up along with a bunch of other images from this set using Memento tuxedo black ink and then colored them in using the following Copic markers: Y06, Y35, YG11, YG23, RV000, RV00, RV14, RV21, RV29, E000, E00, E11, N0, N1, N2, N5, N8, B000, B00, B02.

To build my scene I die cut a piece of white card stock using the Memory Box Wrapped Scalloped die and then I blended a little Tumbled Glass distress ink for my sky. I then cut a strip of patterned paper for my 'ground' from the Echo Park Spring Fling paper pad and also die cut the grass from the same paper pad. I adhered the grass to the back of the 'ground' paper and then adhered just the bottom portion of the combined papers to the scene so that I could be free to place things in amongst the grass, like the cute mushroom. I adhered all the images to create my scene and then popped up the focal panel on a white card base. To finish off the front of the card, I stamped my sentiment using my Tim Holtz Stamp Platform. Now, just a little tip... I should have stamped the sentiment before I popped up the focal panel, but because I used the Stamp Platform I was able to stamp the sentiment a few times to get the crisp sentiment I wanted.


The sentiment on the front of the card just keeps you hanging so I just HAD to add to the inside of the card. I combined the patterned papers again to continue the design on the inside of the card. I added another gnome... I colored several since I was on a roll. LOL
And then I stamped the sentiment for the inside of the card. I decided to add the little clock to this gnome's hand to tie in the sentiment... so cute! Now, I got to thinking you could leave the card like this basically saying that the card is the recipient's birthday gift. Or...


You could slide a gift card in there for just a little something... a quick gift idea!


Here's a close up of the scene on the front of the card... I went a little crazy with the flowers, but couldn't help myself! So many cute images to color in this set!

You can find the Heffy Doodle Gnome Matter What stamp set available in the shop!


Thank you friends for checking out my blog post!
See ya next time.

Inky Hugs,
Crystal

Wednesday, July 4, 2018

Scrapping for Less ~ Heffy Doodle & Sunny Studio ~ Happy B-day!

Hi there! Today, I have a fun bunch of cards using Heffy Doodle's Big Bold Words with Sunny Studio's Oceans of Joy

I started by blending some Distress Oxide inks on white card stock - one color per card. I used Seedless Preserves, Salty Ocean, Twisted Citron, and Abandoned Coral.


Now, you'll notice this first card is different from the others. I rubbed an embossing buddy over the blended backgrounds but for some reason the Seedless Preserves background still had the clear embossing powder stick to the Distress Oxide ink. So, my octopus just got embossed into the background. My plan B - I stamped the octopus again carefully over the already stamped images with Versamark watermark ink and heat embossed white embossing powder. It kind of gave the octopus a ghostly look... but it's much cuter in person. I also stamped the same sea creatures on a white card base and set them aside.


For each of the background pieces, I also splattered water and white acrylic paint. It was fun to see how the splatter looked on each of the different colors. I die cut the backgrounds with a stitched rectangle die and set them aside. I stamped the sentiment on Vellum card stock using the coordinating colors for each card. I had a bit of trouble with my clear embossing powder sticking to the vellum... for this card with the Salty Ocean ink it looks like water so I thought it was kind of cool. I think it may be time for a new embossing buddy though.


I die cut the vellum card stock pieces with a slightly smaller stitched rectangle die and ran them all through my sticker maker so they'd be easy to adhere to the background piece and I wouldn't have to worry about the adhesive showing. My favorite trick for adhering vellum to cards!


The last step was to pop up all the background pieces onto the card bases. Even though these cards gave me a bit of trouble, I think they turned out pretty cute. This last crab one is my favorite though... and coincidentally it's also the only one that didn't give me trouble! LOL

Here's a look at the stamp sets I used for these cards.


That's it for me today! Have a fun & safe 4th of July everyone!

Thanks for stopping by!

See ya next time.
~ Crystal


Wednesday, March 14, 2018

Scrapping for Less ~ Heffy Doodle ~ Happy St. Paddy's Day!

Hello! I have a fun card for St. Paddy's Day! Do you make cards for St. Patrick's Day? I know it's not a huge holiday so not too many people do... but I do! I've always found St. Patrick's Day to be a fun day. And really, any excuse to make and send a card is great in my book!


Isn't this leprechaun from Heffy Doodle's Lucky Friends stamp set just the cutest?! I stamped him, the coins, and the cauldron using Memento tuxedo black ink and then colored them using copic markers {Skin - E50, E51; Beard - YR15, YR68; Shoes/Cauldron - N0, N3, N7, N10; Clothes - YG01, YG05, YG17; Coins - Y06, Y28}. I fussy cut those pieces and set them aside. 


I blended some Tumbled Glass distress ink on the center of a white card base. I die cut a piece of patterned paper and cut down another piece of patterned paper and set them aside. I created the rainbow by die cutting leftover papers from past card kits using the Paper Smooches Rainbow die from the February card kit. I stamped the sentiment and fussy cut a banner and then set that aside. All that was left was to adhere all the pieces on the card front. This was such a fun card to make! I hope that you like it and that your St. Paddy's Day is filled with fun... and not too much mischief! 

Thanks for stopping by!

See ya next time.
~ Crystal


Wednesday, December 13, 2017

Love You Beary Much

Happy Wednesday! Today I have a cute card using a set from Heffy Doodle that I used awhile back for our product feature blog hop. You can find this adorable set in the Scrapping for Less shop right here ---> Beary Big Heart. I've had Christmas cards on the brain lately so it was nice to play with a set for Valentine's Day.


I blended the background using Worn Lipstick and Picked Raspberry Distress Oxide inks. I then stamped the little flower all over using VersaMark ink and heat embossed ultra fine white embossing powder. I cut a frame using two different sizes of Wonky Square dies. I adhered a piece of vellum card stock to the back the frame piece and then adhered that to my white card base. 


I stamped the little bear using Memento Tuxedo black ink and colored it in with copic markers {E00, E31, E33, R20, and 0}. To color the heart I blended some Pink Flambe Nuvo mousse and paper pieced it to the image. I stamped the little flower on a scrap of paper and colored it in with copic markers {R20, RV04}. I fussy cut the bear and touched the edges with a Memento Tuxedo black marker. I adhered the bear to the vellum square with glue dots. I stamped the sentiment, fussy cut it out, and then adhered it to the card.


Thanks for stopping by!

See ya next time.
~ Crystal


Monday, November 13, 2017

Sending Fuzzy Cuddles

Hello! I am loving Heffy Doodle's Beary Big Heart! I'm a bit of a Pluviophile... I'm not sure that it's an actual word, but I've seen it around. It means a lover of rain; someone who finds joy and peace of mind during rainy days. I love the rain! I always have.


When I saw the cute umbrella in the Beary Big Heart set, I knew I had to make a card with rain so I could use the umbrella stamp. I still had my Nuvo Mousses out on my desk so I dived in!! Using a blending tool I sponged some Aquamarine mousse on a piece of white card stock. I then die cut it out using the My Favorite Things Blueprint 14 Die-namics set. I dug through my stencil collection to find a raindrop stencil. Using microfiber tape I taped down my stencil over the white card stock and then used a spatula to add some Pacific Teal mousse. I love this monochromatic look to the card! I decided to stick with it and colored the umbrella with some blue green copic markers {BG10, BG18, BG72}. I love grey with teal so the little bear just had to be grey... I used copics to color him in too {N1, N3, N4, N5}. I die cut some dark teal card stock and layered that on a 5" x 5" white card base. I popped up the white raindrop panel. I then grabbed a scrap of the dark teal card stock... I stamped and heat embossed the sentiment using a fine white embossing powder. I fussy cut the banner end and then popped that up on the card. I adhered the umbrella to the bear and then adhered them to the card. I love that the bear looks happy in the rain!


Here's a picture to show some of the shimmer from the Nuvo mousses! I just love it!

I really hope that you enjoyed the card that I shared today. If you're loving the Beary Big Heart stamp set... it's still available in the store!!

Thanks for stopping by!

See ya next time.
~ Crystal


Friday, November 10, 2017

Heffy Doodle Comes to Reside @ Scrapping for Less


Heffy Doodle is a brand new stamp company that just got started this summer. They have so many very cute designs! I am hoping that you are going to fall in love with these adorable designs as much as all of us over here at Scrapping for Less have. Lesley is a super sweet lady and oh my, the talent that she has in these cute images. Take a look at all the sweet and cute things the Design Team has whipped up for the blog hop today. Oh and just in case you did not get a chance to read the Brand Focus interview you can find that on the Scrapping for Less Blog


Aren't these bears just adorable! I'm sharing the Beary Big Heart set with you today. I stamped the bears and the little card on scraps of white card stock and then colored them in using copic markers. I also stamped the heart bear on a piece of Knit Picky patterned paper. I paper pieced the heart by cutting it out very closely to the black line and then I glued it onto the heart bear that I had colored in. I just love the look of the patterned paper... the knit looks like hearts! It's so cute! I fussy cut the bears and set them aside. I die cut the wonky stitched square and then used the next smallest size to cut out the center giving me a frame. I set that aside too and then I grabbed a white card base. I marked off my inner area for the framed square very lightly with a pencil. I haven't touched my Nuvo Mousses for awhile so I pulled out my Aquamarine and Spring Green and used those to make my background. I tore a mask from a large post it note to separate my sky from the ground. I then used my finger tip to get some color and then gently rubbed on the card stock staying within the pencil lines that I had made. I removed the mask and very carefully 'finger painted' the grass area. I love the softness and shimmer to the background that the mousse gives. Next I erased all of my pencil marks. I popped up the wonky frame. I adhered the bears and the little card. I then stamped the sentiment using Memento Tuxedo black ink. My last touch was the bow for the girl bear. I stamped it on a scrap of white card stock and then I grabbed my Pink Flambe Nuvo Mousse and again using my finger tip colored in the little bow. I fussy cut it out and then adhered it to the bear. I just love how this card turned out! I think I might just give this one to my husband for Valentine's Day.


~ Blog Hop Line Up ~


Crystal O. Minkler <--- you're here

up next ---> Tanya Hahn

Don't forget to head back over to the Scrapping for Less blog and enter the Rafflecopter giveaway!

Thanks so much for joining us today!

See ya next time.
~ Crystal