Pages

Tuesday, July 30, 2024

Tawny Owl Paperie Inky Inspiration Sketch 24 ~ Bitty Birthday Bash ~ Unity Stamp Co.

 Hello there crafty friend!
Today I'm sharing my first card for the Tawny Owl Paperie Inky Inspiration Sketch Challenge 24 in the Tawny Owl Paperie Inky Inspiration Facebook group.  I've been wanting to play with the adorable Bitty Birthday Bash from Unity. It's been sitting on my desk for weeks!


I am continuing to use up some of my leftover papers. I came across these pretty rainbow papers in my stash. No idea what these papers are called or who made them. They sure are pretty though!
 

Here's a look at the leftovers I'll be using up. I'm hoping to finish these up quick this month.


Here's a look at the fun sketch for Tawny Owl Paperie Inky Inspiration Sketch Challenge 24. The sketch, as always, is meant to inspire not require. So let the sketch lead in your design, but don't feel limited by it. I moved my sentiment and added the sequins in place of the little rectangle. A good example of letting the sketch lead, but not limiting the design.


 I stamped the Bitty Birthday Bash birds using Black Amalgam ink for the birds and Picked Raspberry and Wilted Violet Distress Ink for the balloons. I colored up the birds and a bit more of the balloons using my Copic markers. Fussy cut them leaving a bit of a white border around the images.

Here's a quick list of the Copic markers I used: 
Birds: Y11, Y15, YR12
Pink Hat / Pink Balloons: RV000, RV11, C1
Purple Hat / Purple Balloons: V000, V12, C1
Grass: YG11, YG23
Flowers: B000, B00


I love how quick these cards came together! All my layers are adhered directly to a white A2 top fold card base. No foam tape or popping up of anything on this one.


 I hope you all have fun with this sketch! I can't wait to see what you create with it. 
Have an ink-tastic week!

Thanks so much for stopping by!
See ya next time.

Inky Hugs,
Crystal


{Please note that comment moderation is on. Your lovely comment will appear once approved.}

Monday, July 29, 2024

Inky Paws Challenge #228 ~ Sketch Challenge Reminder

 Hello there crafty friend!
 There's still time to play along with the Inky Paws Challenge 228 - Sketch Challenge! You have until this coming Friday, August 2nd to get your entries in for this fun challenge and a chance to win a $20 store credit to Newton's Nook Designs!


Such a fun sketch! I couldn't wait to make a Halloween card using my favorite Halloween stamp!


I stamped the adorable Newton's Perfect Pumpkin using Memento Tuxedo Black ink and colored it up with my Copic markers. I fussy cut this cutie and colored up the edges with a Memento Tuxedo Black marker making the fussy cutting nice and neat! I heat embossed the sweet sentiment using Sugar Cube White Pigment ink from Taylored Expressions along with Alabaster White Embossing Powder from Brutus Monroe. This is my favorite combo for a pretty white heat embossed sentiment. I melted the powder with a Wagner Precision Heat Tool and then trimmed the sentiment.

Here's a quick list of the Copic markers I used:
Kitty: R00, R20, N0, N2, N4
Hat: N2, N4, N6, N8, YG11, YG23
Pumpkin: E53, E55, E57, YR21, YR15, YR68, YR14


I die cut a hexagon from True Black card stock from Papertrey Ink using a die from the awesome Hexagon Frames Die Set. I adhered the sentiment across the bottom of the hexagon and adhered the kitty just on top... I think the pumpkin lays over the sentiment strip just a tiny bit. I added foam tape to the back of the hexagon and sentiment and set it aside.


I die cut the background paper using the stitched scalloped die from the Frames & Flags Die Set and I adhered it to a black A2 top fold card base. I cut the rest of my fun pattern papers from the Halloween Meows 6x6 Paper Pad. The orange striped papers measures 1-1/2 x 4-5/8". The cute kitty pumpkin paper measures 1-3/4 x 4-1/8". And the orange pumpkin paper measures 4-1/4 x 1-1/2". I adhered my paper layers to the card and then popped up the focal kitty! So happy to add a cute Halloween card to my stash!


Now it's your turn to get your paws inky with your Newton's Nook Designs products and create a project using the sketch. Be sure to link up to the Inky Paws Challenge! Can't wait to see your projects!


Thanks so much for stopping by!
See ya next time.

Inky Hugs,
Crystal


{Please note that comment moderation is on. Your lovely comment will appear once approved.}

Friday, July 26, 2024

Christmas in July 2024 {BYSHC} Linky Party ~ Winter Cardinal ~ Pink & Main

 Hello there crafty friend!
I couldn't help myself I'm sneaking in another card for the Christmas in July 2024 {BYSHC} Linky Party! So I've played with this adorable Winter Cardinals Stamp Set from our lovely Sponsor Pink & Main a couple of times now. And I'm happy to say that with this card, I have stamped all of the adorable cardinals! How fun is that!? It's not often that I stamp every stamp from a stamp set.


I stamped the adorable cardinal using Memento Tuxedo Black ink in my mini misti with the Pressure Pal from our awesome Sponsor Twiddler's Nook. I love this tool! It comes in handy when my hands are hurting. I colored up the adorable Winter Cardinals using my Copic markers and die cut it using the X Stitched Circle die from our lovely Sponsor Gina Marie Designs. Unfortunately, I'm not finding this awesome die set on the website. I mat the cardinal with a black circle but it was in my file folder of black card stock. No idea what I used to die cut it though I would guess I used the Nesting Circles Dies from Sponsor Waffle Flower.

Here's a quick list of the Copic markers I used:
Cardinal: R20, R14, R46, C00, C1, C3, YR15
Scarf: C00, C1, C3, YG11, G24, G46
Holly: YG11, G24, G46, R20, R14, R46
Snow: C00, C1, C3


I'm also playing along with the Color Hues Challenge today! Red and Green are so perfect for a Christmas card! This fun challenge is open until July 29th, if you want to play along! 


The fun background was created using two dies from Pink & Main. I die cut New Leaf card stock from Papertrey Ink using the Plaid Cover Die Panel A. And then I die cut Pure Poppy card stock from Papertrey Ink using the Plaid Cover Die Panel B. These fabulous dies also come at a bit of a discount in a bundle called the Plaid Cover Dies Bundle. I adhered them over the front of a black A2 card base of True Black card stock also from Papertrey Ink using iCraft UltraBond Adhesive from our fab Sponsor Therm O Web.


I found a scrap of black card stock that was the width I was looking for but wasn't quite the length so I just cut it in half. I heat embossed the sentiment on the bottom piece. I prepped the card stock using the TE Anti-Static Powder Tool from Sponsor Taylored Expressions. And then I stamped the sentiment using the Sugar Cube White Pigment Ink from Taylored Expressions. I added some Alabaster White Embossing Powder and melted the powder with my Wagner Precision heat tool. I actually forgot to wipe away the excess powder... that's why it's so visible in the photo. Ugh. No time to redo! So just imagine it's all cleaned off. ;)


 I adhered the wide strip of black card stock on the top and bottom of the card and then I used iCraft 3D Foam Tape Jumbo Roll (white) from our lovely Sponsor Therm O Web to pop the cardinal circle up on the card. I finished off the card with three green Flat Back Rhinestones from Sponsor Twiddler's Nook.


My card design is inspired by a past sketch... the {BYSHC} Sketch 26. This is a classic sketch! I thought it would be perfect with this fun background and the circle focal image.


Have you stopped by the Christmas in July 2024 {BYSHC} Linky Party to check out all the wonderful Holiday inspiration being shared?! I've been inspired by so many of the cards! That's why I just had to make so many extras! LOL! I sure hope you'll stop by and check it out! Have an ink-credible day!


Thanks so much for stopping by!
See ya next time.

Inky Hugs,
Crystal


{Please note that comment moderation is ON. Your comment will appear shortly.}

{BYSHC} Sketch Challenge 47 ~ Christmas in July 2024 {BYSHC} Linky Party ~ Fluffy Friends Holiday ~ Taylored Expressions

Hello there crafty friend!
I'm back with more inspiration for the {BYSHC} Sketch Challenge 47 over in the Build Your Stash Holiday Cardmakers Facebook group! Today I'm sharing a fun Christmas card featuring the adorable Fluffy Friends - Holiday stamp set from our amazing sponsor, Taylored Expressions! Taylored Expressions has generously offered up a $25 gift card as a prize for the {BYSHC} Sketch Challenge 47 this month! So fabulous!!


I started with my background for this card. I ran a card front of Stampers Select White Card Stock from Papertrey Ink through my Big Shot with the cool Fanfare Cutting Plate from Taylored Expressions. It looked like little hills to me. Haha! I thought it would be fun for this cute bear!  Like he's sledding through some hilly snow. I also die cut a small scrap using the same cutting plate and then I die cut it again using a die from the Stitched Square Stacklets.


I trimmed the background to 3-7/8 x 5-1/8" and mat it with a piece of Pure Poppy card stock from Papertrey Ink measuring 4 x 5-1/4". I die cut a mat using the next largest square die from the Stitched Square Stacklets from Pure Poppy card stock. I pulled a fun scrap of pattern paper from the Meowy Christmas 6x6 Paper Pad from Newton's Nook Designs. It was a decent width but I had to trim the length. It measures 2 x 4-1/8" and then I mat it with a Pure Poppy mat measuring 2-1/8 x 4-1/4". I adhered all of my layers to a white A2 top fold card base using iCraft UltraBond Adhesive from Therm O Web.


 I stamped the adorable bear and hat from the Fluffy Friends - Holiday stamp set using Memento Tuxedo Black ink and then I die cut them using the coordinating Fluffy Friends - Holiday Die. I colored them up using Copic markers. I colored the black dots on the scarf using a Sakura White Gelly Roll pen. And then I added a few dots to the hat. I also cleaned up the edge under the sled where the red bled out of the line. Love my white gelly roll pen!! 

Here's a quick list of the Copic markers I used:
Bear: C00, C1, C3, R00, R20
Hat: R20, R14, R46
Scarf: YG11, G24, G46
Sled: R20, R14, R46, E53, E55, E57


 I heat embossed the sentiment from the Fluffy Friends - Holiday stamp set from Taylored Expressions. I prepped the red card stock with the TE Anti Static Powder Tool. I stamped the cute sentiment using the Sugar Cube White Pigment ink and added Alabaster White Embossing powder from Brutus Monroe. I then melted the embossing powder using my Wagner Precision Heat Tool. After letting the melted powder cool a bit, I rubbed my card stock with a microfiber cloth to remove the anti static powder. I trimmed up the sentiment and added a couple scrap pieces under the left side and the bottom using liquid glue. A great trick to adhere the sentiment flat for cards with layers. I also did that on the left and right sides of the squares.


Here's a look at {BYSHC} Sketch Challenge 47 for the month of July. Loving this sketch! There's just a few days left to play along with us. If you're interested in seeing a bit more inspiration for this sketch, check out the amazing inspiration from the design team over on the {BYSH} Cardmakers blog! So many fabulous cards this month from the design team.


I'm also playing along with the Christmas in July 2024 {BYSHC} Linky Party. Have you stopped by to check out all the wonderful holiday inspiration being shared?! I've been inspired by so many of the cards! That's why I've been making so many extras! LOL! I sure hope you'll stop by and check it out! Have a wonderful day!


Thanks so much for stopping by!
See ya next time.

Inky hugs,
Crystal


{Please note that comment moderation is ON. Your lovely comment will appear shortly.}

Thursday, July 25, 2024

Christmas in July 2024 {BYSHC} Linky Party ~ Beautiful Poinsettia Stencil ~ A Colorful Life Designs

 Hello there crafty friend!
I couldn't help myself I'm back again today to share a couple more cards I made for the Christmas in July 2024 {BYSHC} Linky Party! I've been so inspired by the cards shared over at the Linky Party... I just HAD to get inky! 


And my order from our amazing Sponsor A Colorful Life Designs did just arrive so I really wanted to play with a couple new stencils. Yay! I ended up inking up both the Beautiful Poinsettia Stencil and the Merry Christmas Stencil. I wanted to see what these beautiful stencils would look like on Kraft card stock from Papertrey Ink.


 I once again used the awesome 5.5 x 8.5" Grip Mat from Sponsor Waffle Flower. I placed my 4-1/4 x 5-1/2" piece of Kraft card stock in the center of the grip mat and placed the Beautiful Poinsettia Stencil over it. I blended Candied Apple, Fired Brick and Worn Lipstick Distress Oxide inks over the inner leaves of the poinsettia.


I blended Mustard Seed Distress Oxide ink over the center of the poinsettia. And then I blended Twisted Citron and then some Pine Needles Distress Oxide inks over the ends of the leaves. I replaced the panel with a new piece of Kraft card stock and then placed the Merry Christmas Stencil over the panel. For this second stencil I just blended Candied Apple and a bit of Fired Brick Distress Oxide inks.


I die cut both panels using the Postage Stamp {nesting dies} from Sponsor Unity Stamp Co. I cut the panels from corner to corner using my Tim Holtz Tonic Guillotine Comfort Paper Trimmer. I cut one panel first and then I laid the left corner piece on the other full panel as a guide. I made sure it was line up right on the edge and then I cut the second panel. I hope that makes sense. It really made it easy for the two panels to line up together on the card bases.


I distressed the outer edges using Vintage Photo Distress Oxide ink. I love the vintage vibe it gives the card stock. I placed the two triangle pieces {one Merry Christmas and the opposite poinsettia} back in the die and then adhered them together with a scrap of thin card stock. It was just a scrap maybe 2" wide that covered the center line from behind. I adhered the panels to a red A2 top fold card base of Pure Poppy Card Stock from Papertrey Ink. I adhered all my layers using iCraft UltraBond Adhesive from Therm O Web.


And then I splattered the cards using Apple Barrel White Acrylic paint that I spritzed with a tiny bit of water. I debated adding a strip of card stock across the card where the two triangles meet but I decided against it. I didn't want to take away from the stenciled backgrounds. What do you think? Should I have added a strip of card stock across?


 All that was left was the sentiments. I applied some anti static powder using the TE Anti-Static Powder Tool from Sponsor Taylored Expressions to a scrap piece of Kraft card stock. I stamped the beautiful sentiment from the Sketched Poinsettia Stamp Set from Waffle Flower using Sugar Cube White Pigment Ink from Taylored Expressions. I then added some Alabaster White Embossing Powder from Brutus Monroe. I melted the powder using a Wagner Precision Heat Tool. I used the fabulous Pressure Pal from our awesome Sponsor Twiddler's Nook when I stamped the sentiments. Once the sentiments had cooled I wiped off the anti static powder using a microfiber cloth. I distressed the edges of the sentiments with the Vintage Photo Distress Oxide ink. Trimmed the sentiments and then popped them up with iCraft 3D Foam Tape Jumbo Roll (white) from our lovely Sponsor Therm O Web.


I hope you'll stop by the Christmas in July 2024 {BYSHC} Linky Party to check out all the wonderful Holiday inspiration being shared! I've been inspired by so many of the cards! I sure hope you'll stop by and check it out! Have an ink-tastic day!


Thanks so much for stopping by!
See ya next time.

Inky Hugs,
Crystal


{Please note that comment moderation is ON. Your comment will appear shortly.}

Christmas in July 2024 {BYSHC} Linky Party ~ Wishing You Mini ~ Gina K. Designs

 Hello there crafty friend!
It's day 7 of the Christmas in July 2024 {BYSHC} Linky Party!! I'm super excited to share another sweet card that I've made to add to my holiday stash this week! I am a huge fan of snowflake stamps and I've had the Wishing You Mini stamp set from Gina K. Designs in my stash for a good long while. I love this cute stamp set!


I finally played with the awesome Postage Collage Die and Postage Collage Coloring Stencil from our amazing Sponsor Waffle Flower. I just adore snowflakes in blue! I die cut a piece of white card stock using the Postage Collage Die. And then I cracked open my 5.5 x 8.5" Grip Mat also from Waffle Flower. Another fabulous tool that's been in my stash for awhile but I haven't gotten around to using until now. And I'm very happy with it. Glad I finally tried it out! I placed the die cut panel on the grip mat and blended Tumbled Glass Distress Ink over the first stencil in the Postage Collage Coloring Stencil set. Keeping the stencil over my panel, I then stamped the Wishing You Mini snowflakes using Tumbled Glass, Salty Ocean, and Chipped Sapphire Distress Inks; and then stamped the stars with Black Soot Distress Ink. I used the fabulous Pressure Pal from our awesome Sponsor Twiddler's Nook when I stamped the snowflakes and stars in my mini misti.


I messed up two of the rectangles {left middle and bottom right} so I redid them using the same steps. I stamped the 'A Happy Holiday' sentiment on the longer rectangle. And then I trimmed them both and added foam tape called iCraft 3D Foam Tape Jumbo Roll (white) from our lovely Sponsor Therm O Web. I heat embossed the 'wishing you' sentiment on black card stock. I prepped my black card stock with the TE Anti-Static Powder Tool from our wonderful Sponsor Taylored Expressions. I stamped the sentiment using the Sugar Cube White Pigment ink, also from Taylored Expressions, and added Alabaster White Embossing powder from Brutus Monroe. I then melted the embossing powder using my Wagner Precision Heat Tool. After letting the melted powder cool a bit, I rubbed my card stock with a microfiber cloth to remove the anti static powder. I fussy cut the sentiment and adhered it directly to the rectangle.


I removed the backing from the foam tape and popped up the two pieces. You can see the dimension it gives the card in this photo. Love it! Who knew I'd end up loving that I messed up the panel! Haha! I adhered the postage layer to a 3-7/8 x 5-1/8" mat of black card stock and then adhered it to a white A2 top fold card base. All of my layers are adhered using iCraft UltraBond Adhesive from Therm O Web. I used a Sakura White Gelly Roll pen to add dots of snow to the background. And then I finished off the card with a few white rhinestones from the Frosty Rhinestones from our fabulous Sponsor Gina Marie Designs. 


Just a few more days to play along with the Christmas in July 2024 {BYSHC} Linky Party!! I have thoroughly enjoyed the inspiration being shared! I hope you'll join in the fun! Have an ink-tastic day!


Thanks so much for stopping by!
See ya next time.

Inky Hugs,
Crystal


{Please note that comment moderation is ON. Your comment will appear shortly.}

Wednesday, July 24, 2024

Christmas in July 2024 {BYSHC} Linky Party ~ Sketched Poinsettia ~ Waffle Flower

 Hello there crafty friend!
I couldn't help myself I'm back again today to share another card I made for the Christmas in July 2024 {BYSHC} Linky Party! I've been so inspired by the cards shared over at the Linky Party... I just HAD to make another card! 


I stamped the beautiful poinsettia from the Sketched Poinsettia Stamp Set from our lovely Sponsor Waffle Flower. I used the awesome Sketched Poinsettia Coloring Stencil to color the beautiful poinsettia. I blended Candied Apple and Fired Brick for the leaves; Mustard Seed and Spiced Marmalade with a touch of Vintage Photo for the center of the flower; and Twisted Citron, Pine Needles and Crushed Olive Distress Oxide inks.


I'm also playing along with the Color Hues Challenge today! Red and Green are so perfect for a Christmas card! This fun challenge is open until July 29th, if you want to play along! 


 I die cut the poinsettia using the Sketched Poinsettia Matching Die and set it aside. I stamped the sentiment from the Sketched Poinsettia Stamp Set using Memento Tuxedo Black ink. And then die cut it using the coordinating die. I used the fabulous Pressure Pal from our awesome Sponsor Twiddler's Nook when I stamped the poinsettia and the sentiment in my mini misti.


The fun background was created with iCraft Easy-Tear 1/4" Tape and Deco Foil Color Harmony Transfer Foil Multi-Pack, Shades of Green from our awesome Sponsor Therm O Web. I laid stripes of the tape across a 4-1/4 x 5-1/2" piece of white card stock. And then I laid a piece of Electric Lime foil over the tape with the shiny green facing up. No need for a laminator for these fabulous foils! I just used my bone folder to press the foil into the tape. I went over the whole panel a couple of times from both directions and pulled up the foil. It was perfect! I love it! 


I die cut the foiled background using the Frayed Edge Stacklets dies from Sponsor Taylored Expressions. I adhered the poinsettia and sentiment to the foiled panel using iCraft UltraBond Adhesive from Therm O Web. And then I popped up the whole panel onto a white A2 top fold card base using iCraft 3D Foam Tape Jumbo Roll (white) also from Therm O Web. Such a quick and fun card to make!


I hope you'll stop by the Christmas in July 2024 {BYSHC} Linky Party to check out all the wonderful Holiday inspiration being shared! It's all been so awesome! I sure hope you'll stop by and check it out! Have an ink-tastic day!


Thanks so much for stopping by!
See ya next time.

Inky Hugs,
Crystal


{Please note that comment moderation is ON. Your comment will appear shortly.}

Christmas in July 2024 {BYSHC} Linky Party ~ November 2023 KOM Festive Flair ~ Unity Stamp Co.

 Hello there crafty friend!
I can't believe how fast the time is going by! We are nearing the end of the Christmas in July 2024 {BYSHC} Linky Party! It's always so sad to reach the end, but I'm super happy to be adding so many cards to my stash! I hope you've been inspired to play along with us. My card today features a couple of stamps from the November 2023 Kit of the Month called Festive Flair from our amazing Sponsor Unity Stamp Co. It's Membership Wednesday... a fun day to share inspiration for the awesome memberships over at Unity! I decided to play with an older KOM this time and make another holiday card for my stash!


I had a fun idea for a simple one layer card that kind of took a left turn. I blended over the cool Reindeer Games Stencil from our fabulous Sponsor A Colorful Life Designs using my red TE Blender Brush from another fab Sponsor, Taylored Expressions. I actually didn't add any ink to my brush but I'm pretty sure it has some Candied Apple Distress Ink on it. I kept it very light.


 And then I stamped the beautiful trees from the November 2023 KOM using Iced Spruce Distress Ink. I then applied some anti static powder using the TE Anti-Static Powder Tool from Taylored Expressions. I stamped the beautiful reindeer using Wow Clear Embossing Ink and then added some Raven Embossing Powder from Brutus Monroe. This is a fun black embossing powder with glitter in it. It's really beautiful in person. I melted the powder using a Wagner Precision Heat Tool. As always, I used the fabulous Pressure Pal from our awesome Sponsor Twiddler's Nook when I stamped the trees and the reindeer in my Stamp Platform. Love this tool!


 Once I had all the elements on the panel, it just didn't look right as a one layer card. I trimmed off the front panel of the card base and cut the panel down to 5-1/16 x 3-3/4". And then I die cut a piece of True Black card stock from Papertrey Ink using the largest die from the Postage Stamp {nesting dies} from Unity. I found a card front of Ocean Tides card stock from Papertrey Ink in my stash. I scored the 8-1/2 x 5-1/2" card stock at 4-1/4" for an A2 card. Stamped the sentiment on a scrap of white card stock, trimmed it and mat it with a scrap of black card stock. I adhered all of my layers using the iCraft UltraBond Adhesive from Sponsor Therm O Web. I finished off the card with two glittery red enamel dots from the Holiday Glitter Enamel Dots from Sponsor Gina Marie Designs. Unfortunately, I can't seem to find them on the website but these are a favorite of mine... Red & Green Foil Mirror Enamel Dots.


I hope you'll stop by the Christmas in July 2024 {BYSHC} Linky Party to check out all the wonderful Holiday inspiration being shared! I've been inspired by so many of the cards! I sure hope you'll stop by and check it out! Have an ink-redible day!


Thanks so much for stopping by!
See ya next time.

Inky Hugs,
Crystal


{Please note that comment moderation is ON. Your comment will appear shortly.}

Tuesday, July 23, 2024

Christmas in July 2024 {BYSHC} Linky Party ~ TOP Inky Inspiration Sketch 23 ~ Santa's Workshop ~ Jaded Blossom

 Hello there crafty friend!
It's day 5 of the Christmas in July 2024 {BYSHC} Linky Party!! I'm adding another sweet card to my Christmas stash! This time I played with the super cute Christmas Village: Santa's Workshop stamp set from Sponsor Jaded Blossom. I'm also sharing inspiration for the Tawny Owl Paperie Inky Inspiration Sketch Challenge 23 in the Tawny Owl Paperie Inky Inspiration Facebook group. In my continuing effort to finish off some paper scraps I did use a few scraps of pattern paper from one of my Christmas paper pads. Every little bit counts!


I paired up the cute Christmas Village: Santa's Workshop with the Brewing It Up 6x6 Paper Pad from our Sponsor Not 2 Shabby! Love these pretty papers! I adhered all of my background layers using the iCraft UltraBond Adhesive from Sponsor Therm O Web. I die cut a panel of white card stock using the Wonky Stitched Rectangle Die from Sponsor Gina Marie Designs and adhered the two smaller rectangles to the panel. I then added foam tape called iCraft 3D Foam Tape Jumbo Roll (white), also from Therm O Web, to the back of the whole combined panel and popped it up on the card.


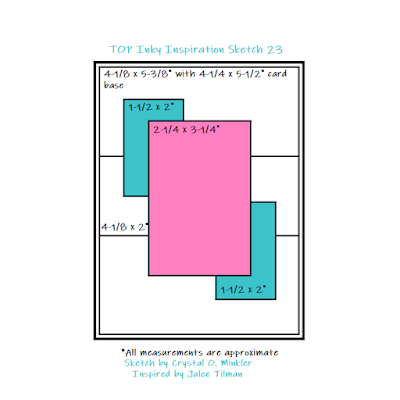
Here's a look at the fun sketch for Tawny Owl Paperie Inky Inspiration Sketch Challenge 23. The sketch, as always, is meant to inspire not require. So let the sketch lead in your design, but don't feel limited by it. A great example is how I turned the sketch for a landscape card. This fun sketch challenge ends July 29th!!


I wanted to add a bit of snow to my panel so I die cut a scrap of white card stock using the hill die from the Land Borders Die Set from Sponsor Newton's Nook Designs. I trimmed it and adhered it to the bottom of the panel. I then fussy cut Santa's Workshop. Boy was that a task! About halfway through my third or fourth Christmas light, I was wishing I had left a nice white border around the image. Hahaha... anywho, I colored the edge of the fussy cutting using a Memento Tuxedo Black marker making it all nice and neat and then I adhered it to the panel. Next I stamped a sentiment from the Big & Bold Santa's Sleigh Slimline stamp set from Sponsor Colorado Craft Company.


To finish off the card I added a bunch of cute little clay snowflakes from the Christmas Confetti Clay Embellishment Mix from Sponsor Twiddler's Nook. I love how this card turned out! And I think I used products from 7 of our amazing Sponsors. Woohoo! That may be a record!! 

Here's a quick list of the Copic markers I used: 
Workshop / Chimney: E53, E55, E57
Windows: Y11, Y15
Doorknob: Y11, Y15, Y28
Snow: C00, C1, C3
Wreath: YG11, G24, G46, R20, R14
Santa's Workshop Sign: R20, R14
Christmas Lights: R20, R14, B0000, B00, YG11, G14, Y11, Y15
Flags: R20, R14, YG11, G14
North Pole Sign: YG11, G24, G46
Pole: R20, R14, C00, C1, C3, E53, E55, E57


If you haven't already, stop by the Christmas in July 2024 {BYSHC} Linky Party to check out all the wonderful Holiday inspiration being shared!! So much amazing inspiration! You can't help but be inspired to make a card or two! Have an ink-tastic week!

Thanks so much for stopping by!
See ya next time.

Inky Hugs,
Crystal


{Please note that comment moderation is on. Your lovely comment will appear once approved.}