Pages

Friday, May 31, 2024

{BYSHC} Sketch Challenge 45 ~ Fireside Friends ~ Newton's Nook Designs

Hello there crafty friend!
I'm back with one last card for the {BYSHC} Sketch 45 over in the Build Your Stash Holiday Cardmakers Facebook group! Today I'm sharing an adorable Christmas card featuring the cute Fireside Friends Stamp Set from our amazing sponsor, Newton's Nook Designs! Newton's Nook Designs has generously offered up a $20 gift code as a prize for the winner of this month's challenge! Please take note that today is the last day to enter the challenge!


I paired up the super sweet Fireside Friends Stamp Set with the cute Christmas Time 6x6 Paper Pad. I thought the houses complimented the fireside scene so well! I was very tempted to add more to the background of the scene. That's a lot of white... but I didn't want to take away from the cute stamp.


I stamped the sweet Fireside Friends and sentiment using Memento Tuxedo Black ink on Stampers Select White Card Stock from Papertrey Ink that I had cut down to 4-1/16 x 4". And then I colored up the critters and fireplace using a bunch of Copic markers. 

Here's a quick list of the Copic Markers I used:
White Kitty: C00, C1, C3, R00, R20
Orange Kitty: YR21, YR15, R00, R20, Colorless Blender
Pup: E51, E55, E57, N3, N5, N7, B0000, B00
Rug: R20, R14, R46
Garland: YG11, G24, G46
Bow: R20, R14, R46
Fireplace: C00, C1, C3, N0, N1, N3, N5
Grate: N3, N5, N7
Wood: E53, E55, E57
Fire: Y06, YR21, YR15, YR68


I trimmed the angle on the right of the stamped panel using the measurements from the sketch. I measured 3-1/4" on the top of the paper and made a tick mark with pencil. I measured the bottom at 3" and made another tick mark. And then I measured up from the bottom right corner to 1-3/4". I made my final tick mark and then I trimmed the angle using my Tim Holtz Tonic Guillotine Comfort Paper Trimmer. I adhered the panel to my 5-1/4 x 4" piece of pattern paper and then adhered it to a 5-1/2 x 4-1/4" piece of Pure Poppy Card Stock from Papertrey Ink. I then adhered the panel to a white A2 top fold card base that I turned on the side for a landscape card. I finished off the card with a few enamel dots.


Here's a look at {BYSHC} Sketch Challenge 45 for the month of May. I've really enjoyed this sketch! Remember... today is the last day to enter this challenge! If you're interested in seeing a bit more inspiration for this sketch, check out the amazing inspiration from the design team over on the {BYSH} Cardmakers blog! The design team has really done a phenomenal job with this sketch.


Thanks so much for stopping by!
See ya next time.

Inky hugs,
Crystal


{Please note that comment moderation is ON. Your lovely comment will appear shortly.}

Wednesday, May 29, 2024

Membership Wednesday ~ May 2024 UU Wind in Your Hair ~ Unity Stamp Co.

  Hello there crafty friend!
Today I'm sharing a fun card featuring the girls stamp from the May 2024 Uniquely Unity membership called Wind in Your Hair from Unity. I absolutely adore this stamp! It reminds me of the bug my auntie had when I was a kid. I don't think it was a convertible like the one in the stamp but I loved going for rides in that car. 


I stamped the car and sentiment on scraps of Stampers Select White Card Stock from Papertrey Ink using Black Amalgam Ink from Gina K. Designs. I colored up the car using my Copic markers and die cut the image using a die from the Deckle & Stitches Nesting Die Set from Unity.

Here's a quick list of the Copic markers I used:
Car: R20, R14, R46, C00, C1, C3, Colorless Blender
Left Girl Hair: E70, E71, E74
Left Girl Shirt: BG11, BG23, BG45
Right Girl Hair: E51, E55, E57
Right Girl Shirt: V000, V12, V15
Outline: C00, C1


I set aside the car panel and grabbed a 4-1/4 x 11" piece of Stampers Select White Card Stock from Papertrey Ink. I scored the A2 top fold card base at 5-1/2" and then turned it on the side for a landscape card. I secured the card base to my table with purple tape. And then I laid the sunray of the 3-in-1 Stencil from Unity over top, also securing it to my table with purple tape. I blended Mustard Seed, Spiced Marmalade and Abandoned Coral Distress Oxide Inks using three of my TE Blender Brushes from Taylored Expressions.  


I fussy cut the sentiment and just adhered it directly to the car panel. I added foam tape to the back of the car panel and popped it up on the card base. I really love how this one turned out!
 

And here's a look at the awesome Uniquely Unity membership! I am seriously loving this month's stamp. Well, that's it for me today! I hope you've been inspired to play with your membership stamps!
Have an ink-redible day!


Thanks so much for stopping by!
See ya next time.

Inky Hugs,
Crystal


{Please note that comment moderation is on. Your lovely comment will appear once approved.}

Tuesday, May 28, 2024

Tawny Owl Paperie Inky Inspiration Sketch 22 ~ Owl Rather Be With You ~ Gerda Steiner Designs

 Hello there crafty friend!
It's time for a fun new sketch over in the Tawny Owl Paperie Inky Inspiration Facebook group. Today I'm sharing my first card for the Tawny Owl Paperie Inky Inspiration Sketch Challenge 22. Another birthday card! Woohoo! You may recognize this card design. Just like last month's Sketch 21, I used another 'scraps' card as my inspiration for this month's sketch. This was such a great sketch for those larger pieces of scraps. I thought it would be perfect as I'm trying to finish off the leftover papers I found in my stash in April. I can't believe it's taking me this long to finish off these papers!


Anywho, for this card I only used two pieces of leftover papers. I didn't have a full sheet to use as my background so I went with a card stock that is also a leftover from my Scrapping for Less days. I trimmed the card stock to 4 x 5-1/4" and adhered the pattern papers near the top center. I stamped the adorable owl and branch from the Owl Rather Be With You stamp set from Gerda Steiner Designs on scraps of Stampers Select White Card Stock from Papertrey Ink using Memento Tuxedo Black Ink. This adorable stamp set has been in my stash for awhile but this is the first time I've inked it up! Yay! 


 I found this stitched rectangle on my desk that the owl fit in just perfectly. It's a die cut from the awesome Frames & Tags Die Set from Newton's Nook Designs. I colored up the owl and branch using my Copic markers. Fussy cut them both on the line (excluding the tufts on the owls head - I left a bit of a white border) and then colored the edges of my cutting using a Memento Tuxedo Black marker making the cutting look all nice and neat.

Here's a quick list of the Copic markers I used: 

Owl Eyes: W00, W1, W2
Owl Beak / Feet: YR21, YR15, YR14
Owl Feathers: W00, W1, W2, W3, W5
Branch: E55, E57, E59


Here's a look at the fun sketch for Tawny Owl Paperie Inky Inspiration Sketch Challenge 22. The sketch, as always, is meant to inspire not require. So let the sketch lead in your design, but don't feel limited by it. I didn't add dimensions for the pattern paper scraps as I'm sure we all have different sized scraps in our stash. The polka dot paper on my card is kind of long so I lowered the sentiment strip across the card. I think I actually covered up a portion of the polka dot paper with the sentiment. A good example of letting the sketch lead but not limiting the design.


I heat embossed the sentiments. I prepped my card stock first using the TE Anti-Static Powder Tool. Stamped the sentiment using Sugar Cube White Pigment Ink from Taylored Expressions. Added some Alabaster White Embossing Powder from Brutus Monroe. And melted the powder using a Wagner Precision Heat Tool. I trimmed up the sentiments and adhered all of my layers to a white A2 top fold card base. I hope you all have fun with this sketch! I can't wait to see what you create with it. Have an ink-tastic week!

Thanks so much for stopping by!
See ya next time.

Inky Hugs,
Crystal


{Please note that comment moderation is on. Your lovely comment will appear once approved.}

Monday, May 27, 2024

Inky Paws Challenge #224 ~ Color Challenge

Hello there crafty friend!
It's time for a new Inky Paws Challenge... a beautiful Color Challenge
I sure hope that you'll join in the fun and play along with us with your Newton's Nook Designs products! You have until Friday, June 7th to get your entries in for the #224 Color Challenge and a chance to win a $20 store credit to Newton's Nook Designs!


Lovely Spring colors... Posy Pink, Sunny Yellow, Grass Green, and White!! 


My first thought when I saw these beautiful colors was the Pastel Basics 6x6 Paper Pad!! It has all the colors and it's so perfect. Plus, I already had some pieces die cut from my polka dot card last month that would be perfect for this card! 


I love mix matching all these beautiful papers to create cards! So easy and so pretty! I did have to die cut the green heart polka dot paper using the awesome frame die from the Frames & Tags Die Set. I trimmed a piece of the green heart polka dot paper slightly larger than the larger bottom window and then secured it to the back of the die using washi tape. A great way to utilize this awesome die without stockpiling a whole bunch of leftover pieces!


I stamped the beautiful daisies and the sentiment from the Dainty Daisies Stamp Set using Memento Tuxedo Black ink and colored up the daisies with a handful of Copic markers. I die cut the flowers using the coordinating Dainty Daisies Die Set. I trimmed up the sentiment and cut two very thin scraps of card stock. I adhered the scraps together and then adhered them on the back right edge of the sentiment allowing it to lay flat on the card when I adhered it.

Here's a quick list of the Copic markers I used:

Daisy Petals: C00, C1, C3
Daisy Centers: Y11, Y15, Y35, Y28
Stems / Leaves: YG11, YG23


Now it's your turn to get your paws inky with your Newton's Nook Designs products and create a project using the color combo of Posy Pink, Sunny Yellow, Grass Green, and White. Be sure to link up to the Inky Paws Challenge! Can't wait to see your projects!


Thanks so much for stopping by!
See ya next time.

Inky Hugs,
Crystal


{Please note that comment moderation is on. Your lovely comment will appear once approved.}

Thursday, May 23, 2024

Light Up the World ~ Echo of Kindness ~ Unity Stamp Co.

Hello there crafty friend! 
The birthday celebration continues over at Unity with Whit's Birthday Sale!! And another amazing release, of course! Woohoo! I don't know about you but I was super excited to see a new Angie Girl!! Isn't she just darling!? And my daughter is always making hearts with her fingers like this. This girl could totally be her. I love it!


I stamped the girl and sentiment from the beautiful new Echo of Kindness stamps using Black Amalgam ink from Gina K Designs onto Stampers Select White Card Stock from Papertrey Ink. I colored up the girl with my Copic markers. I die cut the girl with a die from the Stacked Baroque die set from Tim Holtz and Sizzix. I added these cool dies to my stash awhile ago and just found them in the wrong place... lol! So I thought I'd use them for this card. Aren't they perfect with this sketch? I also die cut a piece of True Black card stock from Papertrey Ink using the slightly larger die from the same die set.


I trimmed the four pattern papers from the gorgeous Enveloped in Love {paper pack} from Unity to 4 x 5-1/4" and then I used a ruler and pencil to cut my angles. I basically did the same measurements and cuts that I used in this video... Cutting & Assembling Papers for {BYSHC} Sketch 29. I then adhered the papers to a True Black card front measuring 4-1/4 x 5-1/2". And as I often do, I adhered the panel to a Stampers Select White Card Stock A2 top fold card base.

Here's a quick list of the Copic markers I used:

Skin: E000, E00, E11
Hair: E70, E71, E74, E77
Dress / Hair Tie: R000, R11, R32, R43


Inspiration for my card came from the {BYSHC} Sketch 29. It's not just a fabulous sketch for Christmas cards! LOL! This is an absolute favorite of mine! It always makes for a lovely card.


I die cut the sentiment using a die from the Scalloped & Stitched Sentiment Nesting Dies from Unity. I softened the brightness of the white card stock by blending with my brown blending brush. I didn't add any ink to it so it would stay light. I adhered the sentiment to the girl and added foam tape to the back of both. Popped it up on the card for a bit of dimension. I added a few black enamel dots from my stash to finish off the card. I love how this turned out! Hope you have an ink-tastic day! 

Thanks so much for stopping by!
See ya next time.

Inky hugs,
Crystal

{Please note that comment moderation is on. Your lovely comment will appear shortly.}

Wednesday, May 22, 2024

Membership Wednesday ~ May 2024 BOM Grandma's Rose ~ Unity Stamp Co.

  Hello there crafty friend!
Today I'm sharing a super quick vintage card featuring the awesome background stamp from the May 2024 Background of the Month membership from Unity. This background reminds me of my grandparents couch when I was a kid. I just had to do a reddish pink hue to capture the color of their couch.


I ink smooshed a 4-1/4 x 5-1/2" piece of Kraft card stock from Papertrey Ink using Festive Berries and Tattered Rose Distress Oxide Inks. I completely dried the background using a Wagner Precision heat tool. And then I stamped the Grandma's Rose Background stamp using Vintage Photo Distress Ink. 


I die cut the Grandma's Rose background stamp using the largest die from the Scallops & Rectangles {nesting dies}. Adhered it to a 4-1/4 x 5-1/2" piece of Early Espresso Card Stock from Stampin' Up that I then adhered to a Kraft A2 top fold card base. I stamped the sassy vintage gal from Queen of the Universe. Love her sass! She actually reminds me of my Granny!


I went ahead and used the Vintage Photo Distress Ink to stamp the Queen of the Universe and the sentiment onto scraps of Kraft card stock. I die cut the queen using a die from the Deckle & Stitches Nesting Dies. I mat both pieces using scraps of the Early Espresso card stock. I adhered the sentiment overlapping the queen just a bit and then added foam tape to the back of both pieces. I removed the backing and popped them up on the card. I felt like the card needed a little something so I tied a pretty bow of Dark Chocolate 1/2" Satin Solid Ribbon from Papertrey Ink and adhered it to the card using a glue dot.
 

And here's a look at the awesome Background of the Month membership! So nostalgic! I love it! Well, that's it for me today! I hope you've been inspired to play with your membership stamps!
Have an ink-redible day!


Thanks so much for stopping by!
See ya next time.

Inky Hugs,
Crystal


{Please note that comment moderation is on. Your lovely comment will appear once approved.}

Tuesday, May 21, 2024

Tawny Owl Paperie Inky Inspiration Sketch 21 ~ Tiny Tutu Soiree ~ Unity Stamp Co.

 Hello there crafty friend!
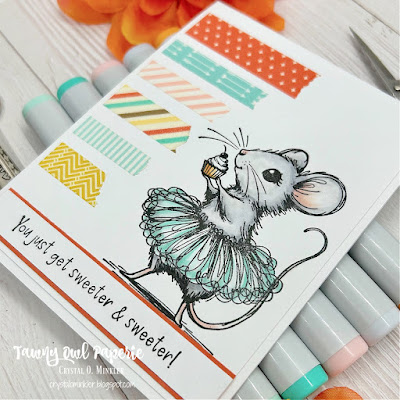
I am sharing one last card for the Tawny Owl Paperie Inky Inspiration Sketch Challenge 21. This cute card could be a birthday card or really a card for any occasion! Again, I am loving all the white open space! So fun!


I set aside my leftover papers... I've already pretty much decided I'm going to finish them off next month anyhow... and I pulled out some of my washi tape. Yup! Washi tape is perfect for this sketch! I found these coordinating pieces of washi tape in my stash and thought they would be fun on a sweet card.


I just received my latest order from Unity and the adorable Tiny Tutu Soiree was a must have so I inked her up. She is probably the cutest mouse I've ever seen. She's also one of those Finely Detailed stamps and I was able to ink her up just fine with my Black Amalgam ink from Gina K. Designs. The key, at least for me, was to make sure my ink pad was juicy enough. I have been noticing that it takes a few times stamping to get my images nice and crisp so it was definitely time to add some ink to the ink pad.

Here's a quick list of the Copic markers I used: 

Mouse: C00, C1, C3, R00, R20
Cupcake: YR21, YR15, C00, C1
Tutu: BG0000, BG11, BG23


Here's another look at the fun sketch for Tawny Owl Paperie Inky Inspiration Sketch Challenge 21. Lots of open space that can be kept white like my card or use pattern paper like I did for my car card. The sketch, as always, is meant to inspire not require. So let the sketch lead in your design, but don't feel limited by it. My card is another good example of altering the sketch but still keeping within the parameters of the sketch since my washi tapes were varying widths I was able to use six different washi tapes and still balance out the space.


I wrapped the washi tape around the edge of the 4 x 5-1/4" Stampers Select White Card Stock from Papertrey Ink. I stamped the sentiment on a scrap of white card stock and trimmed it. I mat it with a slightly larger scrap of Tangerine Tango Card Stock from Stampin' Up and trimmed it. Adhered the panel to a white A2 top fold card base and BAM... another birthday card for my stash! Oh, yea! I hope you're inspired to play along with the sketch... and maybe even use some of that washi tape you've been wondering how to use. Have an ink-tastic week!

Thanks so much for stopping by!
See ya next time.

Inky Hugs,
Crystal


{Please note that comment moderation is on. Your lovely comment will appear once approved.}

Monday, May 20, 2024

Inky Paws Challenge #223 ~ Friendship Theme Challenge Reminder

Hello there crafty friend!
There's still time to play along with the Inky Paws Challenge #223 - Friendship Theme Challenge! You have until this coming Friday, May 24th to get your entries in for this fun challenge and a chance to win a $20 store credit to Newton's Nook Designs!


This has been such a fun theme and I just had to use my favorite stamp set for my reminder card!


I stamped the friends from the Sips & Stories Stamp Set using Memento Tuxedo Black ink. And then I had a blast coloring them up with Copic markers. It's so fun to pull colors from the papers and try to balance them out. I did pretty good until I colored the blonde's hair the same as her pillow. Oh well! Once I was happy with my coloring I die cut the friends using the coordinating Sips & Stories Die Set.


Here's the list of the Copic markers I used:

Skin: E000, E00, E11
Blonde Hair: Y02, Y21, Y26
Brunette Hair: E42, E43, E44
Yellow Shirt / Pillow: Y11, Y15, Y35
Grey Sweater: N0, N1, N3
Jeans: B91, B93, B95, B97
Chair / Slippers / Hair Band: V000, V12, V15
Blue & White Pillows / Blanket: C00, C1, C3, BG000, BG02, BG45, BG57
Grey Kitty: R00, R20, N0, N1, N3
Coffee: E21, E23, E25
Mugs: BG000, BG02, BG45, BG57, C00, C1, C3
Books: V12, V15, C00, C1, E21, E23, E25


I paired the friends with the awesome Coffee House Stories 6x6 Paper Pad. I had so much fun mixing and matching the papers to build a scene for this card. I die cut the books papers using the largest die from the Frames & Flags Die Set. I also die cut the flags for the sentiment and the green polka dots paper using dies from that same die set. The circle for the scene I created for the friends was die cut using a die from the Circle Frames Die Set. I die cut the hearts paper and then die cut a scrap of the blue striped paper. All of my layers are adhered to a white A2 top fold card base.


Now it's your turn to get your paws inky with your Newton's Nook Designs products and create a project with a Friendship theme. Be sure to link up to the Inky Paws Challenge! Can't wait to see your projects!


Thanks so much for stopping by!
See ya next time.

Inky Hugs,
Crystal


{Please note that comment moderation is on. Your lovely comment will appear once approved.}

Sunday, May 19, 2024

Masculine Birthday Card ~ Still Turning Heads ~ Unity Stamp Co.

Hello there crafty friend! 
I'm digging this awesome new mustang stamp called Still Turning Heads from Unity's new release. I absolutely love old cars! This was a fun one to color too. All the details in the stamp made it so easy to color up.


I stamped the car and sentiment from the amazing Still Turning Heads stamps using Black Amalgam ink from Gina K Designs onto Stampers Select White Card Stock from Papertrey Ink. I knew I wanted to make a slimline card for this one so I stamped the car on the far right side. 

Here's a quick list of the Copic markers I used:

Car: BG000, BG02, BG45, BG57
Wheel / Lights: C00, C1, Colorless Blender
Plate: Y35, YR15, YR16


I die cut the image using the Big and Little Chain Slimline dies from Gina Marie Designs. I also die cut another piece of white card stock. I blended over a stencil in my stash. I believe it's from one of the past Whit Kit's but I'm really not sure. I just blended using my yellow and orange blending brushes. I didn't add any more ink to the brushes just used what was on them.


I cut the car panel diagonally and then adhered the panel to the stenciled panel. I trimmed a piece of True Black Card Stock from Papertrey Ink to 7 x 8-1/2" and scored it at 3-1/2" making a slimline card base. I adhered the car panel to the base finishing this card off. That's it for me today.
Hope you have an ink-tastic day! 

Thanks so much for stopping by!
See ya next time.

Inky hugs,
Crystal

{Please note that comment moderation is on. Your lovely comment will appear shortly.}

Saturday, May 18, 2024

Snarky Kitty Birthday Card ~ Pissy Party ~ Unity Stamp Co.

Hello there crafty friend! 
The birthday celebration continues over at Unity!! And that means another amazing release and sale! Woohoo! So many new favorites... I don't know if I can choose just one. Which one's your new fave?


I stamped the kitty and sentiment from the awesome new Pissy Party stamps using Black Amalgam ink from Gina K Designs onto Stampers Select White Card Stock from Papertrey Ink. I colored up the kitty with my Copic markers. I die cut the panel with the largest die from the Scallops & Rectangles {nesting dies}. I also die cut a piece of the pattern paper from the Pastel Party Parade {paper pack}


I trimmed the pattern paper to sit just under the shadow of the kitty and adhered the papers together. I then adhered the panel to a white A2 top fold card base.

Here's a quick list of the Copic markers I used:

Kitty: N0, N1, N3, N5
Nose: RV10
Eyes: YG21, YG11
Hat: Y11, Y15
Cupcake: RV10, RV02, RV14, BG000, BG02,  Y11, Y15


I trimmed the sentiment and popped it up on the card with foam tape. I added a couple enamel dots from my stash that's similar to the blue in the papers. This turned out so cute! 
Hope you have an ink-tastic day! 

Thanks so much for stopping by!
See ya next time.

Inky hugs,
Crystal

{Please note that comment moderation is on. Your lovely comment will appear shortly.}

Friday, May 17, 2024

{BYSHC} Sketch Challenge 45 ~ Newton's Stocking ~ Newton's Nook Designs

Hello there crafty friend!
I'm back with more inspiration for the {BYSHC} Sketch 45 over in the Build Your Stash Holiday Cardmakers Facebook group! Today I'm sharing a sweet Christmas card featuring the adorable Newton's Stocking Stamp Set from our awesome sponsor, Newton's Nook Designs! Newton's Nook Designs has generously offered up a $20 gift code as a prize for the  this month! Have you played along with the sketch?!


I paired up sweet Newton from the Newton's Stocking Stamp Set with the adorable Meowy Christmas 6x6 Paper Pad. They compliment each other so well. I couldn't help but color up a red stocking. So classic for Christmas but now that I'm looking at it with the papers maybe I should have done blue or green. 


I stamped the sweet kitty and sentiment using Memento Tuxedo Black ink on Stampers Select White Card Stock from Papertrey Ink. And then I colored up the kitty using a handful of Copic markers. 

Here's a quick list of the markers I used:

Kitty: R00, R20, YR21, YR15, Colorless Blender
Stocking / Santa Hat: C00, C1, R20, R14, R46


I adhered the pattern papers together and then I cut a few strands of twine, thread it through the hole in the tag and then I tied a pretty bow. I added a few pieces of foam tape to the top and bottom of the tag so it lays flat over the twine. I then adhered the panel to a white A2 top fold card base that I turned on the side for a landscape card. I fussy cut the kitty on the black line and popped him up on the card with foam tape. I can't believe I still don't have the coordinating Newton's Stocking Die Set. Definitely adding that to my next order! I actually die cut the cute tag using a small tag from the Frames & Tags Die Set before I stamped the sentiment. 


Here's a look at {BYSHC} Sketch Challenge 45 for the month of May. I am loving this sketch! I can't wait to see what everyone does with it. I hope you'll join us and play along with the sketch. If you're interested in seeing a bit more inspiration for this sketch, check out the amazing inspiration from the design team over on the {BYSH} Cardmakers blog! Lots of wonderful inspiration this month from the design team.


Thanks so much for stopping by!
See ya next time.

Inky hugs,
Crystal


{Please note that comment moderation is ON. Your lovely comment will appear shortly.}

Wednesday, May 15, 2024

Membership Wednesday ~ May 2024 KOM Spring & Simply Joys ~ Unity Stamp Co.

  Hello there crafty friend!
Today I'm sharing a fun camper card featuring the cutest camper stamp from the May 2024 Kit of the Month membership from Unity. I couldn't help myself. I had to play with another stamp from this month's KOM. 


I stamped the camper and sentiment on scraps of Stampers Select White Card Stock from Papertrey Ink using Black Amalgam Ink from Gina K. Designs. I colored up the camper using my Copic markers and fussy cut the camper leaving a bit of a white border around the image.
Here's a quick list of the Copic markers I used:

Camper: V000, V12, V15, V17, C00, C1, C3, B000, B00, B02, B04
Awning / Door: Y11, Y15
Windows: Y11
Curtains: RV10, RV02
Leaves / Grass: YG11, YG23, G40
Plant Pots: B000, B00, B02, B04, RV10, RV02, V000, V12, Y11, Y15


I paired up the cute camper with the fun Cloud Hopper Chronicles {paper pack}. These papers are so fun for building a scene card using pattern papers. I die cut a piece of the green pattern paper and a piece of the cloud pattern paper using the largest die from the Scallops & Rectangles {nesting dies}. I then die cut the green pattern paper using the grass die from the Land Borders Die Set from Newton's Nook Designs. I turned the paper around and die cut the other bottom edge so I could have two layers of grass paper. I adhered my layers being sure to line up the bottom scallops just right. And then I adhered the panel to a white A2 top fold card base. 


I trimmed the sentiment and just adhered it directly to the card. I debated adhering the grass layers with the camper all together and than adding foam tape to the back, but I decided not to add the thickness to the card. It would have been really nice for dimension but I didn't want to have to add more postage when mailing it.
 

And here's a look at the awesome Kit of the Month membership! I am seriously loving this month's kit. Well, that's it for me today! I hope you've been inspired to play with your membership stamps!
Have an ink-redible day!


Thanks so much for stopping by!
See ya next time.

Inky Hugs,
Crystal


{Please note that comment moderation is on. Your lovely comment will appear once approved.}