Pages

Thursday, September 28, 2023

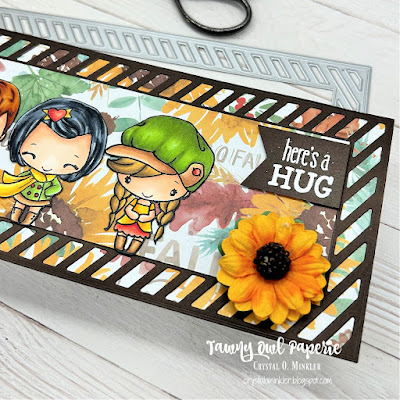
Fall Collab with Teresa ~ Mini-Remix Fall ~ The Greeting Farm

Hello there crafty friend!
I'm back with a second card for my fun collab with my sweet friend, Teresa, from Fresh and Renewed with Teresa. It sure has been fun playing with Fall themed card making goodies that I haven't used before. Shopping your stash is so much fun! I've found some amazing things... oh boy!


I've been having fun the last couple of weeks inking up some cute stamps from The Greeting Farm so I thought I'd look through my collection and find a Fall themed stamp set that I've never inked up before. Surprisingly I only found the one Fall themed stamp set. I did find a few Halloween themed stamps that I should really ink up. They are just too cute!


I had a blast filling up a slimline card last week with all the fun Fall images so I thought I'd do another slimline card. I inked up the Mini-Remix Fall cuties using Memento Tuxedo Black ink. And I had some fun coloring them up with my Copic markers. To save time again, I only share my coloring of one of these cuties in my video {link below}.


I was looking through my slimline dies and noticed that there were a few more slimline dies hiding behind the Gina Marie Designs collection of dies... I was pleasantly surprised to find the Slimline Striped Frame Stand Alone Die Set from Trinity Stamps. No idea when I added this fun die to my collection and I am certain that I've never used it before.


I had so much fun coloring up all these cute images. Here's the list of Copic markers that I used for them all:

Skin: E000, E00, E11, E04
Anya #1: R20, R14, R46, Y11, Y06, Y15, Y38, E21, E23, E51, E55, E57, YR23, YR27, R59
Ian: Y11, Y06, Y15, Y38, YG11, YG03, YG63, E51, E55, E57, E97, E15, E09
Anya #2: YG11, YG03, YG63, E21, E23, R20, R14, R46, B41, C5, C7, C9
Anya #3: Y11, Y06, Y15, Y38, R20, R14, R46, E21, E23, E51, E55, E57, E59, YG11, YG03, YG63, YR31, E43, E44 


I chose stamps and a die that I'd never used before so I had to also choose papers that I hadn't used before. The beautiful Fall Sunflower 8.5 x 11" paper pad from The Paper Studio is absolutely gorgeous. Now this paper pad hasn't been in my collection for very long. I bought it back in June during our vacation to the Lake of the Ozarks. But I've been itching to play with it!!


The beautiful sunflower also hasn't been in my collection for very long. I got it in June at The Craft Lab in Deepwater, MO. I love shopping Amy's store when we have our fun Unity Lover get togethers. She has so many wonderful products. I always find must haves while I'm there! The sunflowers are from 49 and Market and I adhered it using Ranger Multi Medium Matte.

As I mentioned above, to save some time so the video wasn't super duper long, I did most of my coloring off camera. I did record my coloring of Anya #3 though. You can check out the rest of my process in my video... Fall Sunflower Slimline Card | Fall Collab with Teresa | The Greeting Farm.


I sure hope you've enjoyed the card I shared today. I hope you'll give my YouTube channel a visit and then stop by Teresa's YouTube channel, too! As I mentioned above, I'm having a giveaway!! I still haven't put the prize together but I'll be sharing it on my YouTube channel next week when I also announce the winner from the comments on my channel and Teresa's channel!! To be eligible you must comment on each video Teresa and I both share during our whole Fall Collab... this weeks videos and last weeks videos. Hope you have an ink-tastic day!


Thanks so much for stopping by!
See ya next time.

Inky Hugs,
Crystal


{Please note that comment moderation is on. Your comment will appear once approved.}

Wednesday, September 27, 2023

Membership Wednesday ~ September 2023 BOM Off the Grid ~ Unity Stamp Co.

  Hello there crafty friend!
Today I'm sharing a fun card using the cool September 2023 Background of the Month membership from Unity called Off the Grid. I had a fun idea for a background only using a portion of the stamp.


I stamped a piece of white card stock using Sugar Cube Pigment ink from Taylored Expressions. I applied Alabaster White Embossing powder from Brutus Monroe and melted it with my heat tool. 


Then came the fun part... I ink smooshed some Candy Apple and Wilted Violet Distress Oxide inks. I also blended some of the inks to fill in the background.


I die cut the background using the largest die from the Deckle & Stitches Nesting Dies, also from Unity. I dried the background completely, added some white acrylic paint splatters, and then adhered it to a white A2 top fold card base.


I stamped the beautiful Zinnia on a scrap of white card stock really only focusing on the one flower. I didn't want the whole cluster for my card so the grid background would show. I colored up the zinnia with just a few purple Copic markers: V0000, V000, V12, V17. I didn't want it very dark so it would pop on the background. I stamped the 'hello' sentiment from the September 2023 Kit of the Month called Harvest Hues. Love the distressed look of the sentiment. The flower is fussy cut and I colored up the edges using a Memento Tuxedo Black marker to make it all nice and neat. I also fussy cut the sentiment but I left the edges white. Both are popped up on the card with foam tape.


Here's a quick look at the Background of the Month membership this month! So fun! This membership is available for only $18.99. That includes shipping! Included with both of these memberships is a wonderful inspiration sheet with pictures and step-by-step instructions for two cards so you can easily recreate the cards yourself. And now when you sign up you have the ability to pause, skip or cancel your subscription within your Unity account.


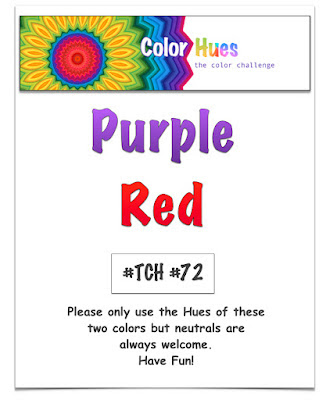
I'm playing along with the Color Hues Challenge #72: Purple & Red


 Well, that's it for me today! I'll be back in two weeks with inspiration for one of the fab October memberships. Just not sure at this point which one I want to play with first. {Be warned... they are ALL amazing!!} Until then, have an ink-tastic day!


Thanks so much for stopping by!
See ya next time.

Inky Hugs,
Crystal


{Please note that comment moderation is on. Your lovely comment will appear once approved.}

Monday, September 25, 2023

Santa Paws Filled with Joy ~ STAMPtember Collab ~ Newton's Nook Designs & Simon Says Stamp

 Hello there crafty friend!
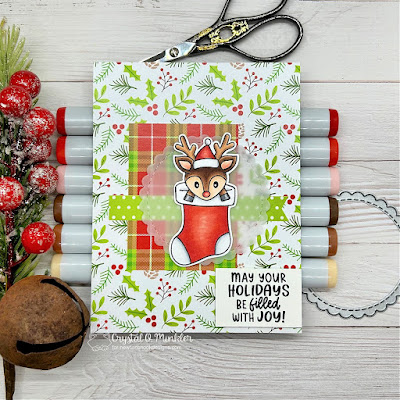
Today I'm so super excited to be sharing a cute card featuring a couple stamps from the adorable STAMPtember collaboration stamp called Santa Paws from Newton's Nook Designs that's available over at Simon Says Stamp!! Oh my gosh... I just can't handle the cuteness in this set!


I paired up this sweet reindeer in a stocking with the gorgeous Christmas Time 6x6 Paper Pad from Newton's Nook Designs. The vellum scalloped circle was die cut using a die from the Circle Frames Die Set from Newton's Nook Designs.


Inspiration for my card came from my new Tawny Owl Paperie Inky Inspiration Sketch 15 {will be posted a bit later today in the group}. A pretty simple sketch with almost a CAS vibe. I share monthly sketches in my Tawny Owl Paperie Inky Inspiration Facebook group. Sketches make designing a card so much quicker. I use them all the time and started sharing them monthly last year, I think. I just recently started doing challenges with the sketches and I pick a winner to send a fun prize to each month. I hope you'll join in the fun and play along.


The adorable reindeer from the exclusive Santa Paws Stamp Set was so fun to color up. Here's a quick list of the Copic markers I used to color it up:

Deer: E000, E51, E21, E23, E25, E27, N0, N1, N3, N5
Ears: R00, R20, E000
Nose: R20, R14, R46
Antlers: E21, E23
Hat / Stocking: C00, C1, C3, R20, R14, R46


I stamped the cute reindeer and the sentiment using Memento Tuxedo Black Ink. I trimmed up the sentiment and I popped it up using foam tape. I fussy cut the deer leaving a white border. FYI - this cute stamp set does have a coordinating die set available if you're not one for fussy cutting (it comes as a combo set).


 Be sure to head over to Simon Says Stamp to get yours before they are all gone! These exclusive cuties will not be restocked! Once they are gone.. they are gone!!

Thanks so much for stopping by!
See ya next time.

Inky hugs,
Crystal


{Please note that comment moderation is on. Your lovely comment will appear once approved.}

Inky Paws Challenge #207 ~ Sketch Challenge Reminder

 Hello there crafty friend!
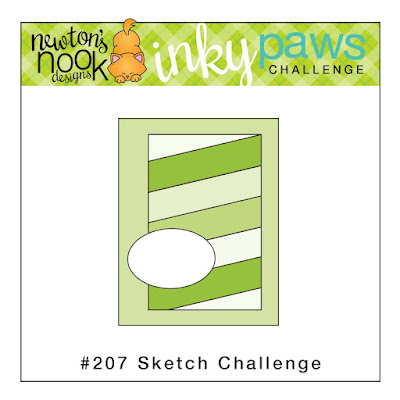
 There's still time to play along with the Inky Paws Challenge #207!! You have until this coming Friday, September 29th to get your entries in for this fun sketch challenge and a chance to win a $20 store credit to Newton's Nook Designs!


Today I'm sharing a cute Halloween card using the sketch for the current challenge. 
I am just smitten with this sketch!


I started by cutting four pattern papers from the Halloween Meows 6x6 Paper Pad. Each of these measured 6 x 1-1/4". I adhered them across a 3-1/2 x 5" piece of True Black card stock from Papertrey Ink. I mat the panel with a 3-5/8 x 5-1/8" piece of Lemon Lime Twist card stock from Stampin' Up that I adhered to a True Black card front measuring 4-1/4 x 5-1/2". 


The fun sentiment is from the Witchy Newton Stamp Set that I die cut using a die from the Oval Frame Die Set. I also die cut a black mat using the next largest oval die from the same die set.


All of my layers on the front of the card are directly adhered to a white A2 top fold card base.


Now... I've been having fun continuing the design of my cards inside the card. So I stamped the first sentiment - "Best Witches" - inside and I also stamped Newton from the Witchy Newton Stamp Set. I had planned on not coloring Witchy Newton but it just looked too plain. So I stamped him again on a scrap of white card stock. I colored him up with the Copic markers I've listed below and then I die cut him using the Witchy Newton Die Set and adhered him inside the card. I thought the sentiment needed a little something so I added the ampersand {&} from the Spring Blooms Oval Stamp Set. I just masked the rest of the sentiment and inked up the ampersand and then removed the mask and stamped in the card. Easy peasy. And then I finished my sentiment with the Happy Halloween sentiment from the Spiderweb Oval Stamp Set.

Here's a quick list of the Copic Markers I used for this stamp:

Kitty ~ Y11, YR21, R00, R20
Hat ~ N0, N1, N3, N5, N7, V000, V12, V15, V17
Boot ~ V000, V12, V15, V17, YG21, YG11, YG03, N0, N1, N3, N5, N7


Now it's your turn to get your paws inky with your Newton's Nook Designs products and create a project using the sketch. Be sure to link up to the Inky Paws Challenge! Can't wait to see your projects!


Thanks so much for stopping by!
See ya next time.

Inky Hugs,
Crystal


{Please note that comment moderation is on. Your lovely comment will appear once approved.}

Sunday, September 24, 2023

Friends Warm the Heart ~ Cozy Knit Stencil ~ A Colorful Life Designs

 Hello there crafty friend!
Today I'm so excited to share a fun Winter card as a guest designer for A Colorful Life Designs. Have you checked out the selection of stencils over at A Colorful Life Designs yet? All so AMAZING! There is literally something for every occasion!! Before we get to my card, please use code Crystal10 for 10% OFF your order over at A Colorful Life Designs and tell them Crystal sent you over!


Today I'm sharing a very simple Winter card featuring the Cozy Knit Stencil from A Colorful Life Designs. It makes such a pretty background! I love, love, love this stencil! I blended Tumbled Glass and Wilted Violet Distress Oxide inks over the stencil leaving white space around the edges.


The adorable girl and snowman (and the bunny further down in the pictures) is from the STAMPtember stamp set collaboration from The Greeting Farm and Simon Says Stamp called Warm the Heart. This is an exclusive set that, unfortunately, is no longer available. I'm so glad I was able to get it and super excited that I could play with it already. Here's a quick list of the Copic markers I used to color up these cute images:

Skin: E000, E00, E11, E04, R00, R20
Hair: YR31, E43, E44
Hat: B000, B00, B02, B04, V000, V12, C00, C1, C3
Coat / Button: V000, V12, V15, V17, B000, B00, B02
Pants: B000, B00, B02, B04
Shoes: N0, N1, N3
Snowball: C00, C1, C3
Snowman: C00, C1, C3, YR21, YR15
Snowman Hat: B000, B00, B02, B04, N0, N1, N3, N5
Snowman Buttons: B000, B00, B02, B04
Bunny: W00, W1, W3, R00, R20 V000, V12, V15, C00, C1, C3


Since I did my ink blending directly on the front of my card base, all I had to do was adhere the cute die cut images to the card. I heat embossed the sentiment using Sugar Cube Pigment ink, Alabaster White embossing powder and my heat tool on True Black card stock from Papertrey Ink. I trimmed the sentiment and popped it up on the card using foam tape.

You can check out my process video here... Friends Warm the Heart | Cozy Knit Stencil | A Colorful Life Designs.


 Be sure to head over to A Colorful Life Designs and check out their amazing selection of stencils. And don't forget to use code Crystal10 for 10% OFF your order! Have a wonderful weekend friends!

Thanks so much for stopping by!
See ya next time.

Inky hugs,
Crystal


{Please note that comment moderation is on. Your lovely comment will appear once approved.}

Thursday, September 21, 2023

Happy Fall Slimline Card ~ Fall Collab with Teresa ~ Waffle Flower

Hello there crafty friend!
I'm so excited! Today I'm starting a fun Collab with my sweet friend, Teresa, from Fresh and Renewed with Teresa. We will be sharing a Fall card {or cards} each Thursday for the next couple of weeks. And we're both having a giveaway!! Details for my giveaway are further down in my blog post.


I thought this would be a great time to use products that I haven't used before. I'm a bit of a collector... LOL! Aren't we all! But this year I've been working hard to make my crafty purchases more intentional... buying things that I will use. However, I still have lots and lots of stuff that I added to my collection over the years. I mean I've been making cards now for over 20 years! The collection sure can build over that time. I'm super excited to play with a few of those must have Fall goodies that haven't been touched yet.


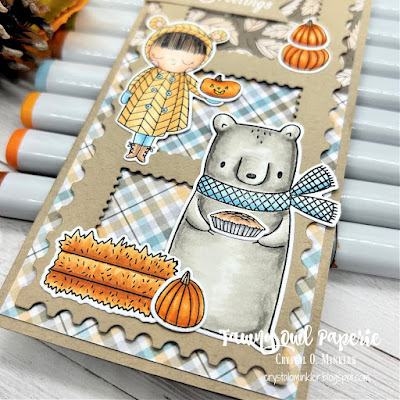
Today I'm sharing a sweet Fall inspired slimline card featuring the adorable Happy Fall Stamp Set and Dies from Waffle Flower. I don't even remember when I got this cute combo. I was looking through my stamps and spotted it... thought it would be perfect for a fun card. 


And right behind my Waffle Flower collection of stamps and dies is my Whimsy Stamps collection. I saw the awesome Slimline Postage Die that I've also never used before. I remember wanting this die so bad and then I never used it. Such a shame. But now I've used it and it was so fun to create a little scene using the different sections of the die.


I don't know why but coloring images for Fall is one of my most favorite things to do! I just love the color combos, I guess. I had so much fun coloring up all these cute images. Here's the list of Copic markers that I used for them all:

Flower Pot: YR31, YR21, Y06, YG03, YG63, N0, N1, N3
Pumpkins: YR21, YR15, YR16, YR27, E21, E23
Mouse: N0, N1, N3, N5, R00, R20, B000, B02
Mug: YR31, YR21, R00, R20, R43
Girl: E000, E00, E11, E04, E21, E23, YR31, YR21, B000, B02
Hay Bale: YR21, YR15, YR16, YR27
Pie: N0, N1, N3, E21, E23
Bear: W00, W1, W3, W5, B000, B02


I chose stamps and a die that I'd never used before so I had to also choose papers that I hadn't used before. I have quite a collection of Fall papers. Again, I love the colors so I'm just drawn to them and I have to have them all. I looked through my stash and found a pretty set of papers that were actually created by Teresa for her little crafty company called Scrapping for Less. She closed down her shop awhile ago now so these aren't available anymore, sadly. But she does still design papers for Not 2 Shabby. If you love pretty papers, head on over there and check them out.


The adorable Happy Fall Stamp Set didn't have a sentiment so I heat embossed a pretty sentiment from the Bountiful Fall stamps from Unity. I stamped it with Sugar Cube pigment ink from Taylored Expressions on a scrap of Kraft card stock and then melted the Alabaster White embossing powder that I had applied to the white ink using my Wagner Precision Heat Tool. Trimmed it up, cut a fishtail on the right side, and popped it up on the card along with the Slimline Postage Die and all the cute critters. 

To save some time so the video wasn't super duper long, I did most of my coloring off camera. I did record my coloring of the sweet girl though. You can check out the rest of my process in my video... Happy Fall Slimline Card | Fall Collab with Teresa | Waffle Flower.


I sure hope you've enjoyed the card I shared today. I hope you'll give my YouTube channel a visit and then stop by Teresa's YouTube channel, too! As I mentioned above, I'm having a giveaway!! I haven't had a chance to put the prize together just yet so I don't have a photo to share but it will be awesome!! I promise!! To be eligible you must comment on each video Teresa and I both share during our whole Fall Collab over the next couple of weeks!


Thanks so much for stopping by!
See ya next time.

Inky Hugs,
Crystal


{Please note that comment moderation is on. Your comment will appear once approved.}

Wednesday, September 20, 2023

Membership Wednesday ~ September 2023 Whit Kit Worthy of a Good Thing ~ Unity Stamp Co.

 Hello there crafty friend!
I had so much fun playing with the Fall-filled September 2023 Whit Kit from Unity Stamp Co. I made three cards featuring this fabulous kit. A couple focusing on the gorgeous papers in the Golden Autumn Whispers paper pack and the last one using the awesome Spotlight Stencil.


First up is a card featuring a few pattern papers from the Golden Autumn Whispers paper pack from the kit. I just fell in love with these papers. I really love this front maple leaf paper. It's so pretty! I wanted to feature it on the front of the card. I just die cut it and a darker pattern paper using the larger rectangle dies in the Scallops & Rectangles Nesting Dies. I adhered all my layers together and adhered them to a white A2 top fold card base. I trimmed a sentiment and adhered it directly to the card. Done. Easy peasy and oh so lovely for Fall.


Card number two features two lovely pattern papers. Loving the yellows and golds! I die cut the yellow pattern paper using the second largest die from the Make a Tag Die Set. I also die cut a piece of Early Espresso card stock from Stampin' Up using the largest die from that same die set. I adhered those together and then I went a little nuts wrapping them with gold metallic thread from my stash. I adhered the tag element directly to the pattern paper that I had adhered to a white A2 top fold card base. The sentiment was heat embossed using Sugar Cube White Pigment ink from Taylored Expressions along with Alabaster White Embossing Powder from Brutus Monroe. I trimmed the right side at an angle, added foam tape to the back of the sentiment and popped it up on the card.


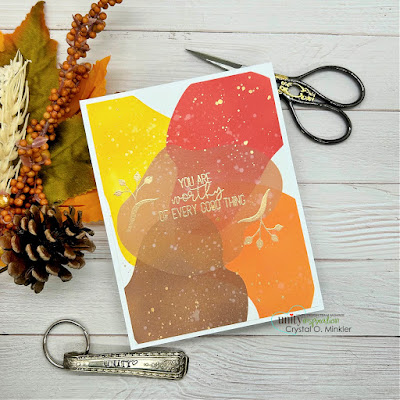
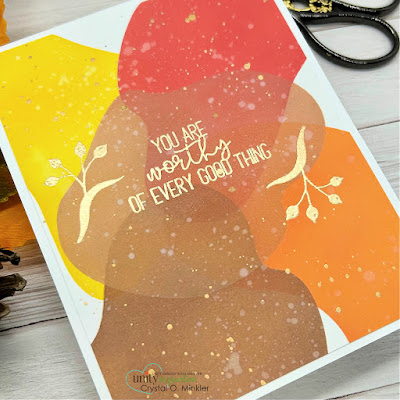
And my last card is an abstract Fall-ish card using the awesome Spotlight Stencil. I debated back and forth doing a super CAS card but I thought it would be fun to play with some Fall colors and try out all the different shapes on the stencil. The sentiment and little branches are heat embossed with an Antique Gold Embossing Powder from Simon Says Stamp.


I used Mustard Seed, Barn Door, Carved Pumpkin, and Vintage Photo Distress Oxide inks over the Spotlight Stencil. I also did a bit of water splatter over the Distress Oxide inks. And added a bit of gold watercolor splatters using the gold watercolors included in the kit.

You can check out my process for this final card here... Abstract Fall Card | September 2023 Whit Kit | Unity Stamp Co.


Here's a look at all three cards together. All so different, but so fun!! 
Another wonderful card kit!


Speaking of... here's a look at the wonderful Whit Kit for September!! Those papers are so gorgeous!! This wonderful card kit is available for only $42.99. That includes shipping! Members get a $6.95 discount on every order from Unity over $45. Members are also able to purchase past Whit Kit stamp sets for just $14 and past Whit Kit paper packs for $2 off!! So awesome!!! 

That's it for me today! I'll be back next week with inspiration for the Background of the Month membership... at least, that's what I'm leaning towards. I may change my mind. I hope you'll come back to visit and check it out - whatever 'it' may be. LOL! Have an ink-tastic day!

Thanks so much for stopping by!
See ya next time.

Inky Hugs,
Crystal


{Please note that comment moderation is on. Your lovely comment will appear once approved.}

Monday, September 18, 2023

Inky Paws Challenge #207 ~ Sketch Challenge

 Hello there crafty friend!
Who's up for a new challenge?! It's time to get our paws inky with a fun sketch challenge! This is such a fun sketch and I knew just what papers I wanted to use for this one as soon as I saw it. You have until Friday, September 29th to get your entries in for the #207 Sketch Challenge and a chance to win a $20 store credit to Newton's Nook Designs!


I am an avid reader. If I'm not stamping or working on homeschool stuff with the kiddos, it's a pretty good chance that I'm reading. So no surprise that today's card is book themed.


Even though I was tempted to make a holiday card, I just knew I had to use the kitty cat papers with the book shelves from the Coffee House Stories 6x6 Paper Pad. It's perfect with this sketch! And so cute!
I also thought it was fun to do stripes in the background which I think draws the eye right across the card.


I stamped the beautiful girl and kitty stamp from the Sips & Stories Stamp Set using Memento Tuxedo Black ink. I colored it up with the following Copic markers:

Skin: E000, E00, E11
Hair: E42, E43, E44, E47
PJs: V000, V12
Sock: V000, V12, V05
Mug: E00, E11, E25, BG000, BG11
Coffee: E42, E25
Book: E000, E42, E43, C00, C1
Polka Dot Pillow: YR21, V000, V12, V05
Striped Pillow: B0000, B52, B04, V000, V12, V05
Blanket: C00, C1, B0000, B52, B04
Kitty: YR21, YR15, R00, R20
Chair: BG000, BG11
Background: E40, E42


I die cut the sweet Copic colored image using the stitched and scalloped oval die from the Oval Frames Die Set. It cut off just a tiny bit of the chair on the bottom but I think it's just perfect! The sentiments in the Sips & Stories Stamp Set were a little big so I decided to go with a sentiment from the All Booked Up Stamp Set. I stamped it using the Memento Tuxedo Black ink, trimmed it and adhered it to the die cut oval. I then added foam tape to the back of both and popped them up on the card.


Now it's your turn to get your paws inky with your Newton's Nook Designs products and create a project using the sketch. Be sure to link up to the Inky Paws Challenge! Can't wait to see your projects!


Thanks so much for stopping by!
See ya next time.

Inky Hugs,
Crystal


{Please note that comment moderation is on. Your lovely comment will appear once approved.}

Saturday, September 16, 2023

Hocus Pocus ~ Halftone Circle Stencil ~ A Colorful Life Designs

 Hello there crafty friend!
Today I'm so excited to share another cute Halloween card as a guest designer for A Colorful Life Designs. Have you checked out the selection of stencils over at A Colorful Life Designs yet? All so AMAZING! There is literally something for every occasion!! Before we get to my card, please use code Crystal10 for 10% OFF your order over at A Colorful Life Designs and tell them Crystal sent you over!


Today I'm sharing a very simple Halloween card featuring the Halftone Circle Stencil from A Colorful Life Designs. It makes the perfect background! I can imagine so many different fun images with this stencil. I used a palette knife from my stash and applied Unicorn Horn Glitter Glaze from Brutus Monroe all over the stencil onto a card front of True Black card stock from Papertrey Ink.


The adorable witch is from the Hocus Pocus stamp set from The Greeting Farm. I don't see it currently on their website. But I did find Hallo Witch - she's a fun digital stamp and she's also on a broom. Here's a quick list of the Copic markers I used to color up this cute witch:

Skin: E000, E00, E11, E04
Eyes: YG11, YG23, C00, C1
Mouth: E04, E000
Hair: YR14, YR18, E09, E29
Dress / Boots / Hat: YG11, YG23, YR21, YR15, YR16, N0, N1, N3, N5, N7
Broom: E51, E55, E57, E59, YR21, YR15, YR16
Gecko / Leaves: YG21, YG11, YG23, YG63


I adhered the stenciled background to a white A2 top fold card base measuring 4-1/4 x 11"; scored at 5-1/2". I added foam tape to the back of the fussy cut witch and popped her up on the card. I heat embossed the sentiment using Sugar Cube Pigment ink, Alabaster White embossing powder and my heat tool. I trimmed the sentiment and popped it up on the card also using foam tape.

You can check out my process video here... Hocus Pocus | Halftone Circle Stencil | A Colorful Life Designs.


 Be sure to head over to A Colorful Life Designs and check out their amazing selection of stencils. And don't forget to use code Crystal10 for 10% OFF your order! Have a wonderful weekend friends!

Thanks so much for stopping by!
See ya next time.

Inky hugs,
Crystal


{Please note that comment moderation is on. Your lovely comment will appear once approved.}