Pages

Wednesday, August 31, 2022

CAS Mixed Media Cards ~ August 2022 WK Grow Untamed ~ Unity Stamp Co.

 Hello there crafty friend!
I got inky with the latest Whit Kit for August 2022 from Unity Stamp Co. and boy was it fun! Have you played with the Distress Archival inks before? I haven't really. I've just stamped with them. But I wanted to try something different so I watched Tim Holtz's video when he introduced the latest Distress Archival inks and it inspired me to make a couple of fun cards. I probably would have gotten a different result on a glossy paper but I used the paper that came in this months kit just to see what it would do and I do love the CAS mixed media design I came up with.


I masked the card fronts with some iCraft Pixie Tape and stamped a few of the Grow Untamed stamps in the space with all four of the Distress Archival inks included in this months kit. And then I lightly ink blended Vintage Photo Distress ink over the stamped area.


On the Kraft card stock it's a little hard to see the flowers in the background. I did a bit of water splatters and then blended some more ink along the edge of my masks. I did have a bit of a heavier hand with my Vintage Photo Distress Ink blending for this card. 


I do love the rich brown ink on this Kraft card stock! The water splatters are very striking in person too. Definitely a fun technique to try again!


On the white card stock you can see more of the stamps in the background. They didn't quite resist like they would on the glossy paper so I'm eager to give that technique a try but I do love how these turned out.


I stamped the one wildflower for my focal piece with the Evergreen Bough Distress Archival ink and die cut it with a Wonky Stitched Oval die from Gina Marie Designs. I kinda wish I'd stamped it on vellum or maybe used a smaller die and not cover up as much of the background, but it is what it is now. 


I popped up the ovals with foam tape. Stamped the sentiments with the same ink on the scrap card stock. Trimmed them up and distressed the edges a bit with the Vintage Photo Distress ink. 


What do you think? I definitely like the white one better... but I think this technique is fun and I encourage you to check out Tim's video. It's a long one... lol... but the part about the Distress Archival inks is very interesting. And I'm excited to try this technique again with a different paper.


Here's a look at the August 2022 Whit Kit... I may have another card to share later this afternoon. I didn't quite get it finished and then life got in the way. But it's a card showcasing some of the gorgeous papers in this kit. Be sure to check out this fab kit over at Unity! I love getting this wonderful kit each month... the stamps and papers are always beautiful and I love trying out the new products that are included with it like the Archival inks this time. Anywho, have a wonderful day!


Thanks so much for stopping by!
See ya next time.

Inky Hugs,
Crystal


{Please note that comment moderation is on. Your lovely comment will appear shortly.}

Tuesday, August 30, 2022

Tawny Owl Paperie Inky Inspiration Sketch 4 ~ Ever So Thankful ~ Unity Stamp Co.

 Hello there crafty friend!
It's the last Tuesday of August and that means I have a new Tawny Owl Paper Inky Inspiration Sketch to share... we're on Sketch 4 now! I hope that you've found some inspiration from the sketches I've been sharing. I know that they have come in handy for me! 


The beautiful Ever So Thankful stamp from Unity was just delivered to my house and I've been itching to ink it up and color so I thought it would be fun to play with it for Sketch 4. I paired it up with the Fall Y'all {paper pack} from Unity.


Here's a quick list of the Copic markers I used to color up this beautiful image:

Acorn ~ E51, E55, E57, E59
Leaf ~ YG11, YG03, YG63, Y11, Y15, YR15, YR21, YR24, YR27, E55, E57


And a look at TOPII Sketch 4... I love the possibilities with that big white background! It would be great with ink smooshing or blending... not just pattern papers like I've used today.


I adhered all my layers together and then adhered them to an A2 card base of Kraft card stock from Papertrey Ink. I also used Kraft card stock to heat emboss the sentiment. I stamped it with Sugar Cube White Pigment ink from Taylored Expressions and then applied Alabaster White Embossing Powder from Brutus Monroe. I melted the EP with a Precision Wagner Heat Tool. I popped up the focal piece with some foam tape.


My card today is also a sneak peek of a fun collaboration that I'm doing with my sweet friend, Teresa. For more information check out my video... Ever So Thankful Card & A Sneak Peek!!


Did you check out my video?! What do you think about the sneak peek? I sure hope you like it and will follow along with us for the Fall is in the Air Collab! And if you're liking the fun new sketch I shared, I sure hope you'll join us in the Tawny Owl Paperie Inky Inspiration Facebook group. I would love to see what you create with this sketch!


Thanks so much for stopping by!
See ya next time.

Inky Hugs,
Crystal


{Please note that comment moderation is on. Your lovely comment will appear shortly.}

Monday, August 29, 2022

Halloween Memory Dex Cards ~ New Halloween Stamps from Unity Stamp Co.

 Hello there crafty friend!
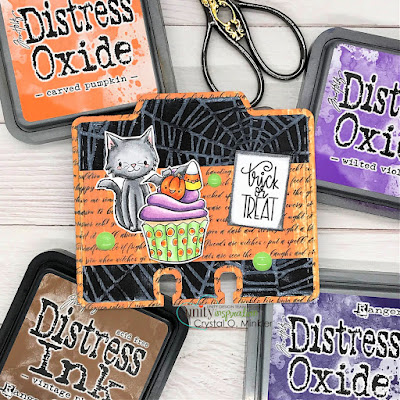
I'm a bit behind on projects... I'm afraid my Membership Monday posts have been hit and miss this month but I did get to play with some of the awesome new Halloween stamps that Unity just released!!! I love making Halloween cards... and Memory Dex cards are so fun to make! I couldn't resist making a bunch! I used the Smell My Feet Background stamp, Winnie the Pooh: Trick or Treat, and 31!!


I used the Ink Swipe Technique for the oxide backgrounds with Carved Pumpkin, Wilted Violet, and Villainous Potion Distress Oxide inks. Basically this technique is just swiping the ink pad directly on the card stock. It's a fun technique that I was reminded of during the Unity get-together I went to back in June. I stamped the inked swiped backgrounds with the Smell My Feet background using Jet Black Archival ink.


I die cut the backgrounds along with some black card stock with a memory dex die in my stash {sadly, it's no longer available}. I also used some Spider Web Doilies from Stampin' Up! that I've had in my stash forever. This cute haunted house is in the 31 stamp kit along with the '31'. The sentiment on this card is from the Winnie the Pooh: Trick or Treat stamps. I used the following Copic Markers to color up the Haunted House:

House ~ N0, N3, N5
Windows ~ Y11, YG11
Door / Window Frames ~ E55, E59
Pot ~ Y06, YR15, YR68
Tombstones ~ YG11, N0, N3, N5


I just love this Mummy Winnie the Pooh stamp... so darn cute! I used the other half of the Spider Web doily for this card and added some {Black} May Arts Burlap String underneath Pooh bear. I used the following Copic Markers to color up Pooh bear:

Pooh ~ Y11, Y15
Mummy Costume ~ YG11, C00, C3
Honey Pot ~ Y11, Y06, Y15, Y38, R20, R14, R27


For the Piglet card I used a Spider Web Embossing Folder from Cuddlebug. I swiped it with a Sugar Cube White Pigment ink pad from Taylored Expressions. The green enamel dots are from my stash. I used the following Copic Markers to color up Piglet:

Piglet ~ RV10, RV21
Ghost Costume ~ YG11, C00, C3
Pumpin ~ YR21, YR15, YR68, Colorless Blender


For the last Memory Dex Card, I used the same Spider Web Embossing Folder for the background and added a few of the same green enamel dots. Rather than adding another layer to the sentiment I used a marker and colored it... a fun alternative. I colored up the cute kitty and cupcake with the following Copic Markers:

Black Cat ~ RV10, R20, N0, N3, N5
Cupcake ~ E30, E31
Wrapper ~ YG11, YG23, YR15, YR68, Y06
Frosting ~ V000, V12, V15, V17
Bat ~ N0, N3, N5
Pumpkin ~ YR21, YR15, YR68, E55
Candy Corn ~ Y11, Y06, Y15, YR15, YR68, C00, C3


All of this fun took me just over 2 hours of recording (not including all the prep - stamping, die cutting, the ink swiping, etc). I was able to edit my video down to about 23 minutes. Of course, the editing took several hours. I hope that you'll check it out! If you enjoy it or the cards, I'd love to hear what you liked. You can check out the video here... Halloween Memory Dex Cards | New Halloween Stamps from Unity Stamp Co.


Be sure to stop by Unity and check out all the amazing new releases!! So many awesome Halloween goodies and another cute Winnie the Pooh set too!


Thanks so much for stopping by!
See ya next time.

Inky Hugs,
Crystal


{Please note that comment moderation is on. Your lovely comment will appear shortly.}

Friday, August 26, 2022

{BYSHC} Sketch Challenge 25 ~ Artistic Christmas Tree ~ Gina Marie Designs

 Hello there crafty friends!
I had some fun playing with a new die I just got and thought it would be perfect for the {BYSHC} Sketch Challenge 25 from the Build Your Stash Holiday Cardmakers Facebook group. It's the Artistic Christmas Tree die from Gina Marie Designs and boy is fun to mix and match papers for this die! So many possibilities!


I chose some American Craft pattern papers that I've had in my stash forever. I think I actually got them from Target years ago... they're called Holiday or Christmas, not sure. I loved the glitter papers in the pack and been slowly using up the scraps and whatnot. I thought I'd focus on the beautiful green plaid and green glitter papers for my cards today.


I also added my favorite True Black card stock from Papertrey Ink. I found the glitter paper and the plaid paper got lost in the background so I used the black card stock for the tree outline so it would pop a bit more on the card.  


For the first two cards I cut the pattern papers to 3-1/4 x 4-1/2" and adhered them to a card front of True Black card stock measuring 4-1/4 x 5-1/2". And then I used the opposite papers for my strips... plaid on the glitter paper and glitter on the plaid paper. I just used scraps of the pattern papers for my vertical and horizontal strips. A great way to use up some of those scraps!


The sentiments are just Holiday Talk sentiment metallic stickers from Tim Holtz. Very easy peasy and they worked well with the sketch and didn't take away from the focal piece. To get them to stick to the glitter paper I used Ranger Multi Medium Matte to adhere them. The sticker itself didn't have enough adhesive for the job.


My last card used a full card front of the plaid paper measuring 4-1/4 x 5-1/2". I love this plaid paper!! And I used a couple scraps of the green glitter paper. I almost added skinny strips of black card stock to either side of the glitter papers... my trick for a faux mat... but decided against it. I think the tree pops much more on this card than the other two. It's definitely my favorite of the three. What do you think?


As I mentioned before, I die cut the tree from True Black card stock. I did that three times for the outlines. I only kept one set of the die cuts though (the puzzle pieces for the inside). I couldn't think of a way to use them... I hate being wasteful but I'm also trying to clean and organize my studio and I can't keep everything! LOL... at least that's what I'm telling myself right now.


I also die cut the Artistic Christmas Tree from the green glitter paper and the green plain paper. I had fun mix matching the pieces for these trees... it was very much like a puzzle but trying to evenly distribute the colors so each tree looked nice. I enjoyed it! I added a bit of Ranger Glossy Accents to the two stars that weren't glitter paper. I also added foam tape to all three trees and popped them up on the cards. Love how these turned out!


Here's a look at this month's Sketch 25 for the Build Your Stash Holiday Cardmakers Facebook group. I sure enjoyed this sketch for the month of August... I hope you have too! Be sure to stop by the {BYSHC} blog to see a whole bunch more adorable inspiration from the {BYSHC} Design Team.


Thanks so much for stopping by!
See ya next time.

Inky Hugs,
Crystal


{Please note that comment moderation is on. Your lovely comment will appear shortly.}

Thursday, August 25, 2022

Simple Ink Smooshed Card ~ Hey, Boo ~ Unity Stamp Co.

 Hello there crafty friend!
I've been so busy prepping for homeschool that I completely forgot to share my cards for the new Unity release that started earlier this week!! So... I have just one to share today in a quick post. I just love Halloween and making Halloween cards!! It's so much fun! And this adorable ghost Itty Bitty stamp called Hey, Boo is so quick and easy to color up! 


I used a very simple ink smooshed background that I had actually created while making my TOP Inky Inspiration Sketch 1 Winnie the Pooh card back in June. I just hate wasting ink when I'm ink smooshing so I try to ink smoosh extra backgrounds and use them with other projects and this one was perfect for this cute ghost! I used Twisted Citron and Mowed Lawn Distress Oxides for this ink smooshed background.


The ghost is very simply Copic colored with the following Copic markers:

Skin ~ E000, E00, E11
Ghost ~ C00, C3
Pumpkin ~ YR20, YR15, YR68
Glow ~ Y06
Flowers ~ V000, V12, V15, V17, YG01, YG23


I die cut the ink smooshed background with the largest stitched rectangle die from the Scallops & Rectangles {nesting die} from Unity and adhered it to a white A2 top fold card base measuring 4-1/4 x 11"; scored at 5-1/2". I trimmed the sentiment and fussy cut the ghost and adhered them directly to the card. I added a few enamel dots from my stash to finish off the card. Easy peasy! Head over to Unity to see all the fab new releases!! So many wonderful new Halloween releases... it's spooktacular! You don't want to miss it!

 
Thanks so much for stopping by!
See ya next time.

Inky Hugs,
Crystal


{Please note that comment moderation is on. Your lovely comment will appear shortly.}

Friday, August 19, 2022

{BYSHC} Sketch Challenge 25 ~ Gifting Girl ~ Angie Blom Digital Designs

 Hello there crafty friend!
I'm back with my weekly Christmas card for the {BYSHC} Sketch Challenge 25 and this week I finally colored up the gorgeous Gifting Girl digi stamp from Angie Blom Digital Designs. I had this beauty printed for the Christmas in July {BYSHC} Linky Party but I never did get to color her up... until now! Yay!


I paired up this lovely girl with the Deck the Halls 6x6" paper pad from Echo Park Paper Co. I actually picked these out before I started coloring so I could pull the colors from the papers. 


I cut all my layers and adhered them to my card front of green pattern paper that measures 4-1/4 x 5-1/2". The tree pattern paper and the red pattern paper are bigger than what the sketch calls for but they were scraps in my paper pad and I liked how they looked.


Here's a quick list of the Copic Markers I used to color up Gifting Girl:

Skin ~ E000, E00, E11, E04
Hair ~ YR0000, YR31, YR02, YR24, YR27, E25
Hat ~ C00, C2, BG11, BG23, BG32
Coat ~ BG11, BG23, BG32, Y11, Y15, Y28
Dress / Gloves ~ R20, R14, R27
Boots ~ E21, E25, E29
Presents ~ BG11, BG23, BG32, R20, R14, R27, G12, G14, G46, C00, C2, C3, YR0000, YR31, YR02


I fussy cut Gifting Girl and the sentiment leaving a skinny white border around both. I adhered the sentiment directly to the card and popped up Gifting Girl with foam tape. I finished off the card with a few enamel dots from my stash.


Here's a look at this month's Sketch 25 for the Build Your Stash Holiday Cardmakers Facebook group. I'm still hoping to make a fun card with this sketch... fingers crossed I have time this weekend to make it. Anywho, be sure to stop by the {BYSHC} blog to see a whole bunch more adorable inspiration from the {BYSHC} Design Team.


Thanks so much for stopping by!
See ya next time.

Inky Hugs,
Crystal


{Please note that comment moderation is on. Your lovely comment will appear shortly.}

Tuesday, August 16, 2022

Tawny Owl Paperie Inky Inspiration Sketch 3 ~ Spooky Sweet ~ Not 2 Shabby

Hello there crafty friend!
Sharing some Halloween cards today!! I've been itching to play with the new Halloween goodies I got from Not 2 Shabby!! Loving the adorable gnomes in the Spooky Sweet stamp set and the Spooky & Sweet 6x6 papers!!! OMG!! They are awesome!!! Love them! 


I couldn't wait to cut into these papers and make a few cards. I inked up all three gnomes with Memento Tuxedo Black ink and had some fun coloring them up with my Copic markers. I thought it would be fun to play with the Tawny Owl Paperie Inky Inspiration Sketch 3. These gnomes worked perfectly with this sketch! For my first card I used just three pattern papers. I cut all four panels of the candy pattern paper and mat them with the black pattern paper. The candy paper layer is cut 1/8" smaller on the side and the top with the black mats following the sketch measurements.


Here's the list of Copic markers I used for this sweet gnome:

Skin ~ E000, E00, E11, E04
Hair ~ E97, E15, E09
Hat ~ YG11, YG23, G14, N5, V000, V12, V15, V17, Y06, YR15, YR68
Dress ~ V12, V15, V17
Shoes ~ N0, N1, N3, N5, N7
Cupcake ~ V000, V12, V15, Y06, YR15, YR68


For the second card I used two different pattern papers for the four panels showing another variation with this sketch. The panels are mat with another black pattern paper and adhered to another glitter paper card front. It was so perfect having the three glitter papers and the three gnomes!!


Here's the list of Copic markers I used for this gnome:

Skin ~ E000, E00, E11, E04
Hair ~ BV20, BV04, N3, N6, N8, 100
Hat ~ YG11, YG23, G14, N5, Y06, YR15, YR68
Dress ~ Y06, YR15, YR68
Shoes ~ N0, N3, N5, N7
Boo Banner ~ V12, V15, Y06, YR15, YR68


For the last card I used four different pattern papers for the four panels and mat them with black card stock. I didn't want to use all the black pattern papers for mats. I die cut circles from black card stock using the X Stitched Circles dies from Gina Marie Designs for behind the gnomes. The sentiments are stamped with Clear Embossing ink and then I melted some Alabaster White Embossing powder from Brutus Monroe. I trimmed the sentiments and adhered them to the circles. I then popped up the circles and the sentiments with foam tape.


Here's the list of Copic markers I used for this gnome:

Skin ~ E000, E00, E11, E04
Hair ~ YR23, YR27, R59
Hat ~ YG11, YG23, G14, N5, Y06, YR15, YR68, V000, V12, V15, V17, N0, N1, N3, N5, N7
Dress ~ Y06, YR15, YR68
Shoes ~ N0, N1, N3, N5, N7
Balloons ~ V000, V12, V15, Y11, Y06, YR20, YR15, YR68, YG11, YG23, N0, N1, N3, 
Colorless Blender


Here's a look at the sketch that I used. I love the different ways you can change up this sketch depending on the papers you use. If you like using sketches, I'd love for you to join us in the Tawny Owl Paperie Inky Inspiration Facebook group. I share sketches each month and try to share inspiration for the sketch too. 


So excited to have three Halloween cards done!! I hope to get a few more done with these cute gnomes from Not 2 Shabby. I believe that the Spooky Sweet stamp set is still available over at Not 2 Shabby if you want to add these cuties to your collection.


Thanks so much for stopping by!
See ya next time.

Inky Hugs,
Crystal


{Please note that comment moderation is on. Your lovely comment will appear shortly.}

Monday, August 15, 2022

Membership Monday ~ August 2022 BOM Autumn Bounty ~ Unity Stamp Co.

 Hello there crafty friend!
I just love the colors of Fall!! So warm and inviting! I was curious to see what they would look like ink smooshed on Kraft card stock. And I had a fun idea for some layers and dimension for a card using the gorgeous new Autumn Bounty background stamp. This stamp is the current Background of the Month stamp... a wonderful Membership at Unity Stamp Co. If you love background stamps, this membership is for you! A wonderful deep red rubber background stamp delivered to your door each month!! Yes, please! I can't wait for mine to arrive each month!


I used Mustard Seed, Carved Pumpkin, Seedless Preserves, Peacock Feathers, and Vintage Photo Distress Oxide inks for my ink smooshing on Kraft card stock from Papertrey Ink. The Kraft card stock from Papertrey Ink is 110lb and holds up really well with ink smooshing.


I stamped the Autumn Bounty background stamp three times on three pieces of Kraft card stock. I trimmed one to 4 x 5-1/4" for my bottom layer. I trimmed the second one for my middle layer measuring 3-1/8 x 2-5/8". I mat both layers on True Black card stock also from Papertrey Ink. 


For the sentiment I used a new Adhesive Transfer sentiment from the {Blooming Friendship} Deco Foil Adhesive Transfers by Unity, a collaboration with Therm O Web. I applied the Adhesive Transfer sentiment to a piece of True Black card stock and trimmed it up. I added a couple layers of scrap under the right side of the sentiment so it would lay flat and adhered it to the card. All done... and I really low how this turned out! You can check out my process video for this card here... Membership Monday | Ink Smooshing with Layers | August 2022 BOM Autumn Bounty | Unity Stamp Co. 


Such an amazing new background stamp! I'm anxious to also ink it up and color with my Copic markers, too! You can check out the Background of the Month membership over at Unity Stamp Co. I'll be back next Monday with a card using the beautiful new August 2022 Uniquely Unity membership!


Thanks so much for stopping by!
See ya next time.

Inky Hugs,
Crystal


{Please note that comment moderation is ON. Your lovely comment will appear shortly.}

Friday, August 12, 2022

{BYSHC} Sketch Challenge 25 ~ Let it Snow ~ Doodlebug Design

 Hello there crafty friend!
I'm back with my weekly Christmas card using the current {BYSHC} Sketch Challenge 25 and today I actually have two quick cards to share. I used the Let it Snow 6x6 paper pad from Doodlebug Design. I've been trying to use up this paper pad. I think I've used it at least once each month and I still have scraps. Actually, I still had two full sheets so that's why I decided to make two cards. And I have a whole bunch of the ephemera pieces from the Let it Snow Odds & Ends and Let it Snow Chit Chat still to use!


As I had mentioned I had two full sheets of pattern paper... the Santa paper and the Polka Dots. I cut them both to 4 x 5-1/4" and adhered them to two Real Red card fronts measuring 4-1/4 x 5-1/2".


I cut scraps of the Polka Dot paper to 1 x 5-1/4" and 1 x 4" and adhered them horizontally and vertically on the card front. Then I started looking through all my ephemera pieces. So many choose from... I finally decided to go with the two circles. They worked well with the layout of the card and fit the sketch perfectly.


I really liked the rainbow of colors in the Polka Dot papers so I thought I'd keep that theme throughout the card and used the Rainbow Striped paper for my 1" strips.


I chose the December 25 ephemera piece for this one... it pops on the card and it has a few of the colors in the papers. I used foam tape to pop up both of the circle ephemera pieces and finished off the cards with a few Frosty Friends Shape Sprinkles. Pretty simple cards but I think they turned out pretty cute too.


Here's a look at this month's Sketch 25 for the Build Your Stash Holiday Cardmakers Facebook group. I have a couple more ideas for cards using this month's sketch that are a bit more involved... we'll see if I have time. Anywho, be sure to stop by the {BYSHC} blog to see a whole bunch more adorable inspiration from the {BYSHC} Design Team.


Thanks so much for stopping by!
See ya next time.

Inky Hugs,
Crystal


{Please note that comment moderation is on. Your lovely comment will appear shortly.}