Pages

Thursday, March 31, 2022

Nature of Friendship Happy Day ~ New Adhesive Transfer Sentiments ~ Unity & ThermoWeb

 Hello there crafty friend!
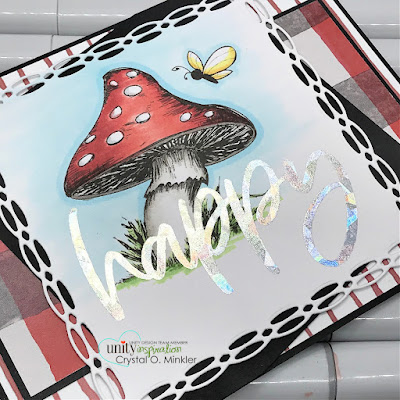
I couldn't help but play a bit more with the new amazing Adhesive Transfers from Unity and ThermoWeb!! I made one more card to share using the new beautiful Nature of Friendship stamp along with the big beautiful happy sentiment from the Adhesive Transfers Sentiment 1 pack.


It's always a good idea to pick out your pattern papers before you color but for this one I didn't. LOL... I knew I wanted to go with a red mushroom, though. Those dots just call for a red mushroom! I colored up the stamps with the following Copic Markers:

Mushroom Cap ~ R20, R14, R27, W1, W5, C00, C2
Mushroom Stem ~ W0, W1, W3, W5
Grass ~ YG23, YG17
Butterfly ~ Y11, Y06, Y35
Background ~ B0000, B00


Once all the coloring was done, I ran the colored image through my big shot with the happy Adhesive Transfer sentiment and then ran it through again with the Silver Shattered Glass Deco Foil Transfer Sheets. So easy peasy and beautiful!!


I die cut the colored and foiled panel with the Double Roped Square dies from Gina Marie Designs. Now, I had to start digging through my pattern papers. I wasn't sure what I was going to go with until I saw the Let Your Soul Wander {paper pack}... I remembered the black and red plaid paper and bam! 


I kinda wish I hadn't done such a bright blue in the background but it is what it is! Although it does actually work with the shine off of the amazing foils so I guess it's okay. I do love that shine from the pretty foils! If you've been hesitant to get into the foiling thing... it's time to try them! These Adhesive Transfers are seriously a game changer! Head over to Unity and check them out!


Thanks so much for stopping by!
See ya next time.


Inky Hugs,
Crystal


{Please note that comment moderation is ON. Your lovely comment will appear shortly.}

Wednesday, March 30, 2022

Thanks So Much Tulips ~ New Adhesive Transfers ~ Unity Stamp Co. & ThermoWeb Collab

 Hello there crafty friend!
Have you seen the amazing new release from Unity and ThermoWeb today?! They've collaborated on the cool new Adhesive Transfers and both design teams have shared a bunch of amazing inspiration on their blogs and on a fun Instagram hop, along with the Gina K. Design design team too!! I'm in awe of all the amazing inspiration shared!


First of all, please forgive the photos... these amazing Adhesive Transfers make such shiny and beautiful cards that they are hard to get good photos! But they are gorgeous in person, I promise! CAS is one of my fave styles of cards so this idea came to mind while the beautiful Layering Tulip Stencil was re-released last week.


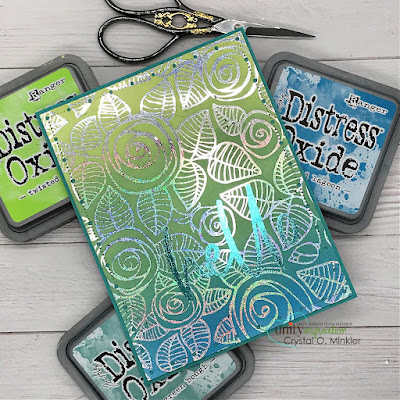
I ink blended some Squeezed Lemonade, Mustard Seed, Kitsch Flamingo, Shabby Shutters, and Bundled Sage Distress Oxide inks over the Layering Tulips Stencil.


No need for a laminator for these amazing Adhesive Tranfers!! I just used my Big Shot to apply the Thanks and So Much sentiments from the Adhesive Transfers Sentiments 1 pack to my card stock. I used the Gold Glitter Deco Foil Transfer Foils by Unity, as well.
Super easy peasy and gorgeous!

*** Crafty Tip ~ be sure to completely dry your Distress Oxide inks either with a heat tool or let them sit overnight so the Adhesive Transfer will adhere to the oxides. ***


I used a couple amazing dies from Gina Marie Designs for my focal piece layers... the Wonky Stitched Oval and Pleated Lace Oval dies. I adhered those to a white A2 top fold card base. And finished off the card with a few black rhinestones from the Rainbow Bling Rhinestones pack from Gina Marie Designs.

You can check out my process video here... Thanks So Much Tulips | New Adhesive Transfers | Unity & ThermoWeb.


I sure hope you'll head over to Unity and check out these amazing new Adhesive Transfers... they are so fun to play with and you don't need a laminator to use them! 


Thanks so much for stopping by!
See ya next time.

Inky Hugs,
Crystal


{Please note that comment moderation is ON. Your lovely comment will appear shortly.}

Rosy Days Hello ~ New Adhesive Transfers ~ Unity Stamp Co. & ThermoWeb Collab

 Hello there crafty friend!
I sure hope you're having a wonderful day! I'm super excited to share a pretty card using new Adhesive Tranfers Sentiments 2 pack from Unity and ThermoWeb!! 


Die cut with the Big and Little Chain Rectangle dies from Gina Marie Designs and adhered to a Bermuda Bay {Stampin' Up!} card front measuring 4-1/4 x 5-1/2".


I used my Big Shot to add the needed pressure to adhere the Adhesive Transfer Hello sentiment to my card front. And then I ran it through my Big Shot again with the Aqua deco foil.


Super easy peasy and beautiful!! Loving these new Adhesive Transfers!

You can check out my quick process video here... Rosy Days Hello | New Adhesive Transfers | Unity Stamp Co. & ThermoWeb.


I sure hope you'll head over to Unity and check out these amazing new Adhesive Transfers... they are so fun to play with and you don't need a laminator to use them! 


Thanks so much for stopping by!
See ya next time.

Inky Hugs,
Crystal


{Please note that comment moderation is ON. Your lovely comment will appear shortly.}

Tuesday, March 29, 2022

March 2022 Whit Kit ~ Big Memories Card Kit ~ Unity Stamp Co.

Hello there crafty friend!
I'm back with one more card using the beautiful March 2022 Whit Kit called Big Memories! I have found myself in desperate need of birthday cards for my stash so I thought I'd pair up this month's card kit with a couple of cute itty bitty stamps to make a special birthday card for one of my friends and at least get ahead a little bit.
 

I used a couple of scraps of torn pattern paper from my blog post yesterday for my background today. Still loving that white torn border on the papers! I die cut another pattern paper with the Postage Stamp {nesting dies} to use as my background for my focal piece. 


I stamped the hearts from the Big Memories stamp kit with Abandoned Coral and Tattered Rose Distress Oxide inks. I fussy cut the hearts leaving a skinny border of white around them.


I stamped the adorable bird from the Old Chicks itty bitty stamp and colored it up with the following Copic Markers:

Beak ~ Y06, YR15
Yellows ~ Y000, Y11
Pinks ~ R20, R22


The sentiment is stamped with Abandoned Coral Oxide ink and fussy cut with a flag on one end. All the layers are just adhered with liquid glue. I didn't pop up anything this time with foam tape... crazy!

You can check out my process video here... A Tweet Birthday Card | March 2022 Whit Kit | Unity Stamp Co.


Here's a look at the card kit! Be sure to check out the Whit Kit membership at Unity... there's just a couple more days to sign up for the March 2022 Whit Kit!! If you already have the kit, I hope you share your creations in the Unity Show & Tell Facebook group! I'd love to see what you create!


Thanks so much for stopping by!
See ya next time.

Inky Hugs,
Crystal


{Please note that comment moderation is ON. Your comment will appear shortly.}

Monday, March 28, 2022

Membership Monday ~ March 2022 Whit Kit ~ Big Memories Card Kit ~ Unity Stamp Co.

 Hello there crafty friend!
No matter how hard I try I can't seem to get time to play with the wonderful Whit Kit card kits until near the end of the month. I've been so excited to play with the March 2022 Whit Kit called Big Memories! Before I really delved into papercrafting I loved to take photographs! So I especially love camera and camera related stamps. The detail in the beautiful camera stamp in this kit makes my heart so happy! It only needs a little touch of color and bam - Beautiful!


Today, I wanted to share a fun way to make pattern paper backgrounds... 2-ways!
A very simple background idea with two totally different looks.


My first card has nice straight lines and angles. I cut strips of the four pattern papers all at 1-1/8 x 6" and then adhered them to a card front that I die cut with the largest stitched rectangle die from the Scallops & Rectangles {nesting dies} from Unity.


 I adhered the pattern paper background to a dark pattern paper from the Enveloped in Love {paper pack} that I've cut to a 4-1/4 x 5-1/2" card front. I stamped the camera stamp with Gina K. Designs Black Amalgam ink and heat embossed some Hero Art Fine Clear Embossing powder. I popped up the cameras on both cards with foam tape.


I watercolored the heat embossed camera with the Pearlescent watercolors included in the kit. I stamped the sentiment with the same Black Amalgam ink and heat embossed it too. I blended a bit of Hickory Smoke and Black Soot Distress Oxide inks around the edge of the sentiment.


For my second card I tore the pattern paper strips leaving a rough white edge to each paper strip.


I love the pop of white that the torn edges gives to the card. 


And I left this sentiment clean and white to coordinate with the pops of white from the torn edges. 
I can't really decide which of the two pattern paper backgrounds I like better. I really like how both cards turned out and are just slightly different from each other.

If you'd like to see my process in making these two cards, you can check it out here... Pattern Paper 2-Ways | March 2022 Whit Kit Big Memories | Unity Stamp Co.


Be sure to check out the Whit Kit membership at Unity... there's just a few more days to sign up for the March 2022 Whit Kit!! If you already have the kit, I hope you share your creations in the Unity Show & Tell Facebook group!


Thanks so much for stopping by!
See ya next time.

Inky Hugs,
Crystal


{Please note that comment moderation is ON. Your comment will appear shortly.}

Friday, March 25, 2022

Distress Oxide Ink Blending ~ Layering Tulip Stencil ~ Unity Stamp Co.

Hello there crafty friend!
There's a fun new release over at Unity! I'm sharing a pretty slimline card with lots of fun Distress Oxide Ink Blending over two stencils from Unity Stamp Co. I thought it would be fun to use the Mountain Scapes Stencil in a different way. I used it for some interest in my background rather than an actual mountain scene.
 

I like the dimension the background gives to those top tulips. I used Squeezed Lemonade, Spiced Marmalade, and Abandoned Coral Distress Oxide inks over the Mountain Scapes Stencil for my background. I splattered some water over the ink blended background and dabbed it dry with paper towel.


I ink blended over the Layering Tulip Stencil with Ripe Persimmon, Barn Door, and Mowed Lawn Distress Oxide inks. I also splattered some white acrylic paint over the panel and dried it with a heat tool.


I die cut a piece of white card stock with the Pleated Lace Slimline die from Gina Marie Designs. I trimmed the tulip panel and adhered it to the die cut layer. And then I adhered it to the slimline card base measuring 7 x 8-1/2"; scored at 3-1/2". 


I stamped the sentiment from the 3 Tiered Birthday itty bitty stamp kit from Unity with Sugar Cube Pigment ink from Taylored Expressions on True Black card stock from Papertrey Ink. And then I added Alabaster white embossing powder from Brutus Monroe and melted it with a Mini Wagner heat tool. You can check out my process video here... Distress Oxide Ink Blending | Layering Tulip Stencil | Unity Stamp Co.


Be sure to stop by Unity to see all the amazing new releases! Lots of fun goodies on sale too!


Thanks so much for stopping by!
See ya next time.

Inky Hugs,
Crystal


{Please note that comment moderation is ON. Your comment will appear shortly.}

{BYSHC} Sketch Challenge 20 ~ True Friends Stay Together ~ Dreamerland Crafts

 Hello there crafty friend!
I'm back with my weekly Christmas card! For today's card I used an adorable stamp set from Dreamerland Crafts called True Friends Stay Together. I've had this stamp on the side of my desk just waiting to ink it up. My son had another orthodontist appointment so it was the perfect time to ink this stamp up real quick and take it along to color while I waited for him.


I didn't pick out my papers first this time but I knew I wanted to go with a more traditional Christmas color combo with lots of red. I knew that I'd be able to pair up my colored image with a pretty Christmas paper and I think the one I chose is very complimentary to the stamp. It's called the My Favorite Christmas paper pad from Echo Park Paper Co.


Here's the list of Copic markers I used to color up this cute image:

Skin ~ E000, E00, E11, E04
Hair / Hair Bow ~ E43, E44, E47, YG11, G24, G46
Girl's Clothes ~ C00, C2, R000, R20, R14, R27
Boots ~ C00, C2, E21, E23
Kitty ~ W0, W1, W3, R000, R20, C00, C2, YG11, G24, G46
Candy Cane ~ C00, C2, R000, R20, R14, R27
Bow / Holly / Berries ~ Y11, Y06, Y15, YG11, G24, G46, R20, R14, R27


The sentiment is actually cut from the sentiment paper in the paper pad. I just cut around it and adhered it to a white mat and then a black mat. I added a few black enamel dots to finish off the card.


Here's a look at the fun {BYSHC} Sketch 20 for the month of March!
There's less than a week left to play along with the Sketch 20 challenge!! If you're interested in seeing a bit more inspiration for this sketch, check out the amazing inspiration from the {BYSHC} design team over on the  {BYSH} Cardmakers blog! I'll be back next Friday with inspiration for the new {BYSHC} Sketch 21 Challenge!!


Thanks so much for stopping by!
See ya next time.

Inky hugs,
Crystal


{Please note that comment moderation is ON. Your lovely comment will appear shortly.}

Thursday, March 24, 2022

Free To Fly ~ Butterfly Moment {Slimline} ~ Unity Stamp Co.

 Hello there crafty friend!
I'm so glad you've stopped by! Today I'm sharing a quick mini slimline card using the newly released Butterfly Moment {Slimline} stamp kit from Unity Stamp Co.


I went with a very simple design. I stamped the butterfly and die cut it with the Wonky Stitched Mini Slimline die from Gina Marie Design. I chose a pretty spring color palette of purple, yellow and pink. And outlined the butterfly with some blue to give it dimension on the card.


Here's a quick list of the Copic markers that I used:

Purples ~ V000, V12, V06, V17
Pinks ~ R20, R22
Yellows ~ Y000, Y11, Y06
Outline ~ B0000, B00


I stamped the sentiment and mat it with kraft card stock. I adhered the butterfly panel to a 6-1/2 x 3-1/2" kraft card front and adhered it to a white mini slimline card base measuring 6-1/2 x 7", scored at 3-1/2". To finish off the card, I added a few purple rhinestones from the Spring Bling Rhinestones pack from Gina Marie Designs. 

This beautiful butterfly is just one of the cute mini release stamp kits newly released at Unity this week!! Go check out all the new releases and, of course, there's an awesome sale going on too!

Thanks so much for stopping by!
See ya next time.

Inky Hugs,
Crystal


{Please note that comment moderation is ON. Your lovely comment will appear shortly.}
Friday, March 18, 2022

{BYSHC} Sketch Challenge 20 ~ Dream of Being {So Loved} ~ Unity Stamp Co.

 Hello there crafty friend!
I'm back with my weekly Christmas card for the sketch challenge over at the Build Your Stash Holiday Cardmakers Facebook group. I was going through my stamps early last week and found my Dream of Being {So Loved} stamp kit... a beautiful Angie Girl stamp from Unity Stamp Co. 


If you're a member of the Unity Show & Tell Facebook group you may have seen me share that I was coloring it while waiting for my son at his Orthodontist appointment. I knew that I wanted to use the beautiful Winter Plaids & Patterns paper pad from Ink n' Splatter again so I was coloring her in similar colors.


Here's the list of Copic Markers that I used to color this stamped image:

Skin ~ E000, E00, E11, E04
Hair ~ E43, E44, E47, E49
Coat ~ B0000, B000, B00, B02
Hat ~ C00, C2, C3, V000, V12, V06
Scarf / Mittens ~ V0000, V12, V06
Cup ~ C00, C2, E21, E23


I fussy cut the girl leaving a bit of white around the pom pom, wisps of hair and the steam from the cup. I cut the rest of the girl along the black line and then cleaned up the edges by coloring them with a Memento Tuxedo black marker. I adhered the blue with polka dot paper to a Cool Caribbean card stock mat. I adhered the plaid paper to a Perfect Plum card stock mat. I adhered my layers together and then adhered the entire panel to a white A2 top fold card base.


I added a couple layers of scrap card stock on the left side of the purple polka dot paper so that it would lay flat on the card. I adhered it to the card and then adhered the girl. She laid pretty flat on her own so I didn't bother adding a layer behind the top portion of her. I stamped the sentiment from the Your Season itty bitty stamp and trimmed it cutting two fishtails on either end. I popped up the sentiment with foam tape. And I finished off the card by adding a few translucent enamel dots from Gina Marie Designs.


Here's a look at the fun {BYSHC} Sketch 20 for the month of March!
I can't believe that we're already more than halfway through this month!! If you're interested in seeing a bit more inspiration for this sketch, check out the amazing inspiration from the {BYSHC} design team over on the  {BYSH} Cardmakers blog! I'll be back on Friday with one more Christmas card using this month's sketch!


Thanks so much for stopping by!
See ya next time.

Inky hugs,
Crystal


{Please note that comment moderation is ON. Your lovely comment will appear shortly.}

Thursday, March 17, 2022

A Little Irish Luck! ~ Irish Luck ~ Penny Black

 Happy St. Paddy's Day, crafty friend!
I hope you have a wonderful St. Paddy's Day! It's always a fun day at our house and I look forward to it each year. Today, I have a cute CAS St. Paddy's Day card to share.


I stamped the adorable bear from the Irish Luck stamp set from Penny Black with Gina K. Black Amalgam ink and colored him up with the following Copic Markers:

Fur ~ E21, E23, E25, E27, R0000, R20, R22
Tie / Shirt ~ R14, R27, YG11, YG13
Vest ~ YG11, YG13, YG63, YG97
Hat ~ N1, N3, N5, Y06, Y15, Y35, Y28, YG11, YG13, YG63, YG97
Shamrocks ~ YG11, C00
Banner ~ YG11, YG13, YG63


Once I was done coloring I fussy cut the bear and then stamped the banner sentiment. I colored it up and then fussy cut it. I cleaned up the edges by coloring them with a Memento Tuxedo black marker. I adhered the banner sentiment to the bear and set it aside.


I ink smooshed a white card front measuring 4-1/4 x 5-1/2" into a bit of Twisted Citron and Mowed Lawn Distress Oxide inks cleaning up my glass mat between colors. I kept my card CAS by leaving a lot of white space. I blended some Forest Moss Distress Oxide ink over the circle design on the Quattro Motifs stencil from The Craft Workshop. 


I trimmed the card front to 4-1/8 x 5-3/8" and stamped the "A little" sentiment directly on the card front. I adhered the card front to a white A2 top fold card base. I popped up the bear and sentiment with foam tape. I think it turned out pretty cute. 


I'm entering my card in the challenge over at the CASology blog for the fun HAT cue.


An Irish Blessing:
May Your Troubles Be Less
And Your Blessing Be More
And Nothing But Happiness Comes Through Your Door

Happy St. Paddy's Day!


Thanks so much for stopping by!
See ya next time.

Inky Hugs,
Crystal


{Please note the comment moderation is ON. Your lovely comment will appear shortly.}

Friday, March 11, 2022

{BYSHC} Sketch Challenge 20 ~ Let it Snow ~ Doodlebug Design Inc.

 Hello there crafty friend!
I'm back with my weekly Christmas card for the {BYSHC} Sketch Challenge 20... and I've had another pretty busy week at home with homeschool, DT stuff and just everyday stuff so I only had a bit of time to make my Christmas card. Doodlebug Design ephemera and pretty papers to the rescue!! 


For this week's card I went with more of a wintry theme with just a touch of Christmas with the candy cane and present. I chose the cute bear and squirrel ephemera and the present ephemera first from the Doodlebug Design Let it Snow Odds & End die cut (ephemera) pack. And I picked a few different sentiments from the Chit Chat die cut pack just to give me a few options for when I put the card together.


And then I started looking through my leftover pieces from the Let it Snow paper pad. I've used a lot of this paper pad, but I was still able to find a couple almost full sheets of the 6x6" papers. I trimmed my layers to fit the sketch measurements and then mat them on Green Galore card stock (another retired SU card stock... or at least as far as I know it's still retired).


I adhered all the layers together and then adhered them to a white A2 top fold card base. I adhered the little present to the bear and squirrel ephemera and then adhered a layer of card stock under the squirrel and the top of the bear's head so that the ephemera piece would lay flat on my card. I adhered the bear and squirrel to the card with Tombow Mono Multi liquid glue. I chose the 'let it snow' sentiment and popped it up on the card with foam tape. Another cute Christmas card for my stash!


Have you checked out the fun {BYSHC} Sketch 20 over at the Build Your Stash Holiday Cardmakers Facebook groupI hope you'll come join in the fun and maybe even play along with the sketch! If you're interested in seeing a bit more inspiration for this sketch, check out the amazing inspiration from the design team over on the {BYSH} Cardmakers blog! I'll be back next week with another Christmas card for the {BYSHC} Sketch!


Thanks so much for stopping by!
See ya next time.

Inky hugs,
Crystal


{Please note that comment moderation is ON. Your lovely comment will appear shortly.}